Getting Started
SMS Pro - Admin with User Panel (SAAS)
- Uploaded Date: 10-July-2024
- Project: SMS Pro
- Author: Acnoo
- Email: acnooteam@gmail.com
Thank you for purchasing our product. If you have any questions that are beyond the scope of this documentation file, please feel free to email us via our user page contact form or directly to email at acnooteam@gmail.com
Requirements
- PHP >= 8.1
- Ctype PHP Extension
- cURL PHP Extension
- DOM PHP Extension
- Fileinfo PHP Extension
- Filter PHP Extension
- Hash PHP Extension
- Mbstring PHP Extension
- OpenSSL PHP Extension
- PCRE PHP Extension
- PDO PHP Extension
- Session PHP Extension
- Tokenizer PHP Extension
- XML PHP Extension
For more information about deployment see the Laravel documentation here https://laravel.com/docs/10.x/deployment
Download Project from Envato
After successfully purchase SMSPro download the project from Envato download page
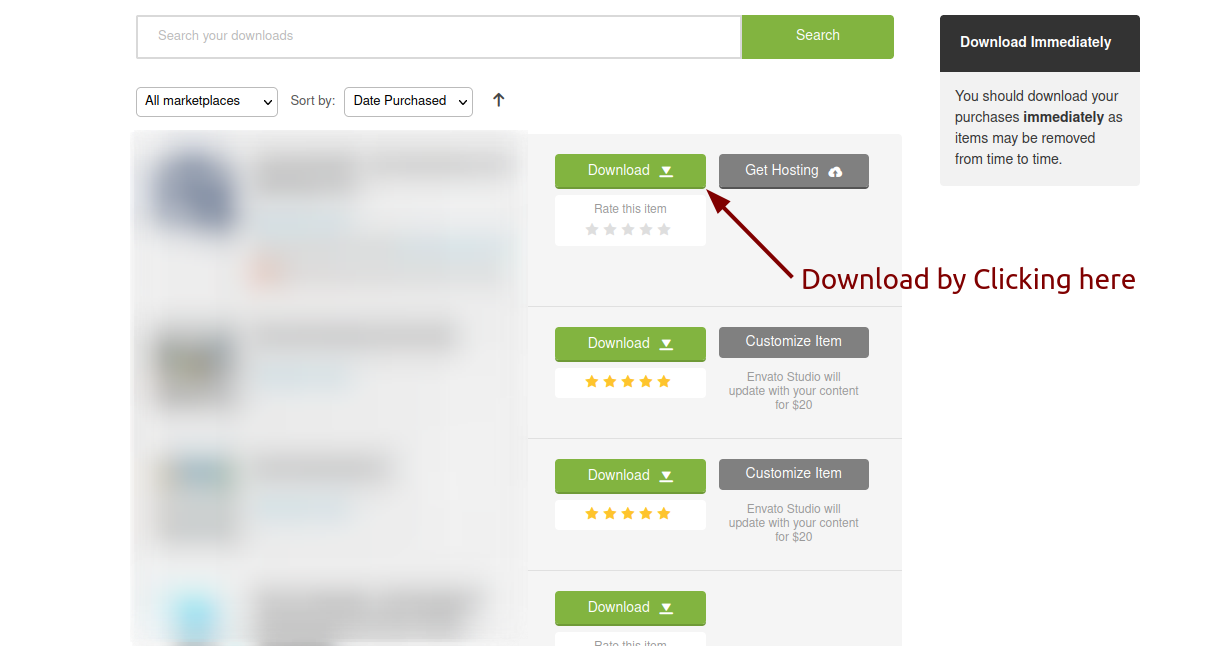
Extract the downloaded file. You will have another zip file named smspro-saas.zip containing the main project's files and a documentation folder. You are reading this documentation, that means you already have theme both.
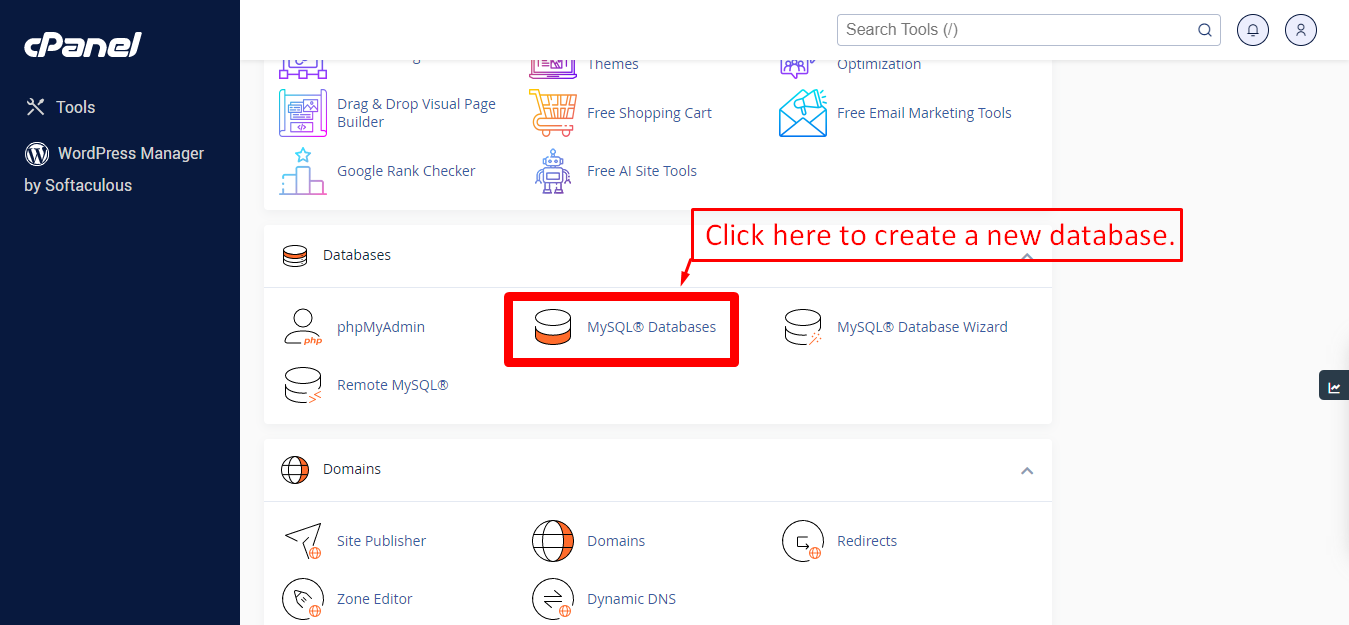
Creating Database
Before installing, you will need to create a new database. If you already know how to do this or have already created one, skip to the next step.
Note: Please use empty database. In most cases you should be able to create a database from your cpanel.
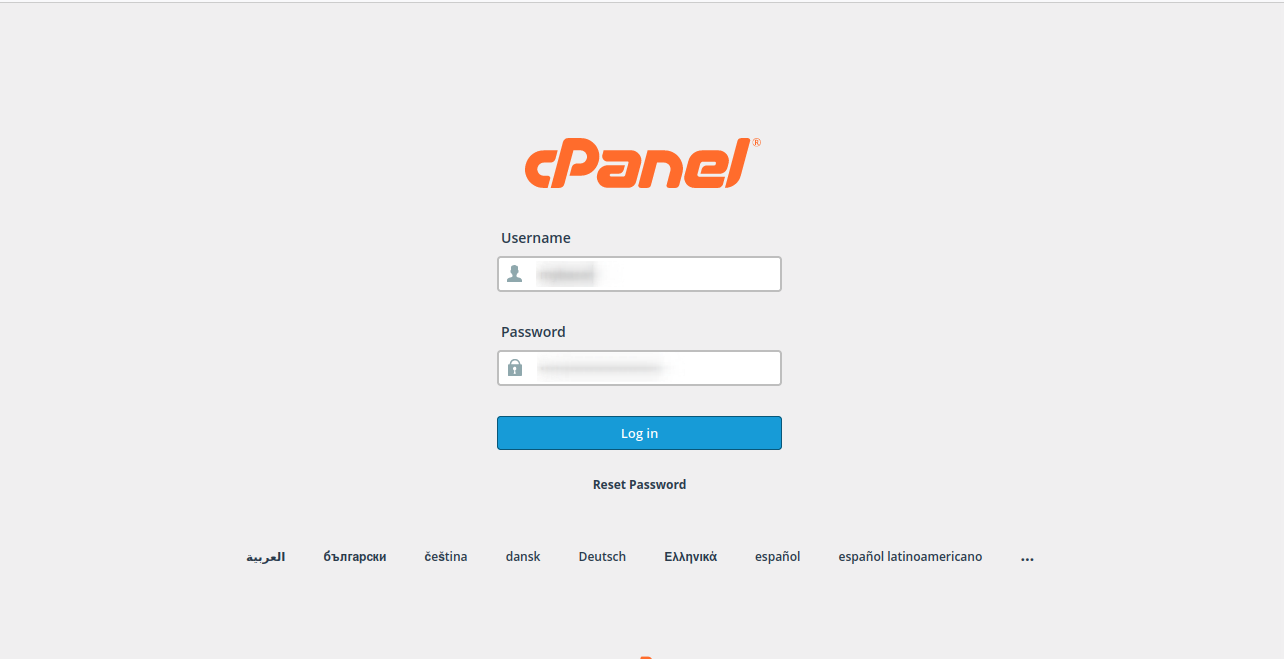
Login to your cPanel by entering this in your browser url
yourdomian.com/cpanel
Step: 1
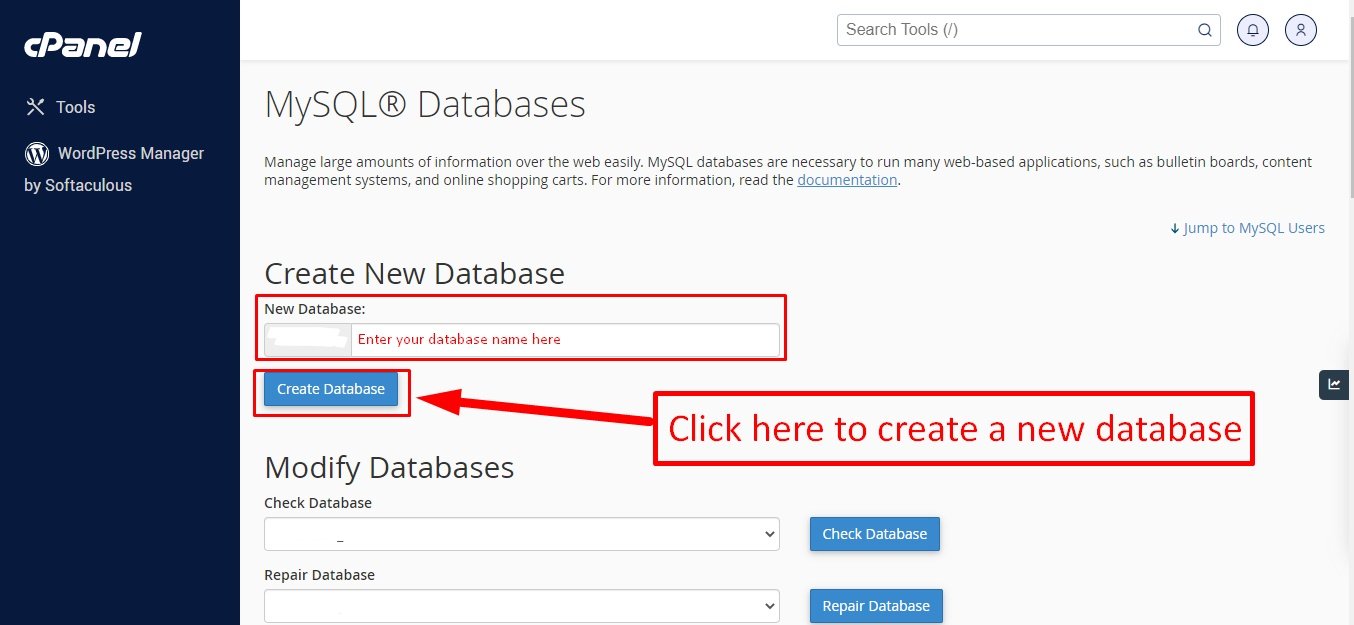
Step: 2
Step: 3
Now you need to create a new user. On the same page go to create a new database user
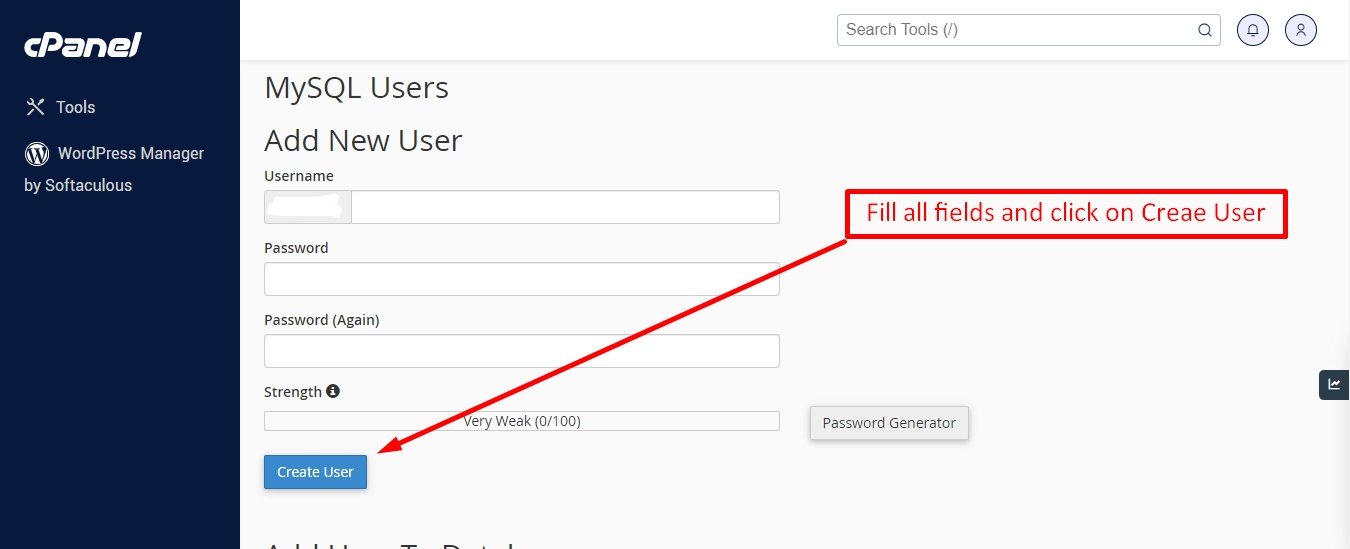
Step: 4
Now add the user to the database
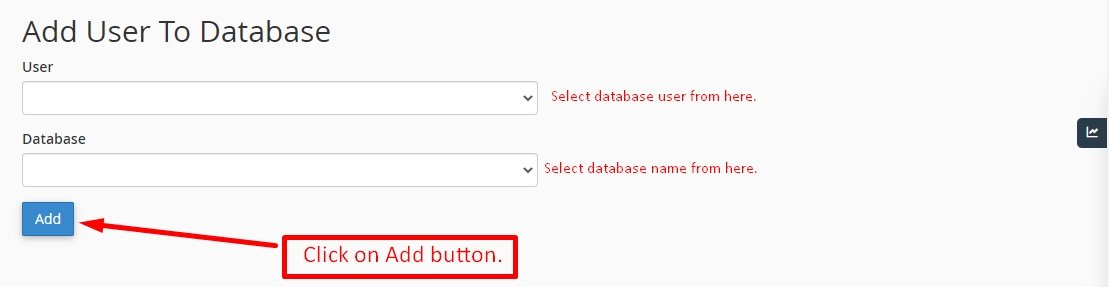
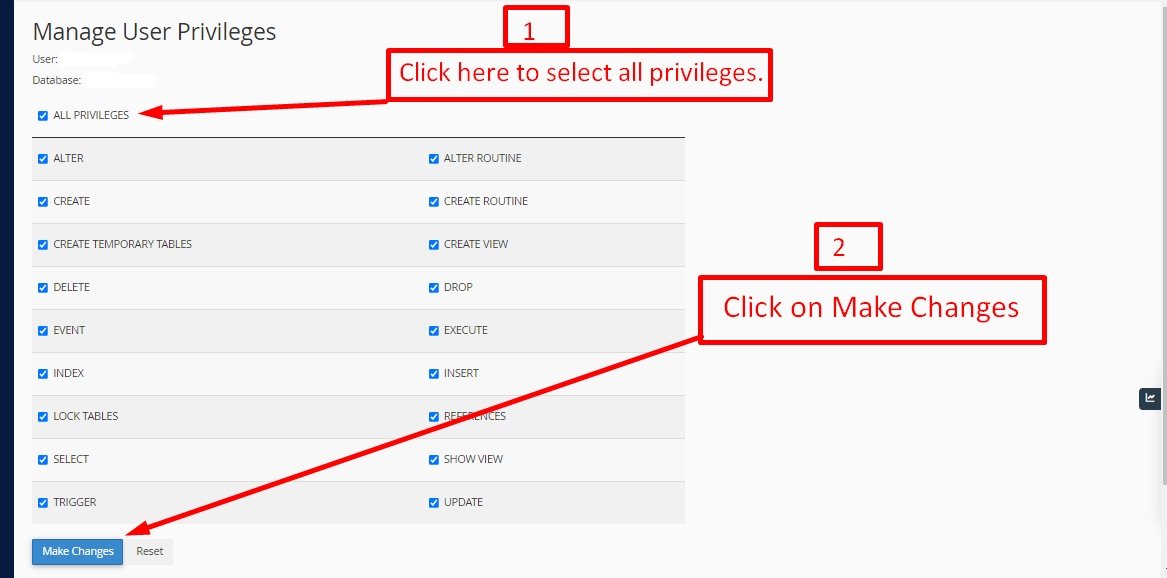
Step: 5
And select full permissions on the database to that user
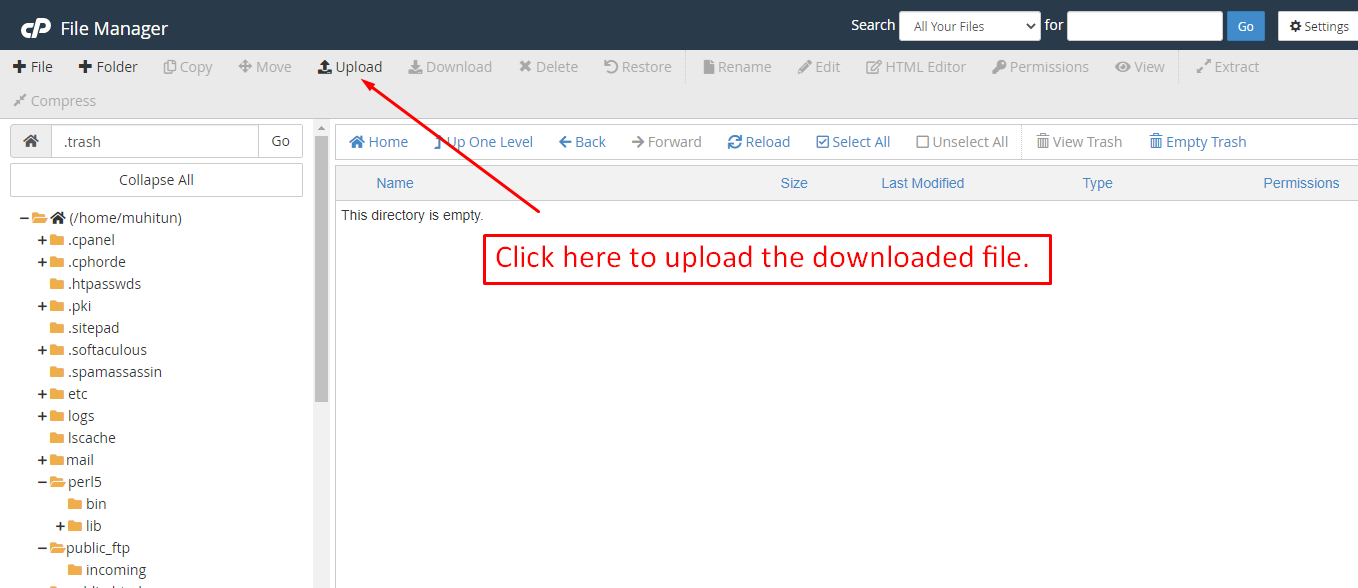
Uploading Files
On some operating systems, the dotfiles are hidden by default. Before starting to upload the files, please make sure your file explorer has the option to view hidden files turned on.
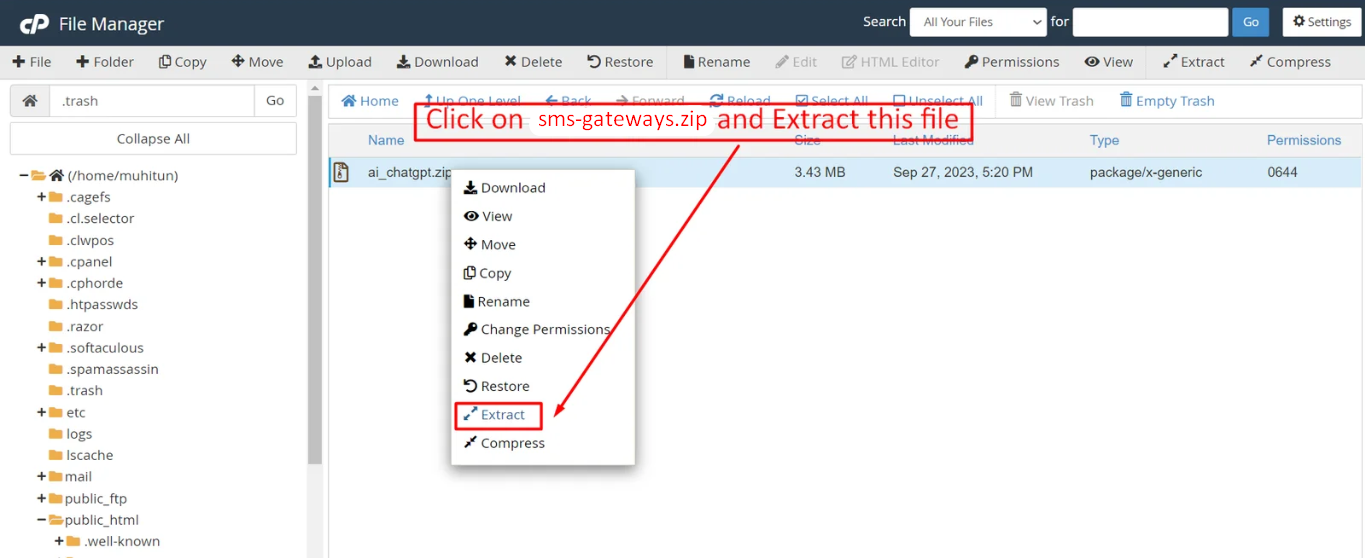
After creating a database, Upload the acnoo_sms.zip file on the web root folder of your domain. This folder is generally called public_html, html, or example.com, but depending on your server's configuration, it might be named differently.
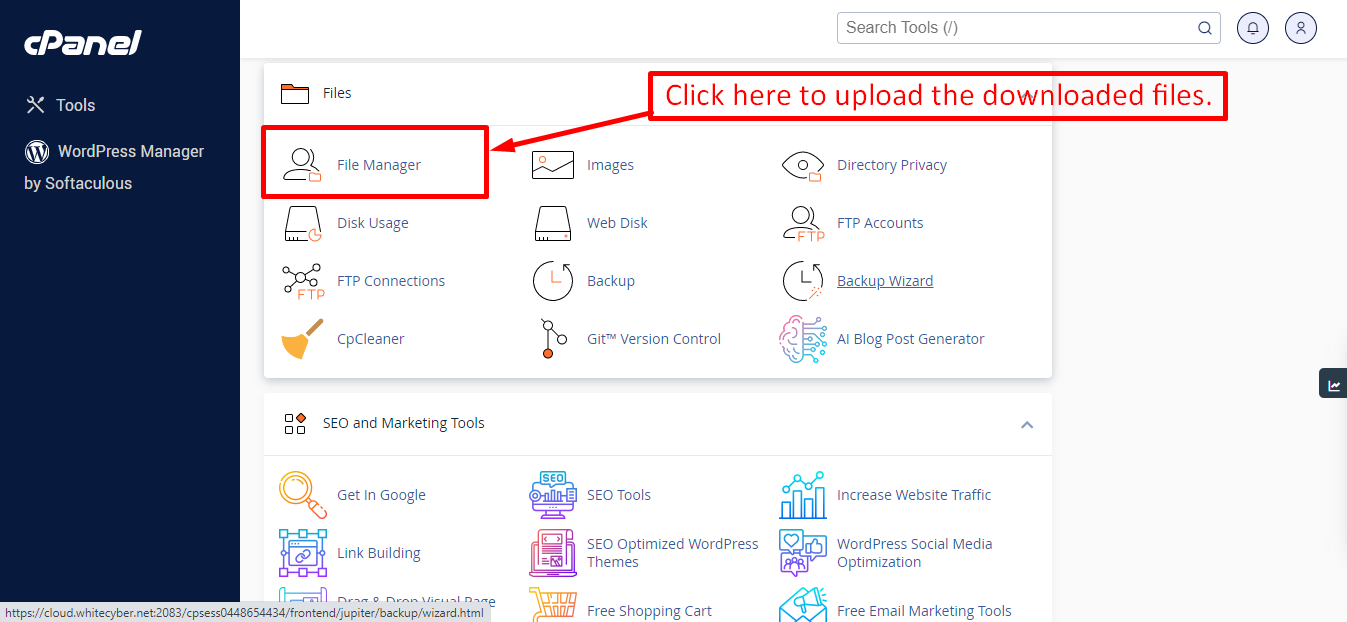

After that in the public_html directory upload the downloaded file.
Note: Important Make sure that you have .env file in your folder.
Note: Make sure that .htaccess file got copied properly from the download to your server.
Installation Wizard
Go to your website address, then you'll see an installation wizard. To open the installer. Visit
yourdomain.com/install
Now the installer will show up.The First screen will be Welcome Screen

Note : If you are not able to access the website by accessing yourdomain.com/install, but you are able to access it via yourdomain.com/index.php/install, this means that you probably don't have Apache mod_rewrite installed and enabled.
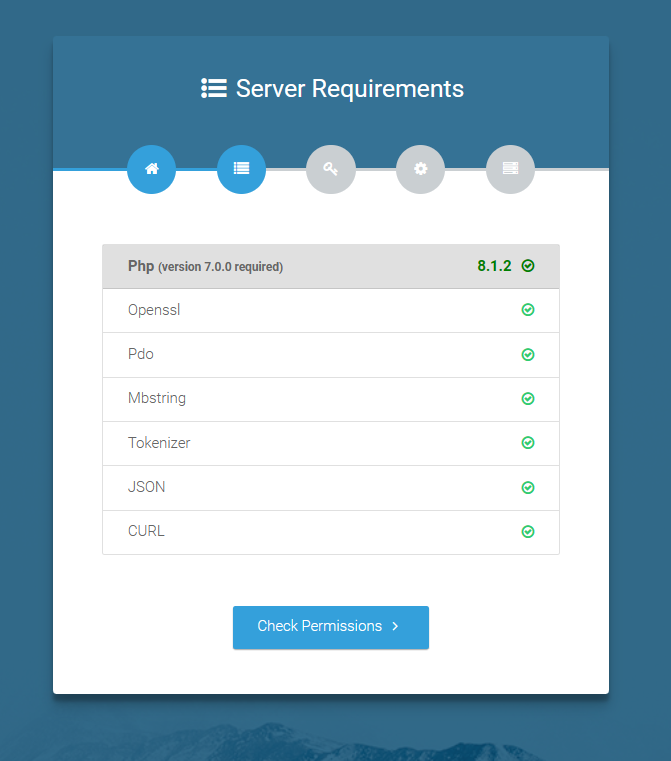
Server Requirements
After clicking on "Check requirement" button, you will be redirected to System Requirements step during the installation wizard, System Requirements.
Directory Permissions
After successfully enabling and installing all required PHP extensions, next step is to set the appropriate permissions for some system folders that shows on below picture.
For giving permissions please open your terminal window. and type command sudo
chmod
777 directory_name for example sudo chmod 777 app
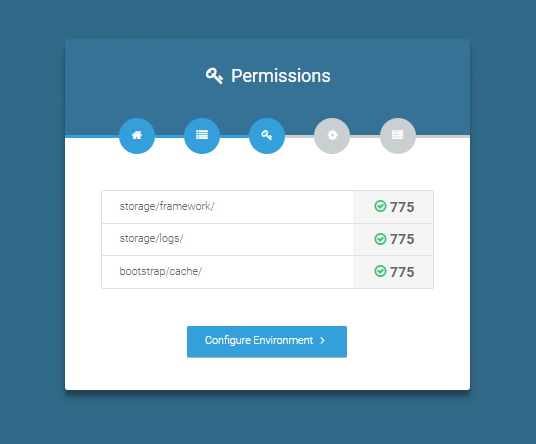
Note : If your control panel has no terminal window, then go to public_html or the directory where you have uploaded the project. now give permission for some system folders that show on Installer. For example, we have demonstrated storage/framework directory permission in the below image.
Open required directory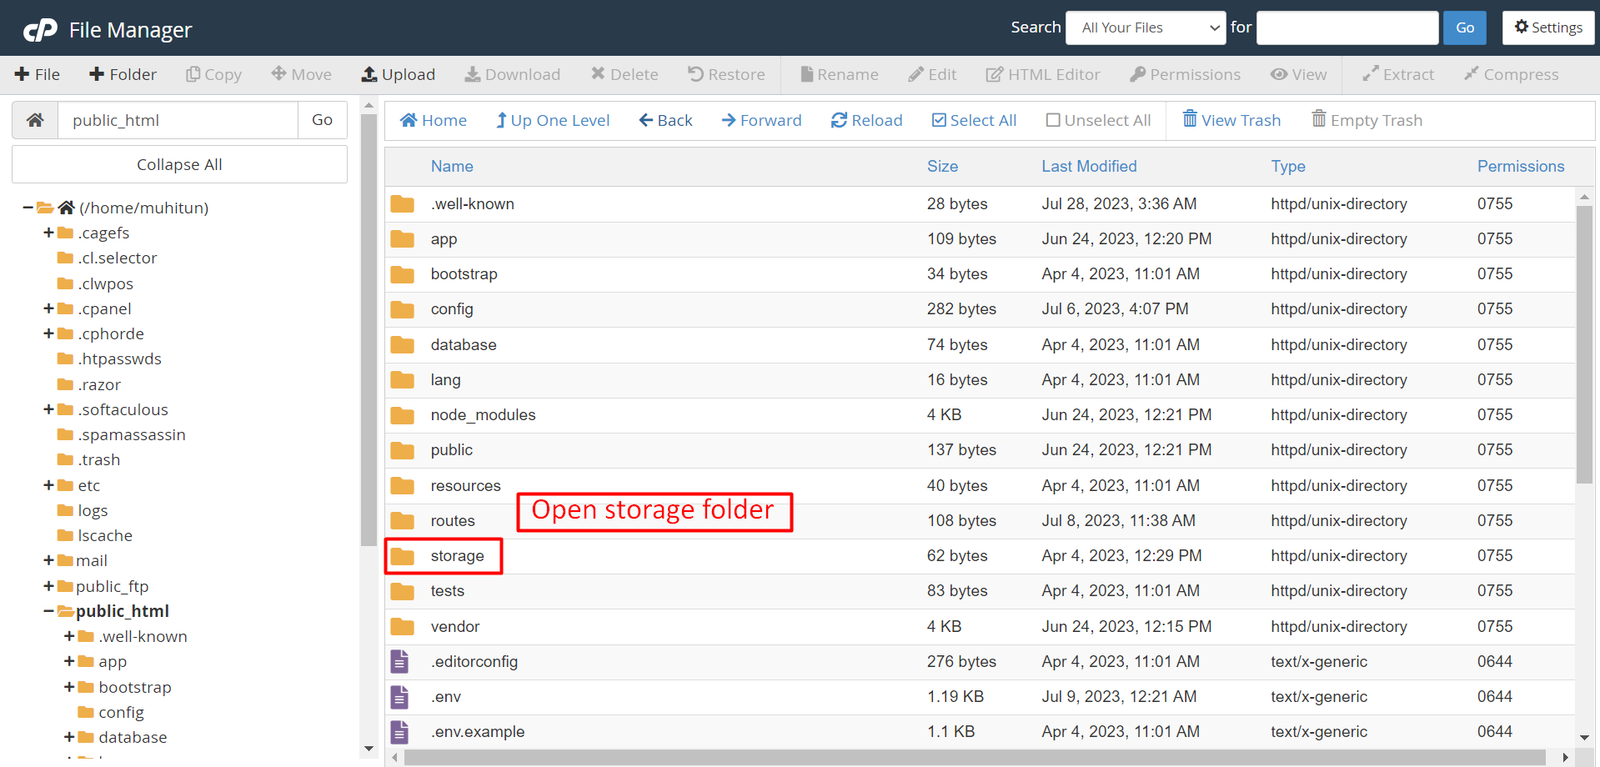 Change permissions for specific directory
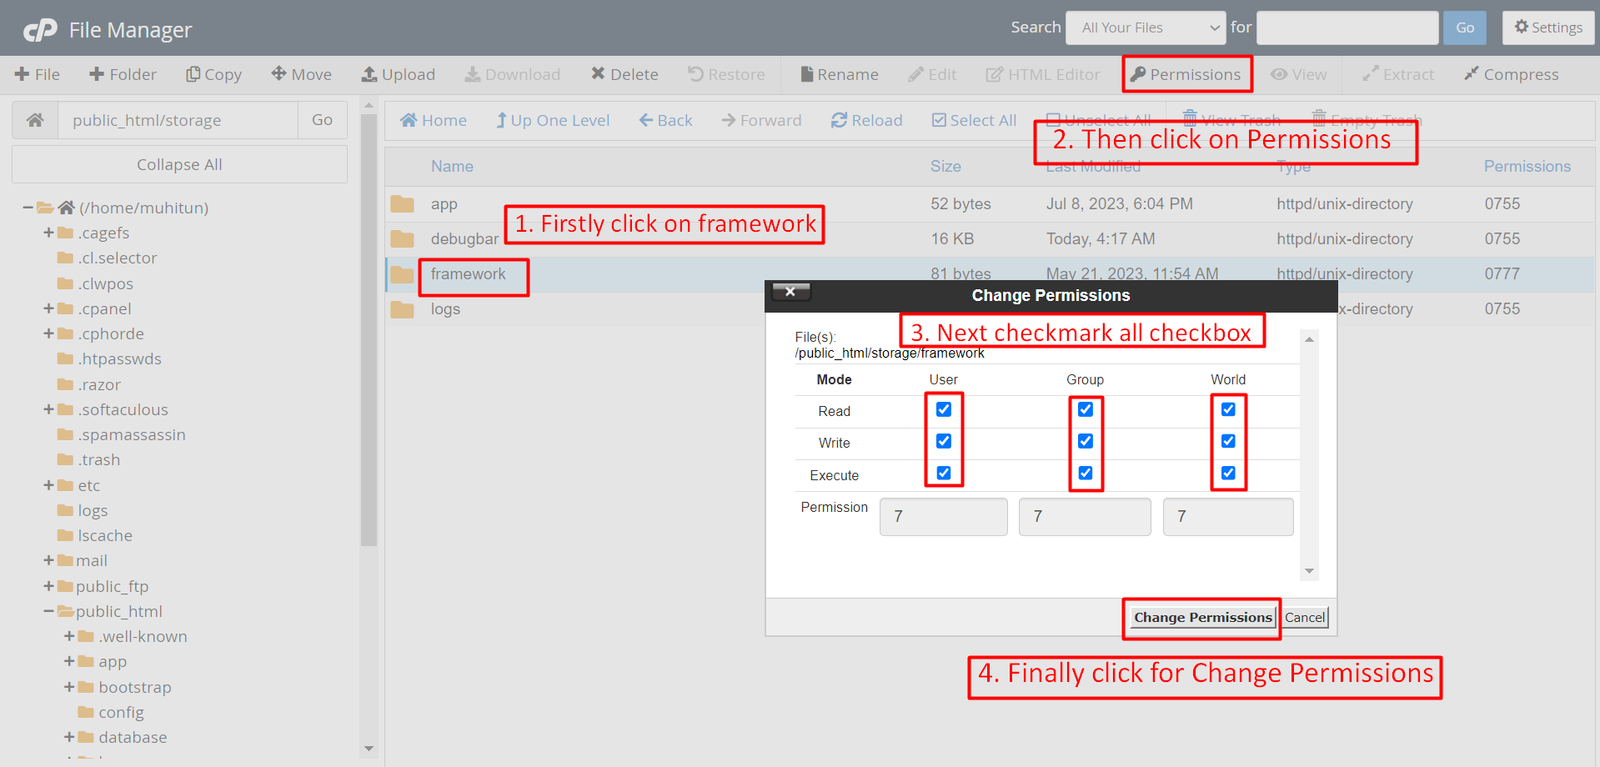
Note: You have to change the directory permissions for the storage/logs and bootstrap/cache folders as shown in the image. If these folders do not have the correct permissions, please adjust them accordingly.
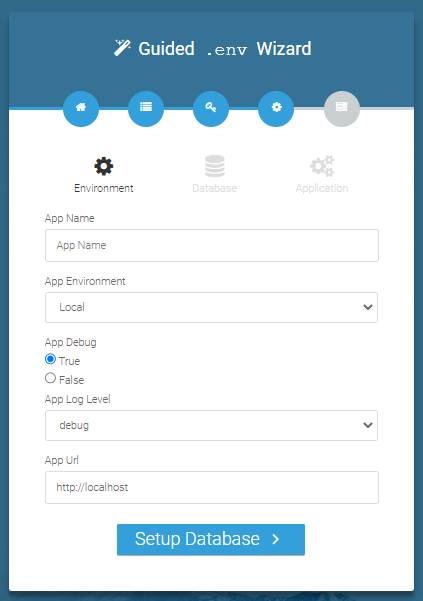
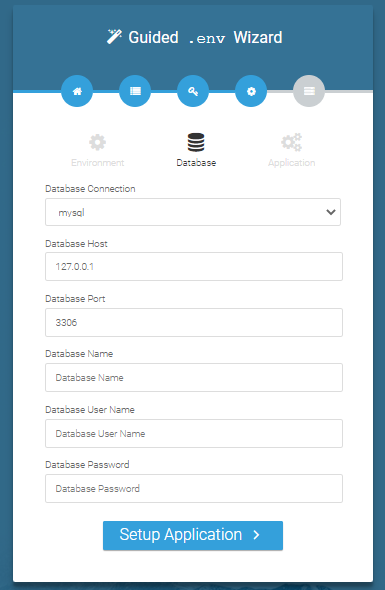
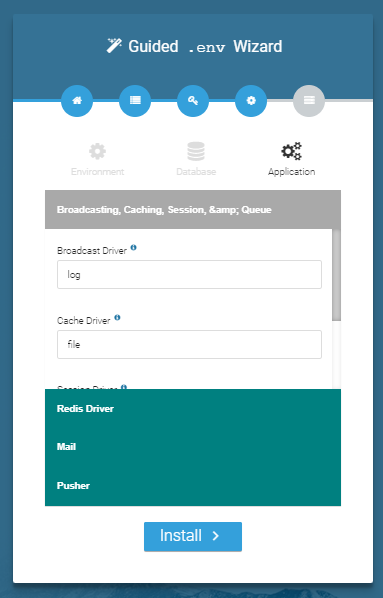
Database/Environment Setting
You have to fill in your database credentials
Exit
The last step is exit step.
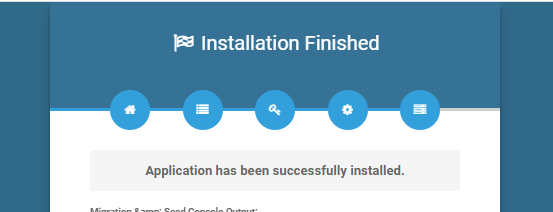
Congratulations you have successfully installed this project on your server. 😀
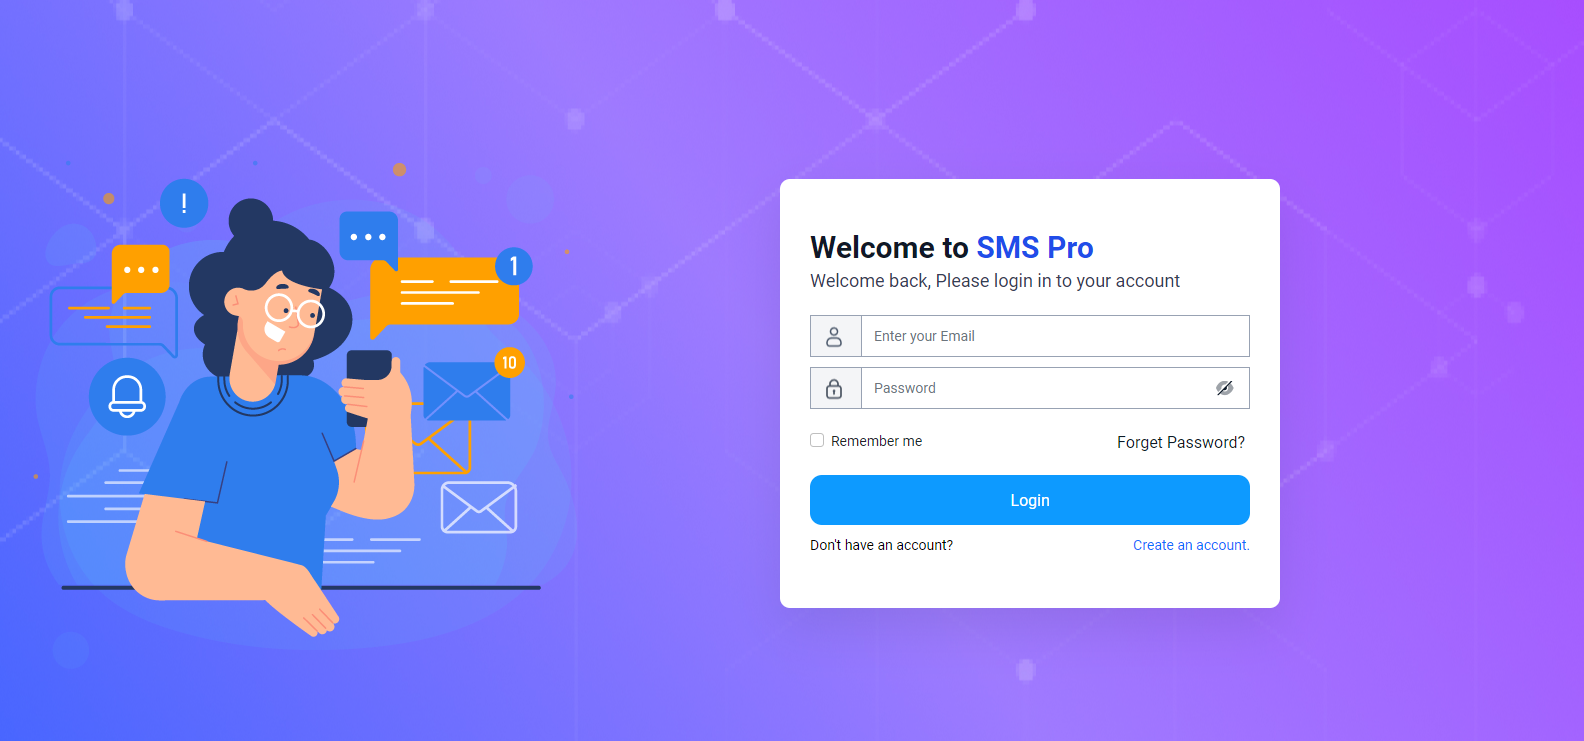
Default Password
You can login using several methods depending on your role.
Super Admin
superadmin@superadmin.com
superadmin
Admin
admin@admin.com
admin
Customer
customer@customer.com
customer
In this project, different modules are assigned based on user roles: Super Admin, Admin, and Customer. Each role has distinct responsibilities tailored to their specific tasks and permissions. Below, we will discuss how each user role operates within the system.
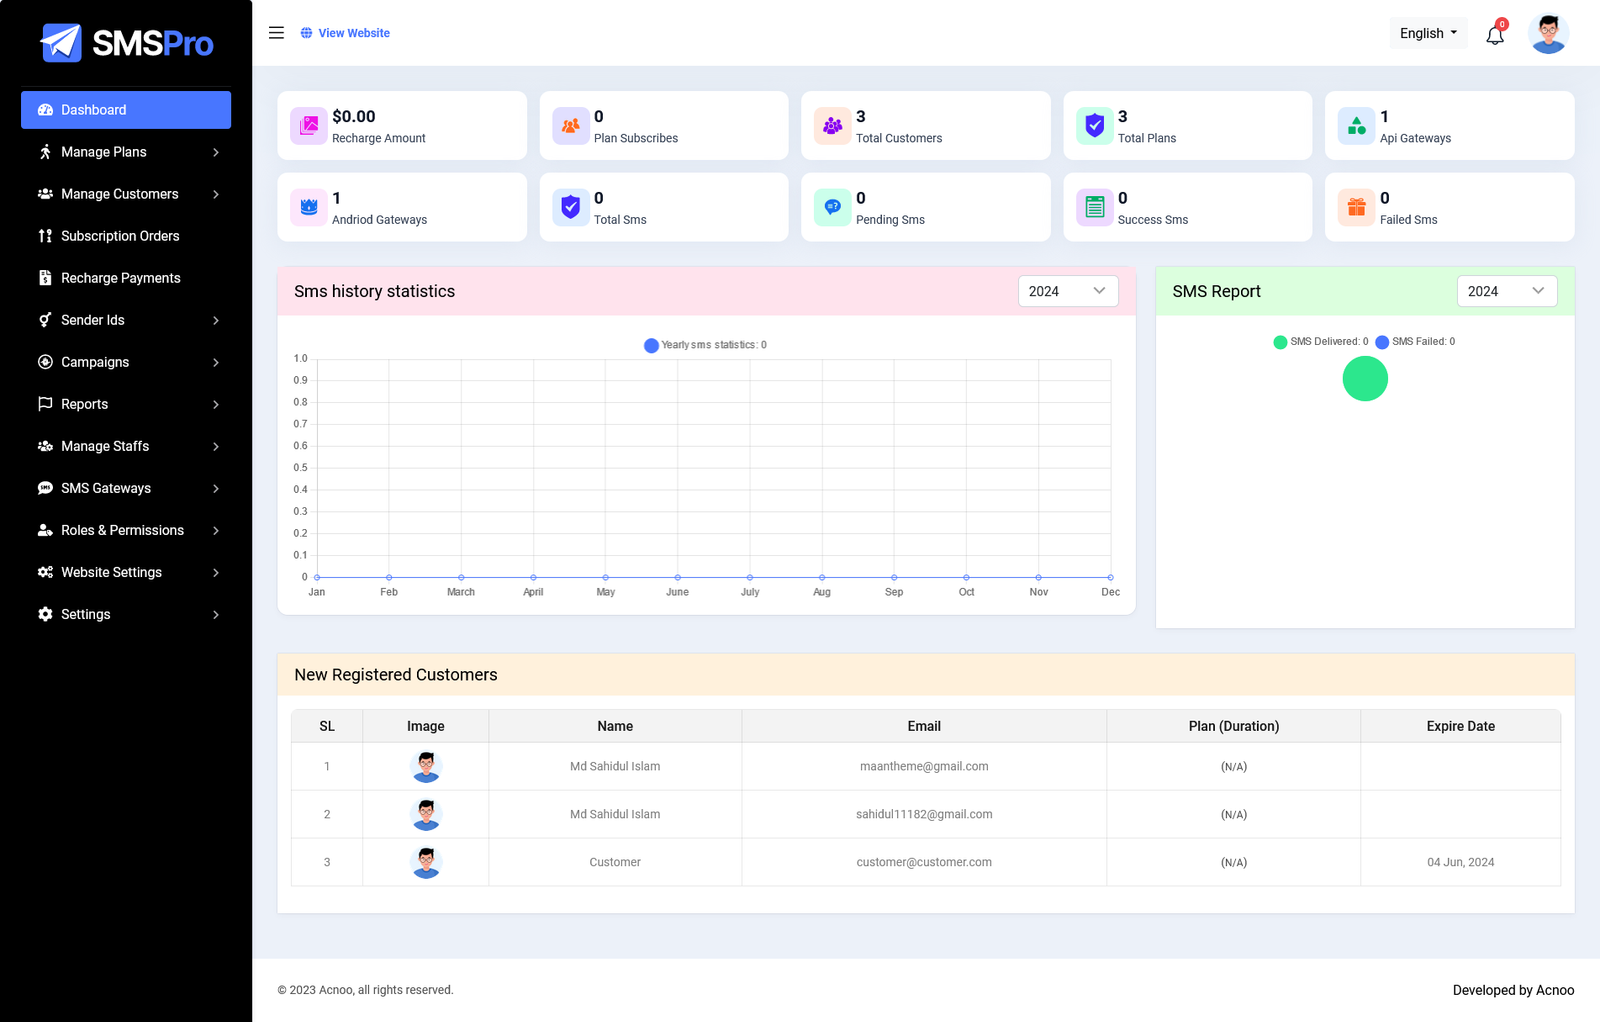
Dashboard
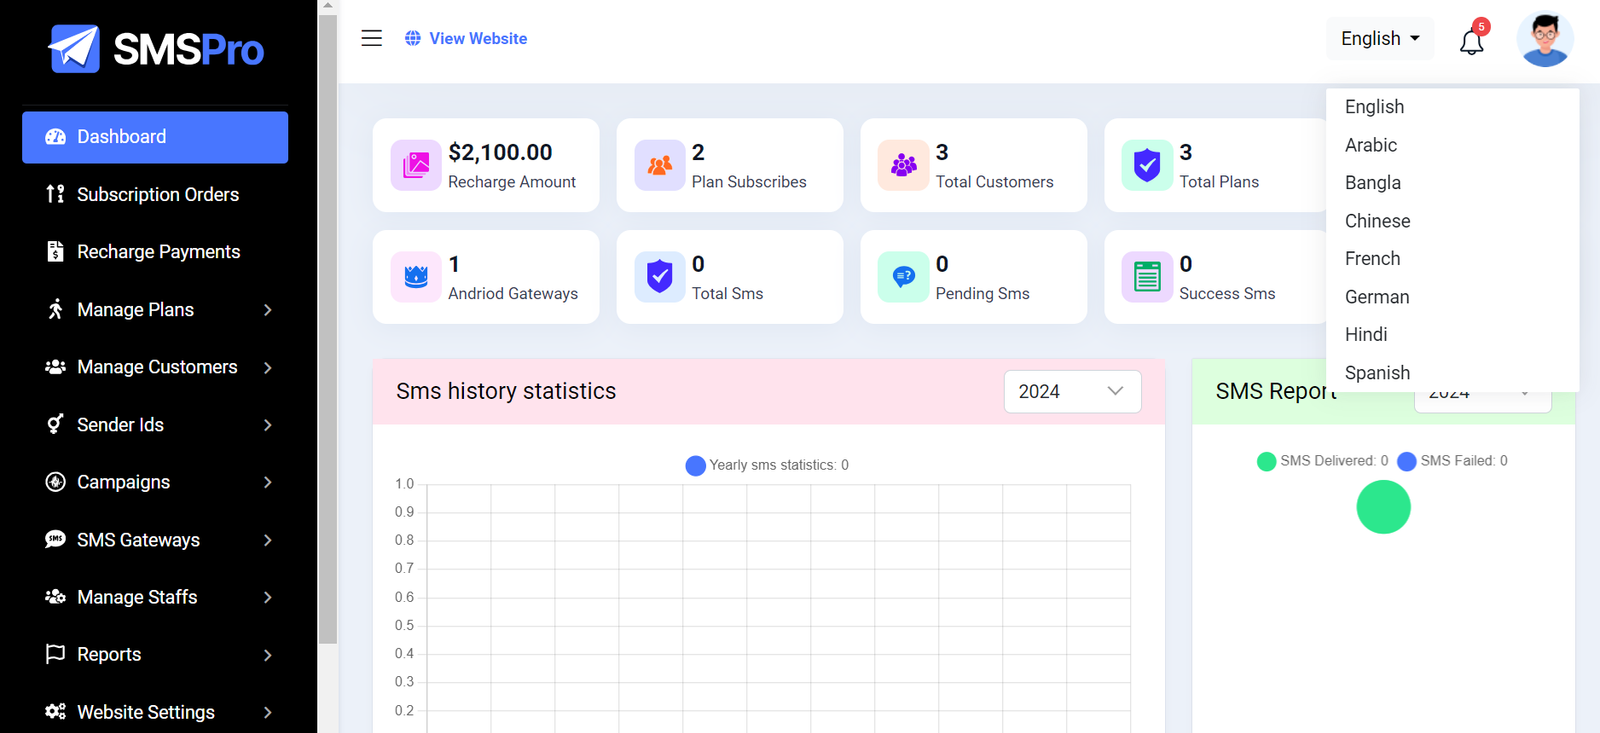
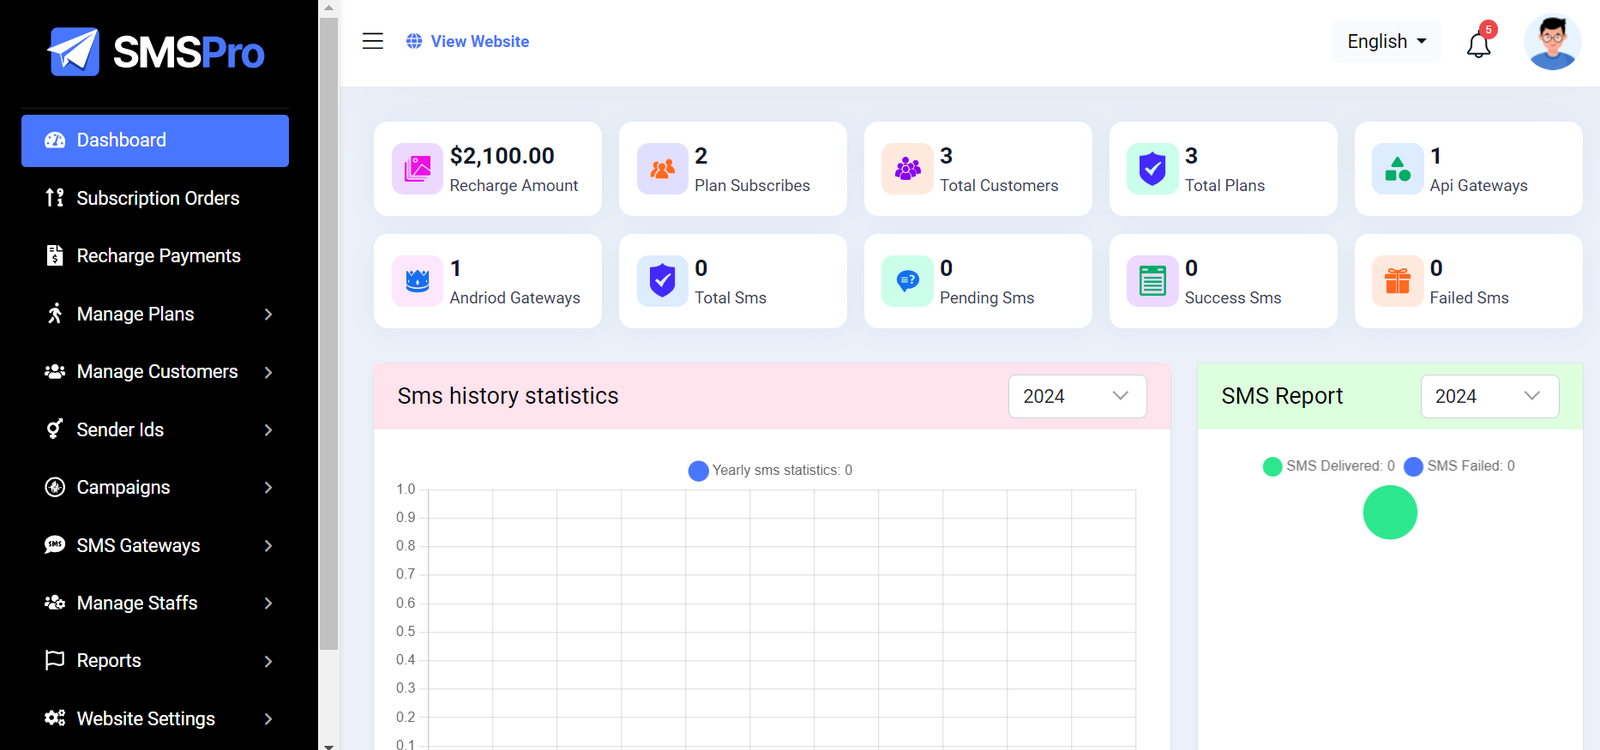
This is the admin dashboard page. The essential information regarding the project are displayed here.
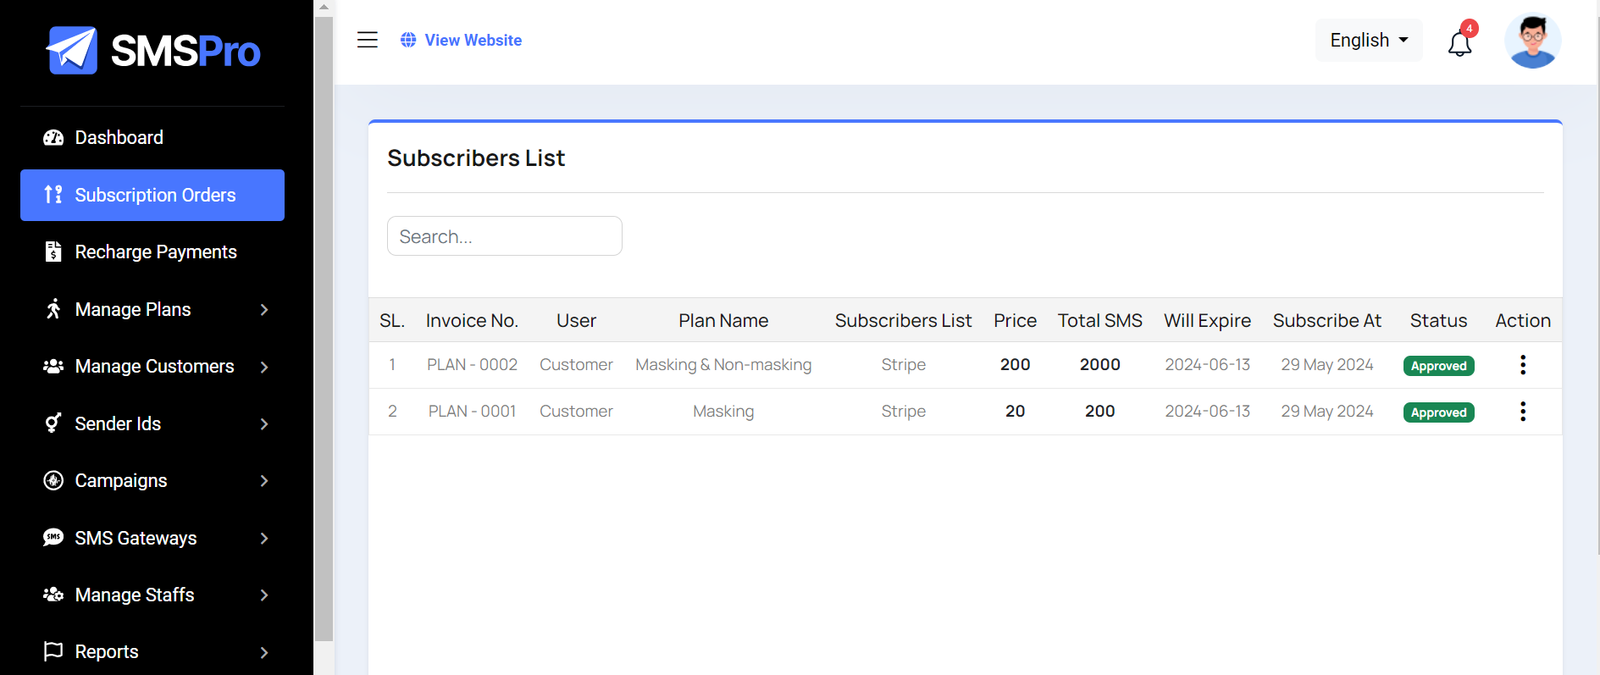
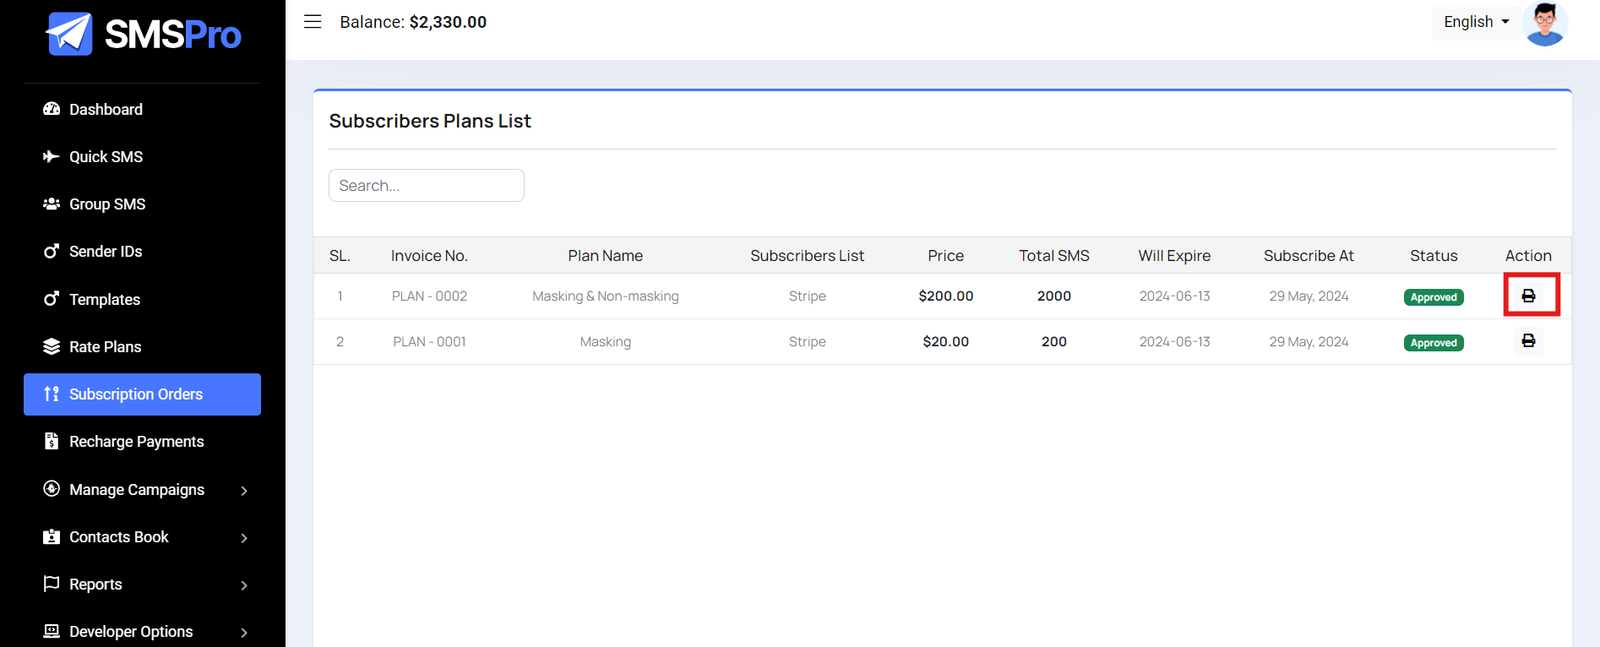
Subscription Order List
Here, you can view subscribed orders and search through the list. Additionally, you have the option to generate invoices for printing.
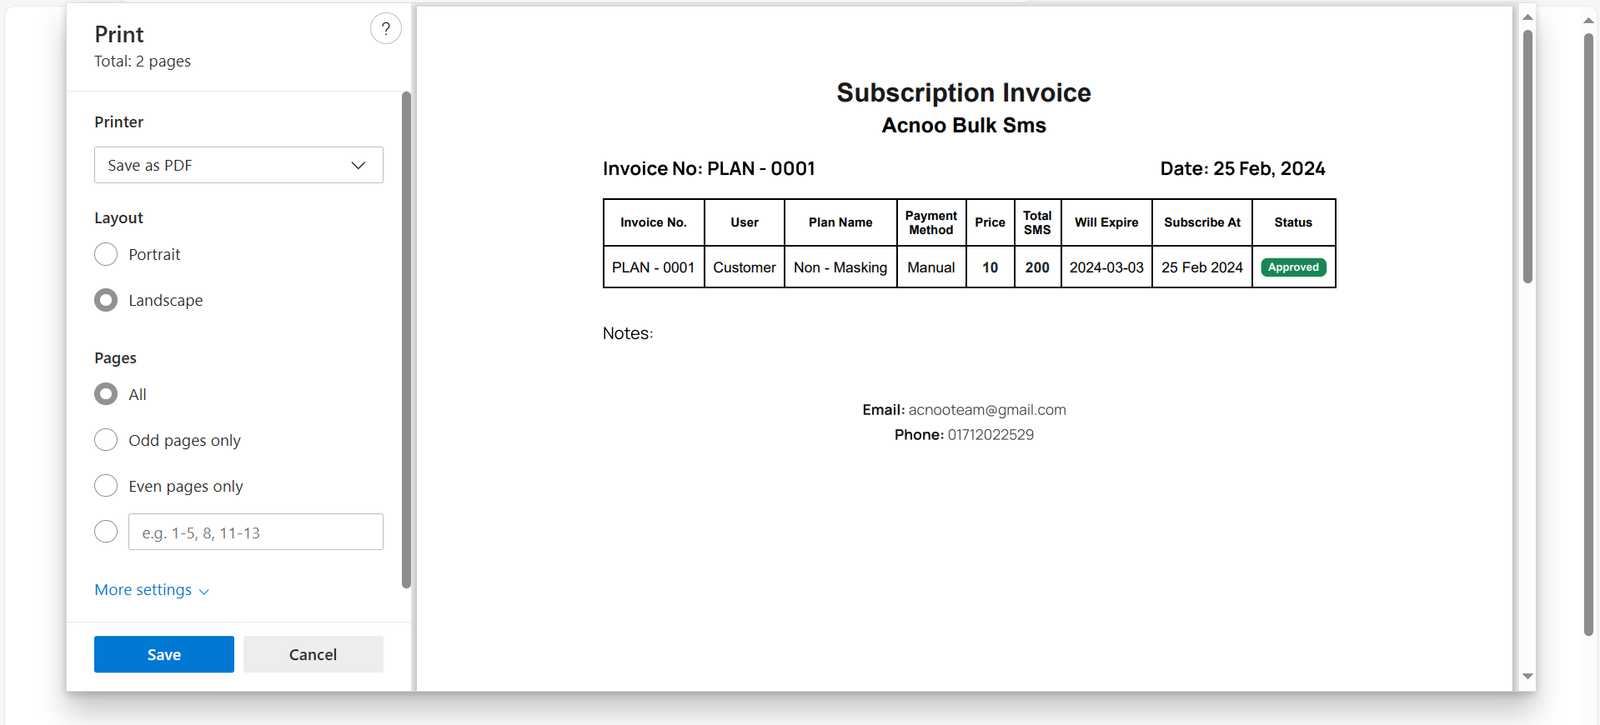
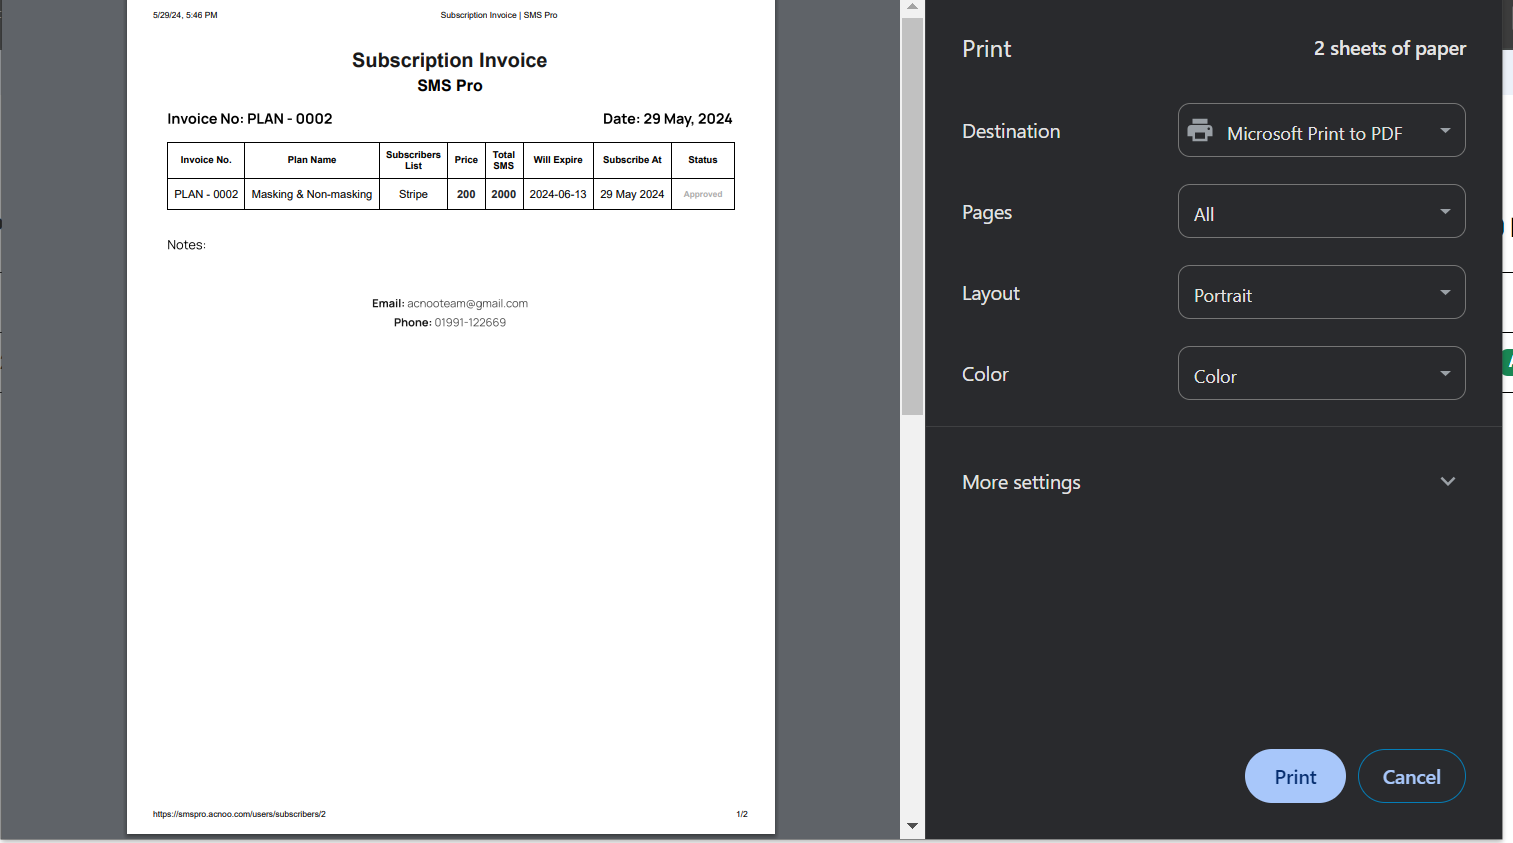
Subscription Invoice
You can print and save this invoice here.
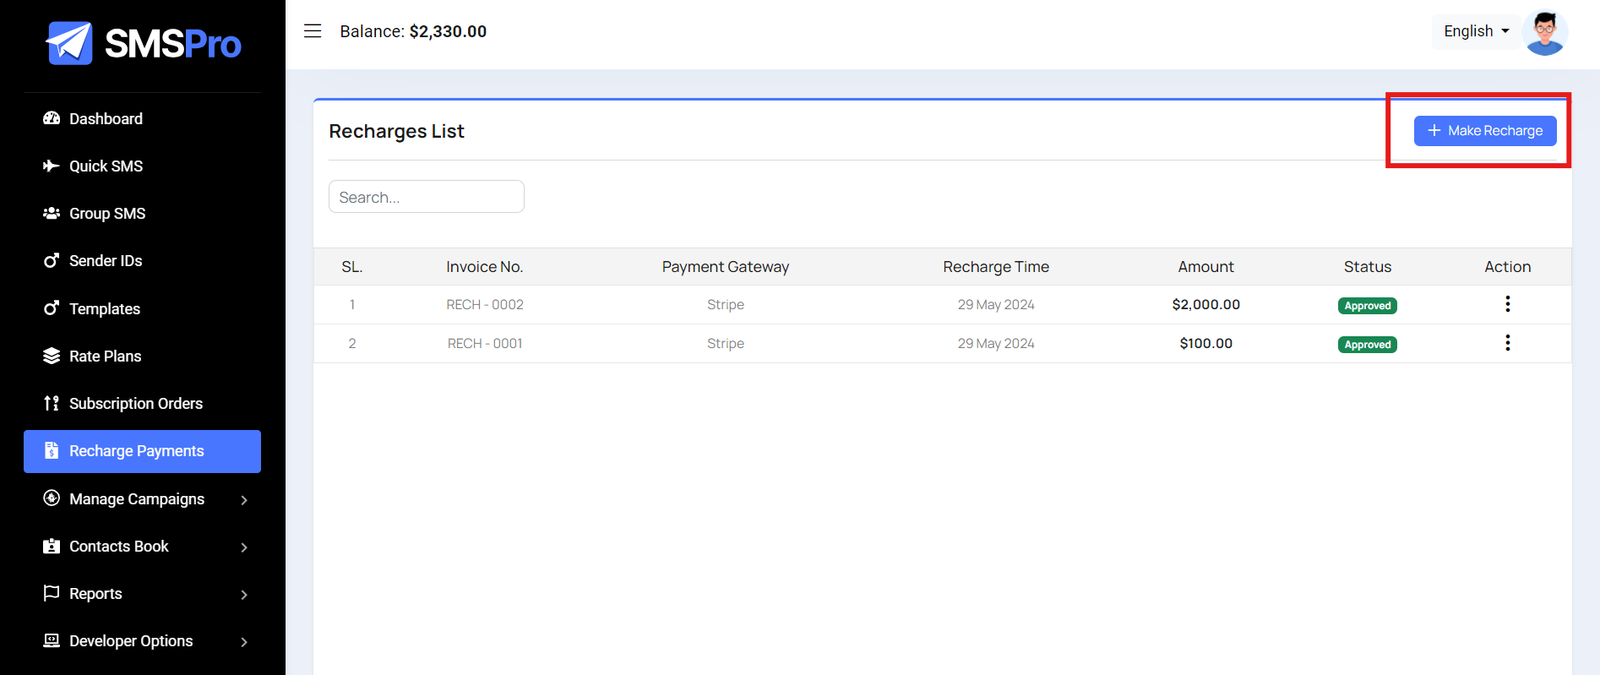
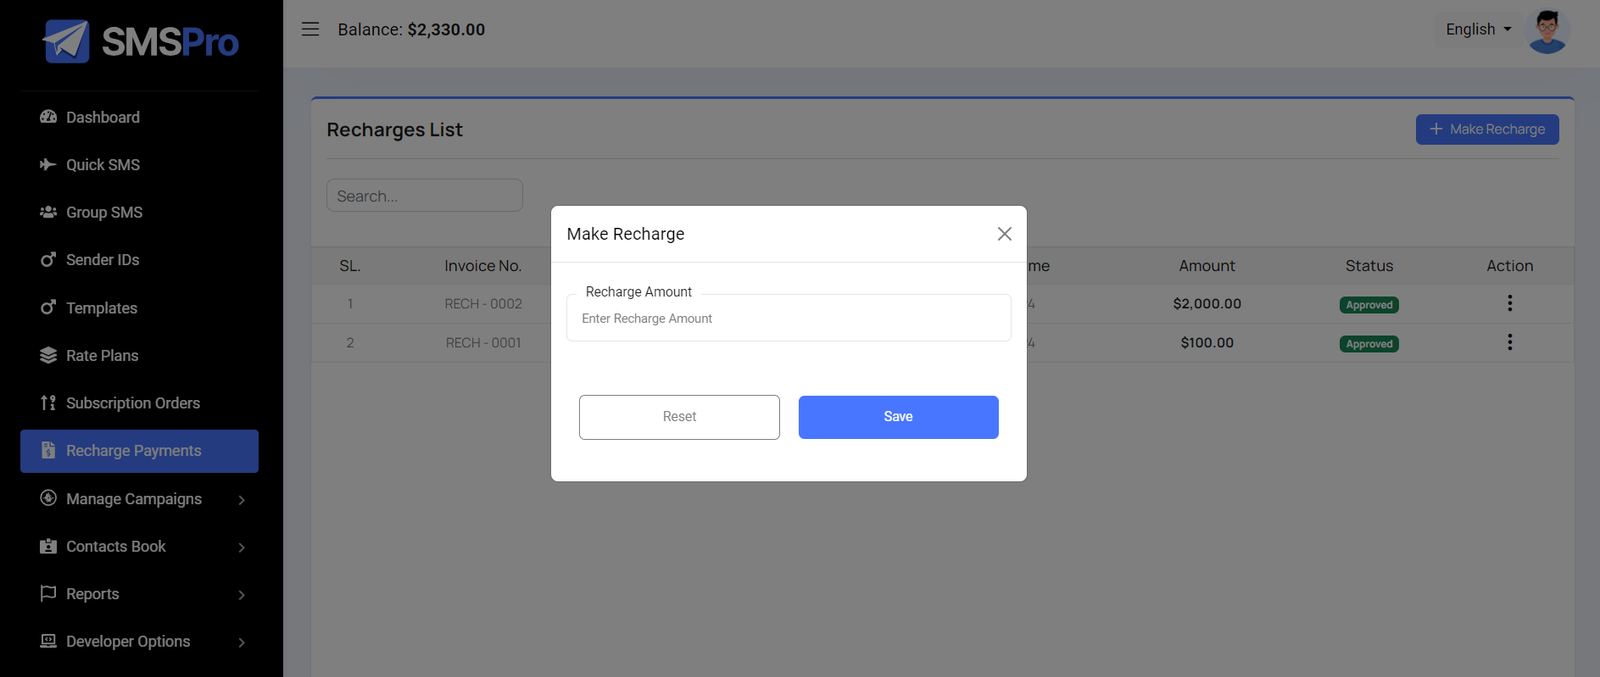
Recharges List
You can view a list of recharges here and filter them using the search function. Additionally, you have the option to approve or cancel recharges and print the list as an invoice.

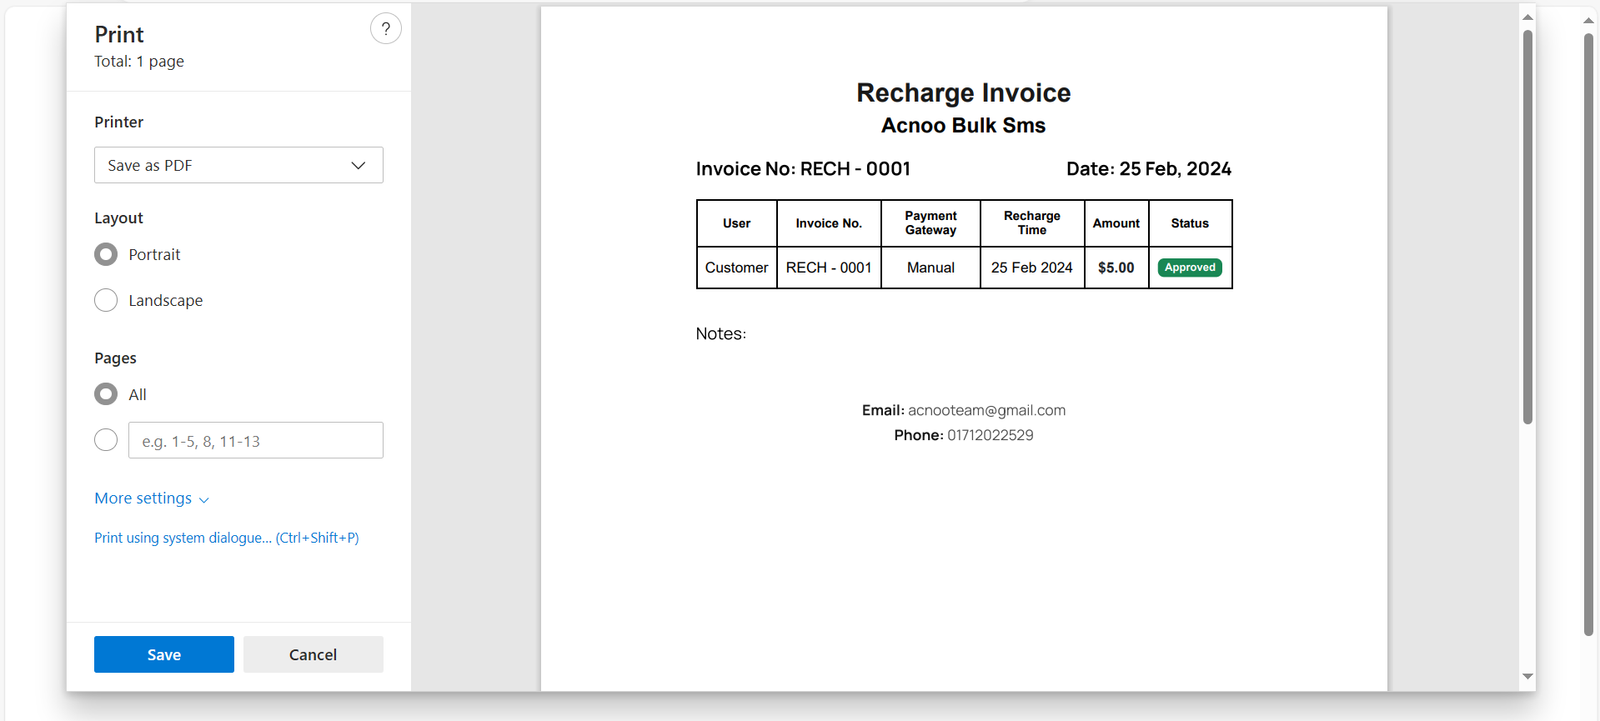
Recharge Invoice
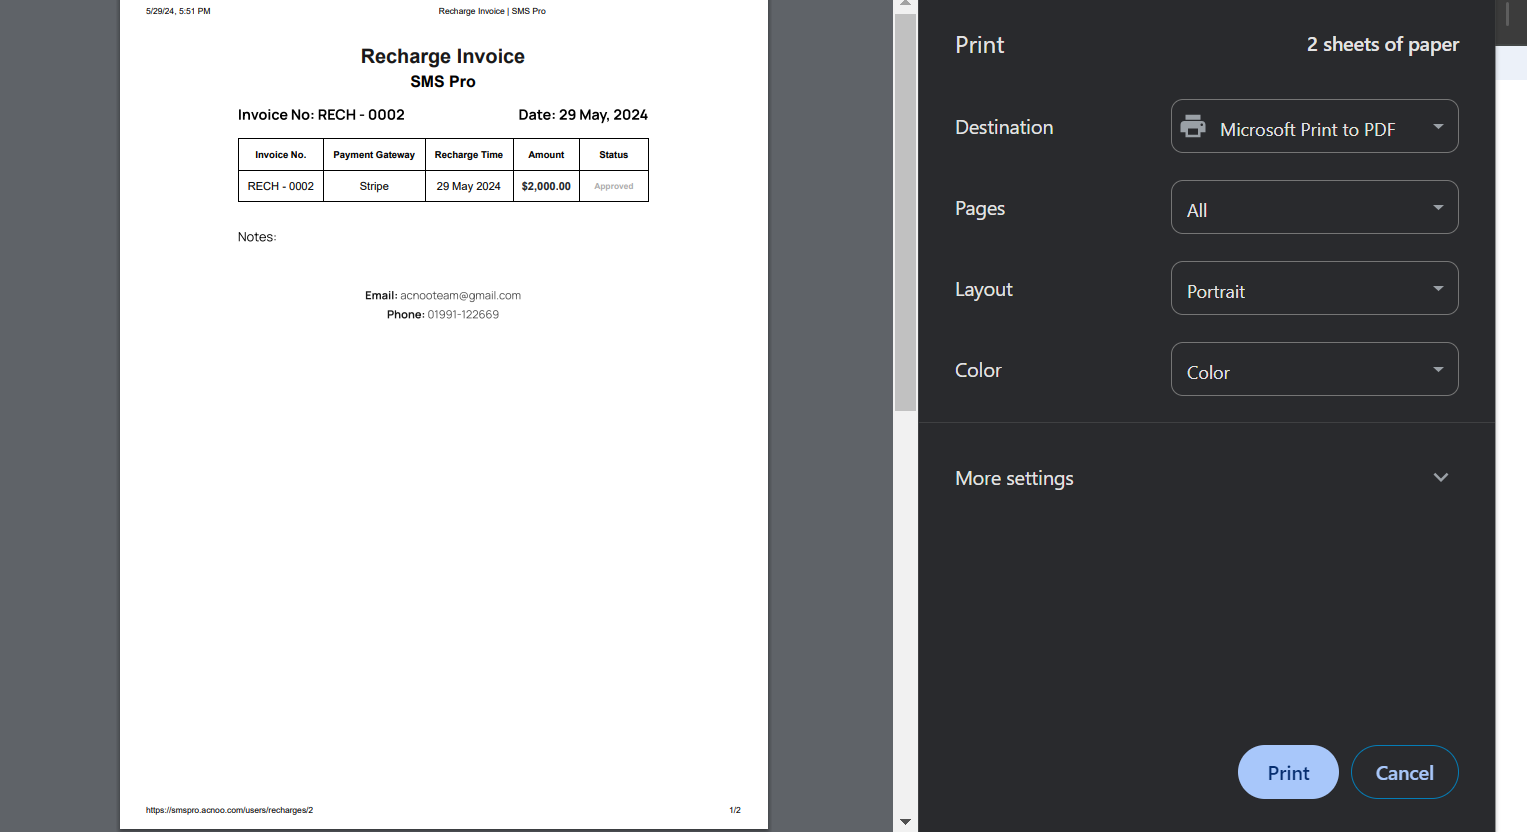
You can print and save this invoice here.
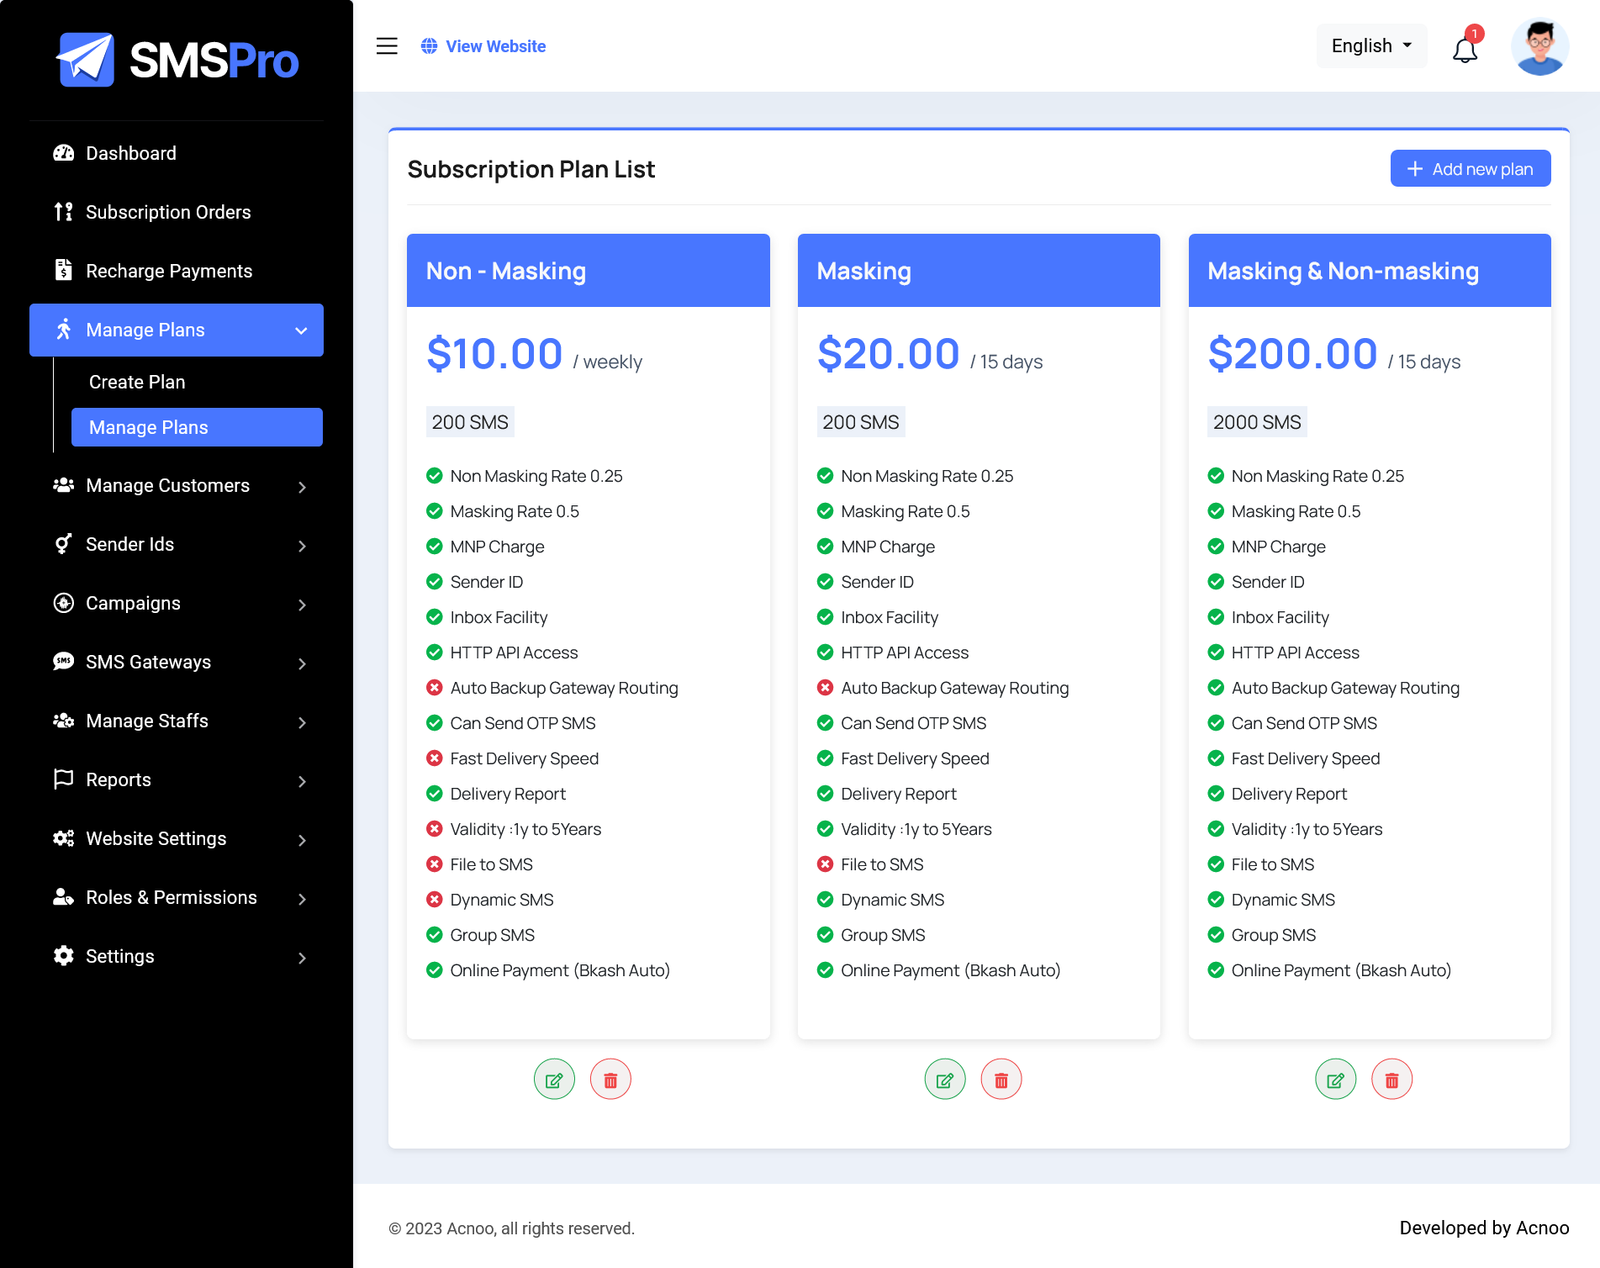
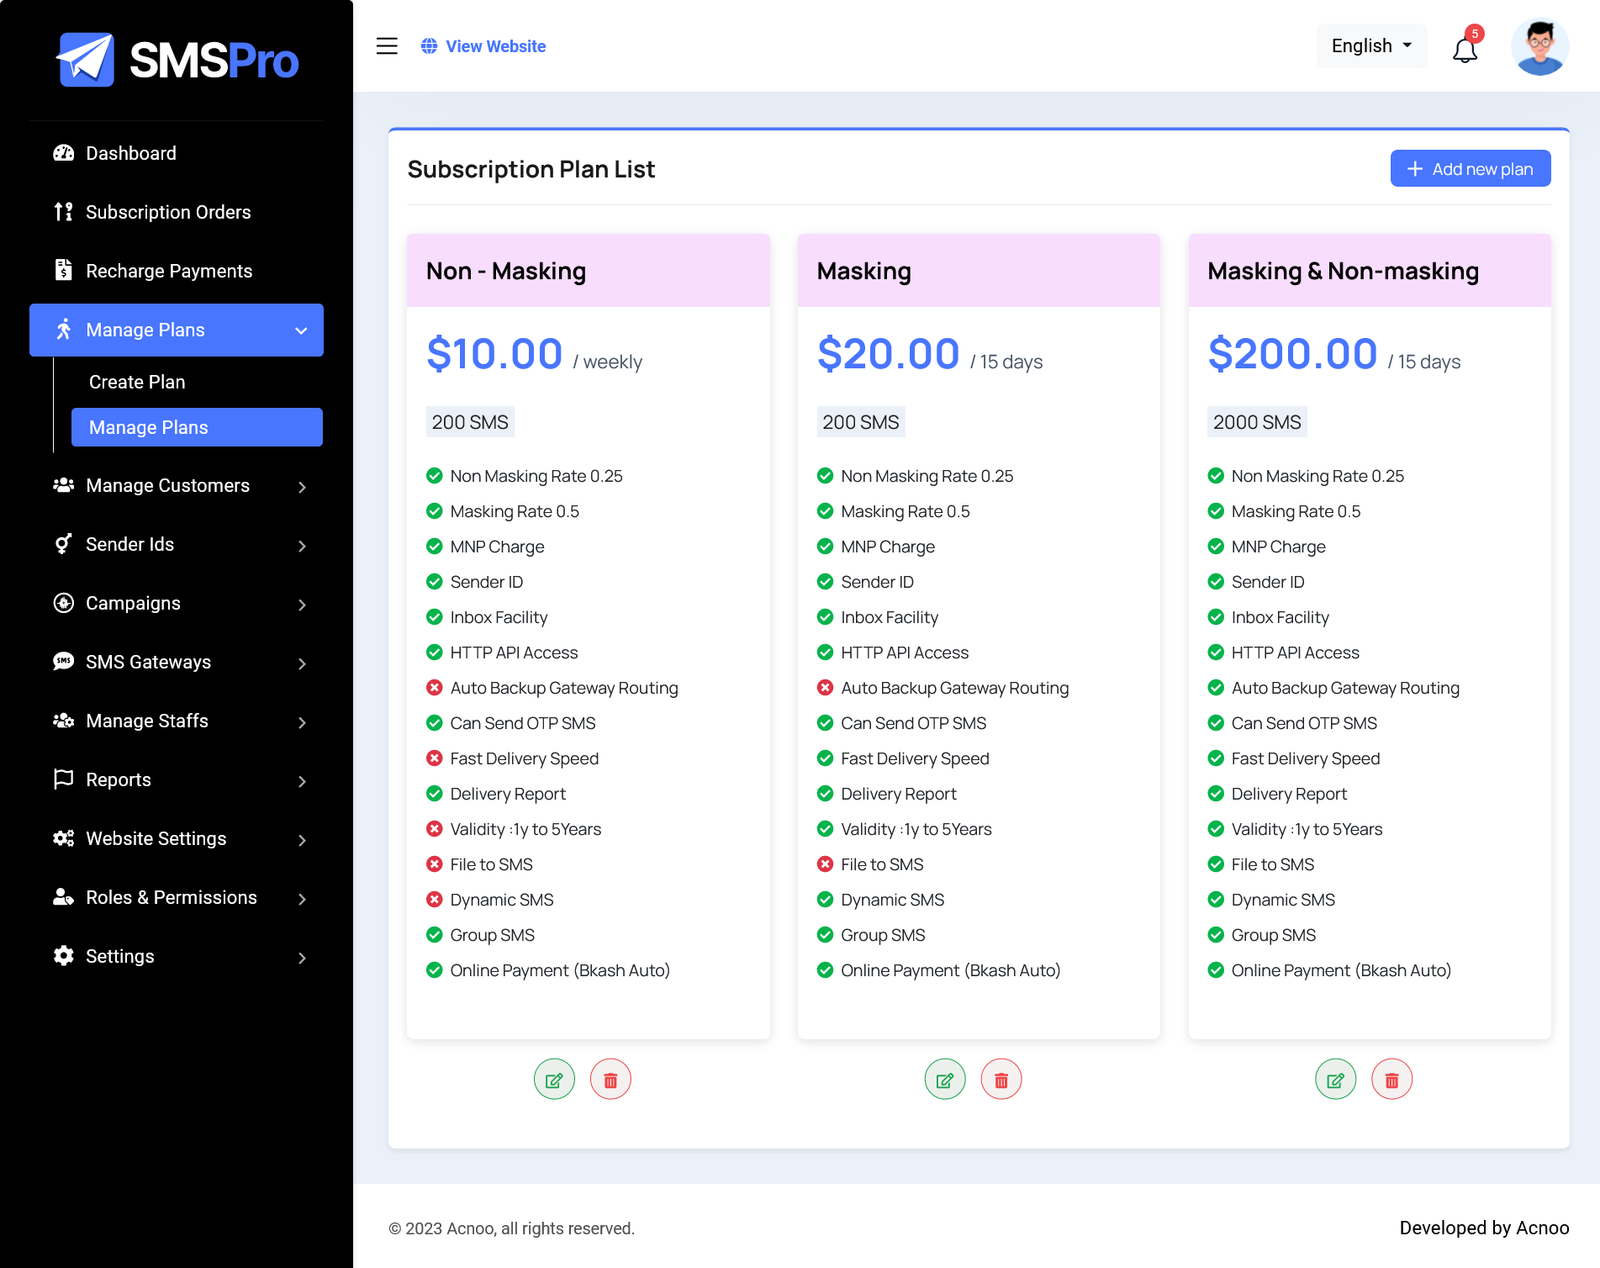
Plan List
Here, you can view a list of available plans and perform actions such as updating and deleting plans. Also you can edit and delete exesting plan from this list.
Create Plan
Here, you have the option to create a plan according to your preferences. Additionally, you can add multiple features by using the "Add New Feature" input field. Once you have completed filling out the form, simply click the save button. You can also review the activity of your entries. If you decide not to proceed with creating a plan, you can click on the cancel button.
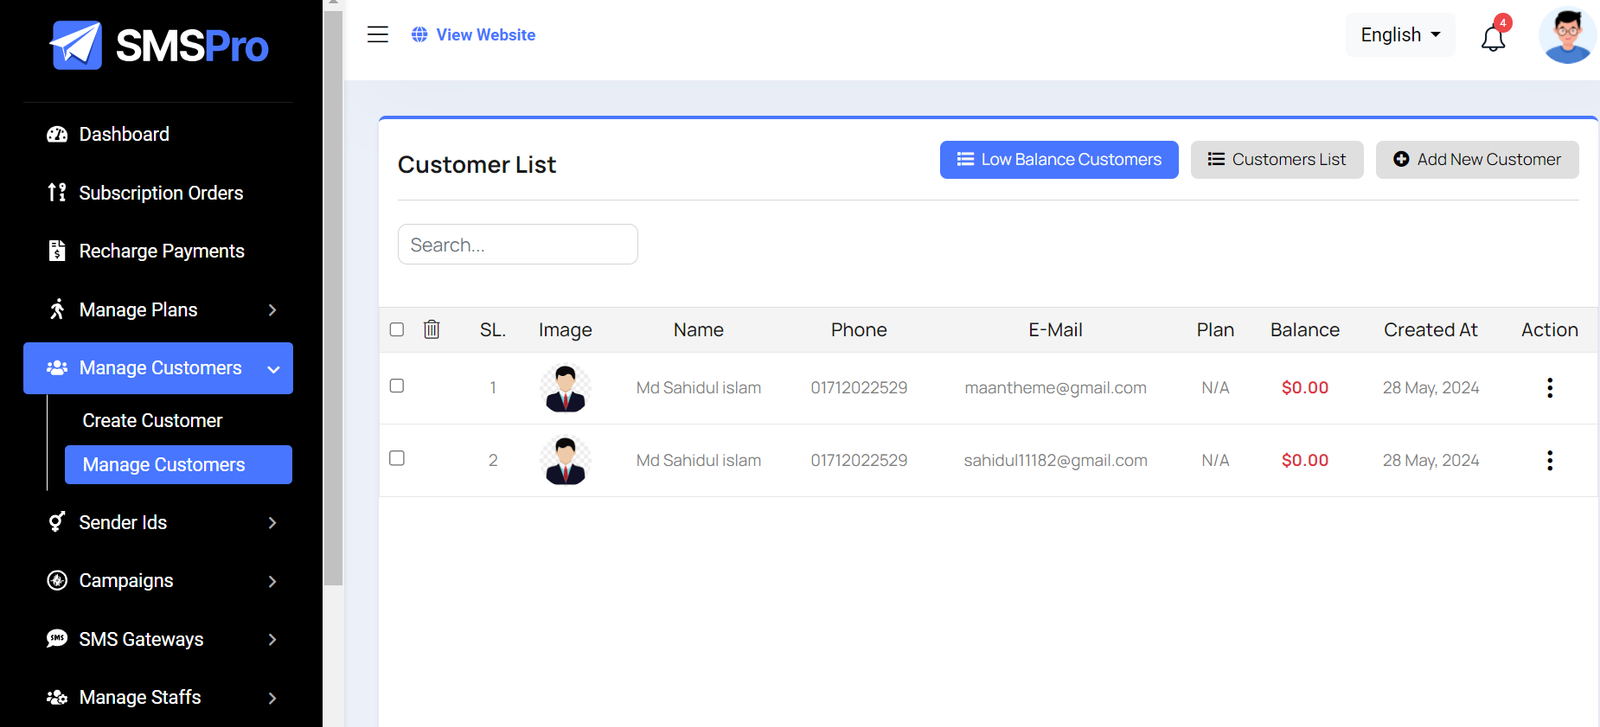
Customers List
You have the opportunity to view a list of customers here. Additionally, you can search for specific data and perform actions such as editing, deleting, and even multi-deleting entries.
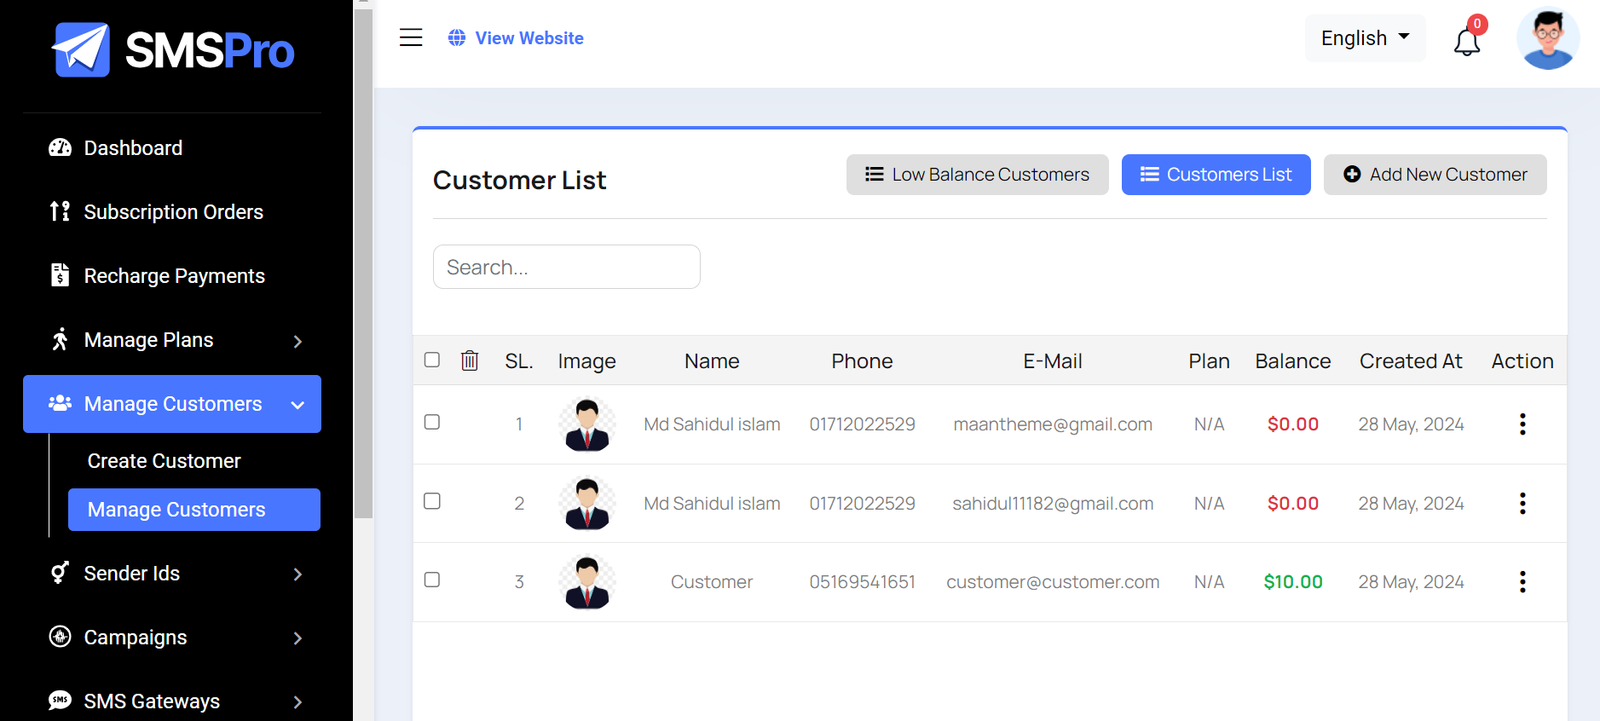
low balance customer
If your balance falls below the threshold set for the Low Balance Alert, the corresponding list will be displayed here.
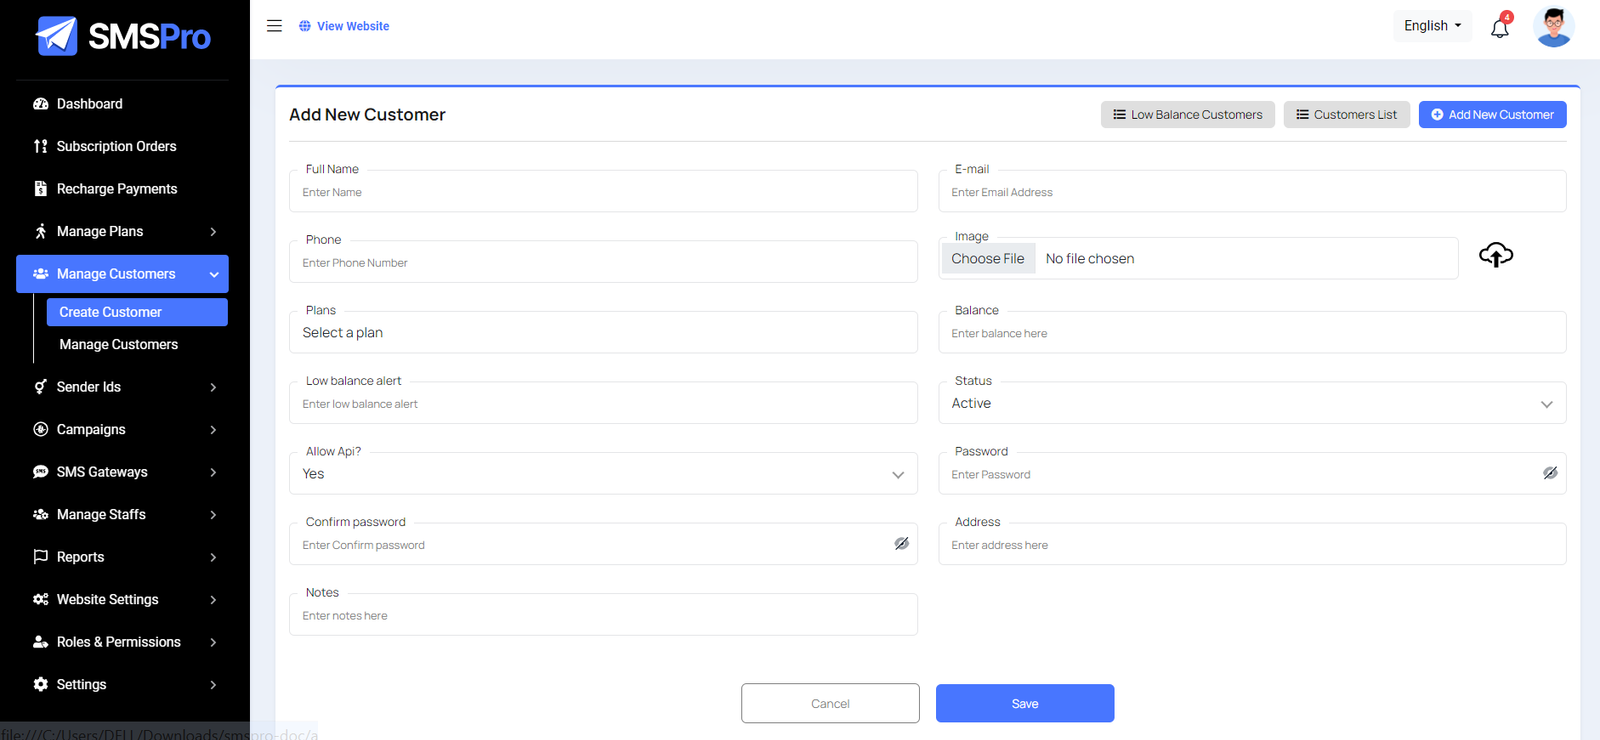
Create customer
Here, you can create a customer by filling out the required fields. Additionally, you have the option to add a plan for the customer.When you create a customer, their user credentials will be sent to their email address.
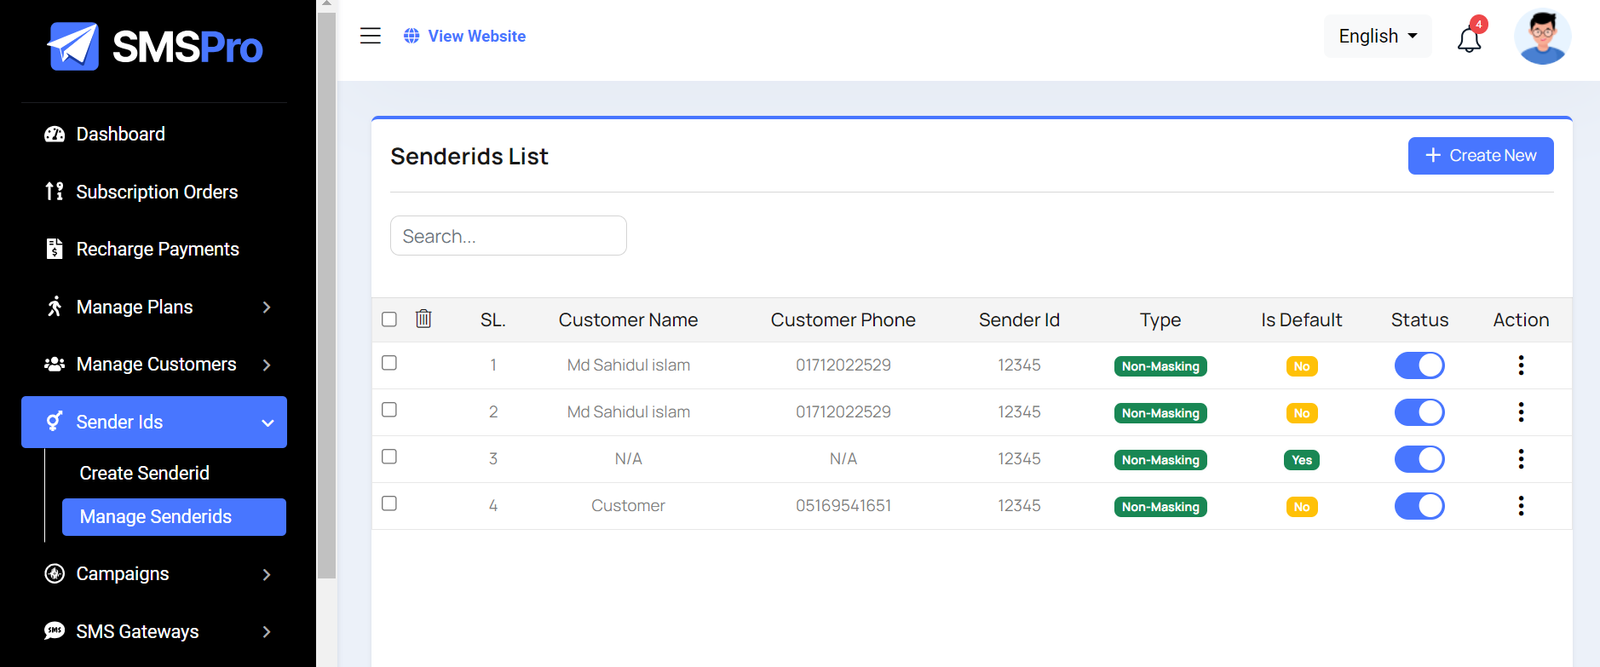
Senderids List
Here you can view a list of senders. You also have the option to search for specific senders and perform actions like editing, deleting, and multi-deleting.
Create Sender Id
You can create a sender Id by completing and selecting the fields you prefer.

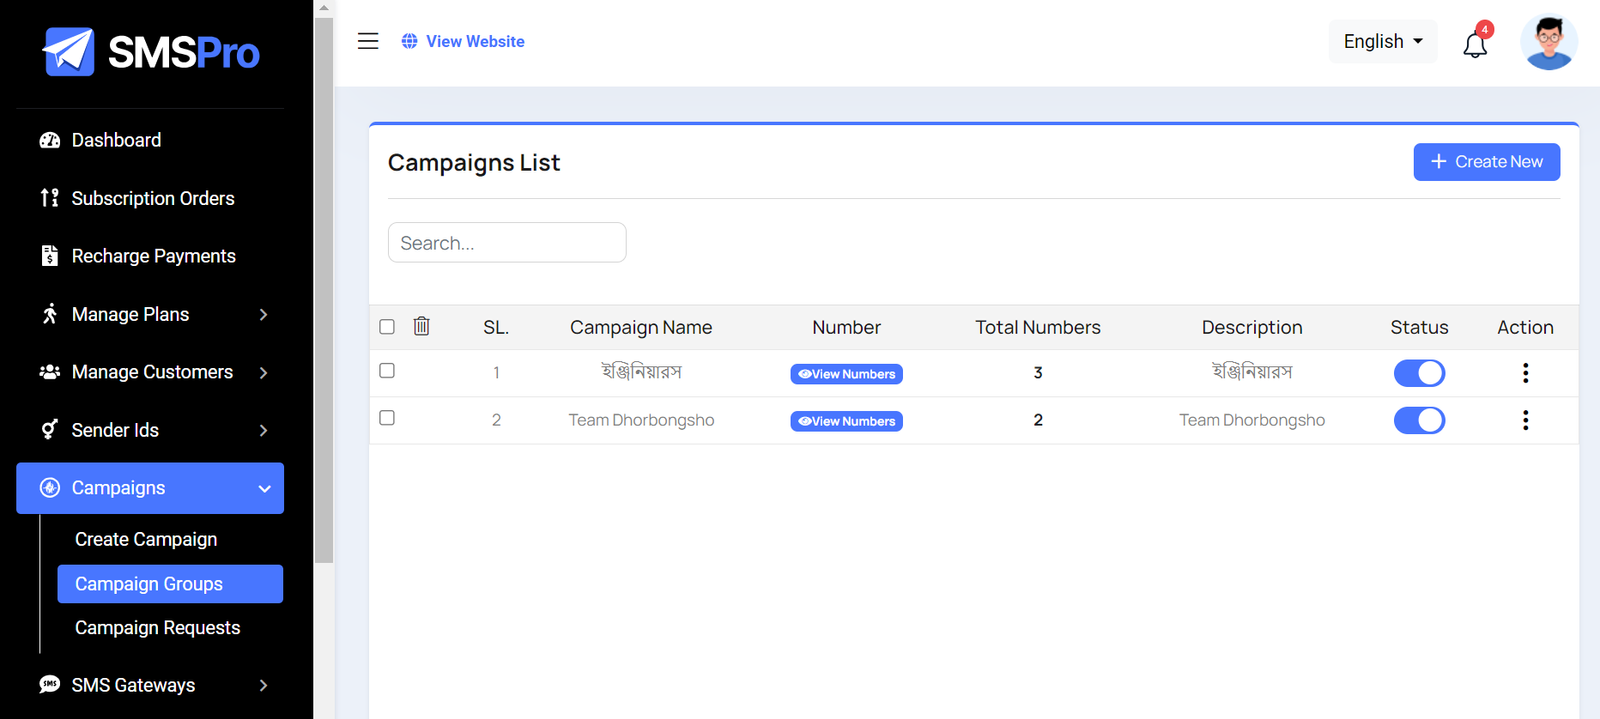
Campaigns List
Here, you can view the list of campaign groups and utilize the filter option for searching. Editing, deleting, and multi-deleting options are provided. Clicking on "View Numbers" allows you to see a list of numbers associated with each group.
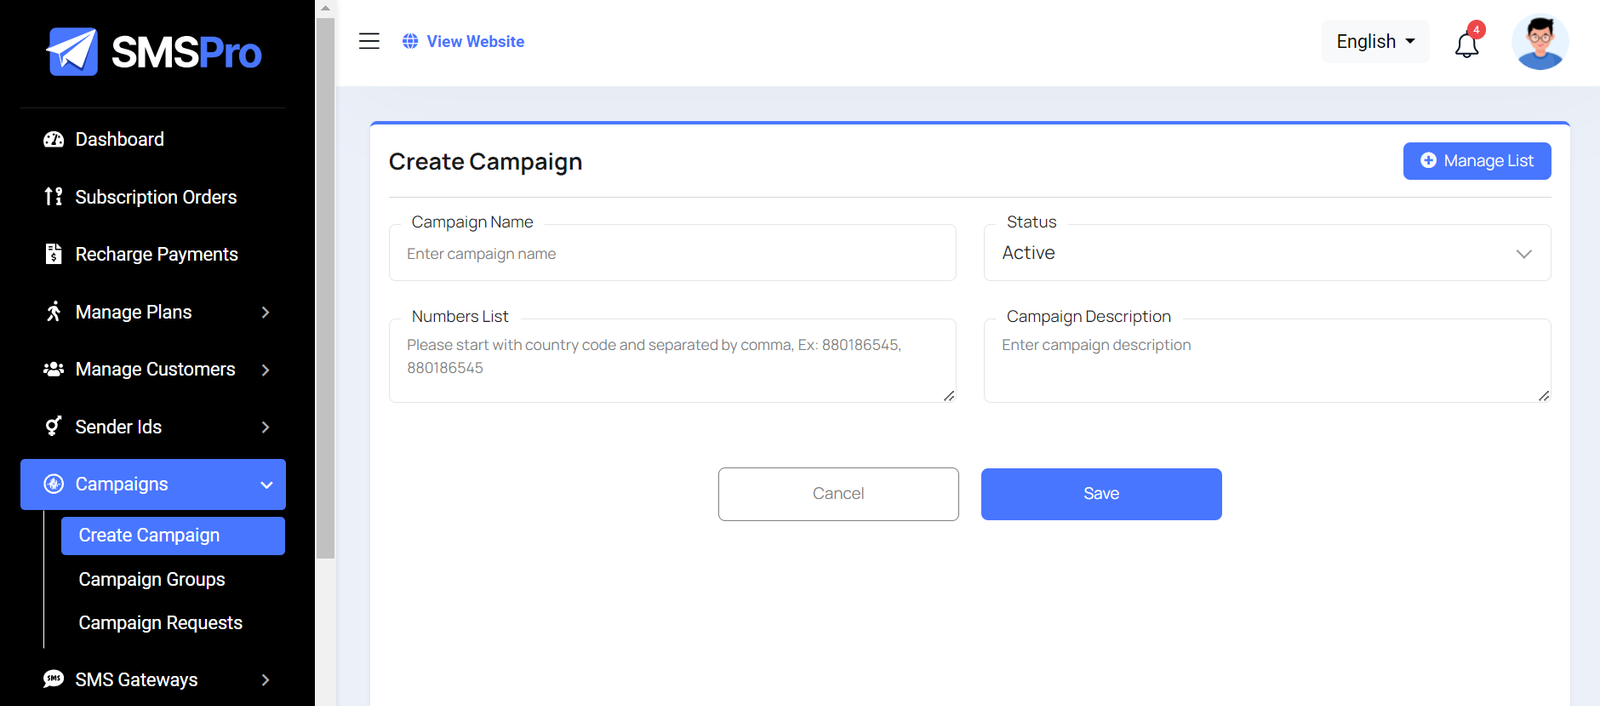
Create Campaign
You can generate a campaign here by completing the necessary fields. If you need to include multiple numbers, simply add a comma between each number.
Campaigns request history
Here, you'll find all campaign histories, and you can approve or reject the camping request. When you've approved the camping request, the amount will be deducted from the requested user's balance, and it will start sending messages to the campaign numbers through your gateways (Android Gateway/Api Gateway). You can learn more about sms gateways from here
SMS Gateways
Note: Please read this section carefully, as it is the most important part of this project.
Api Gateway List
In this section, you can access a list of APIs with a search filter, and you also have the option to edit or delete them.

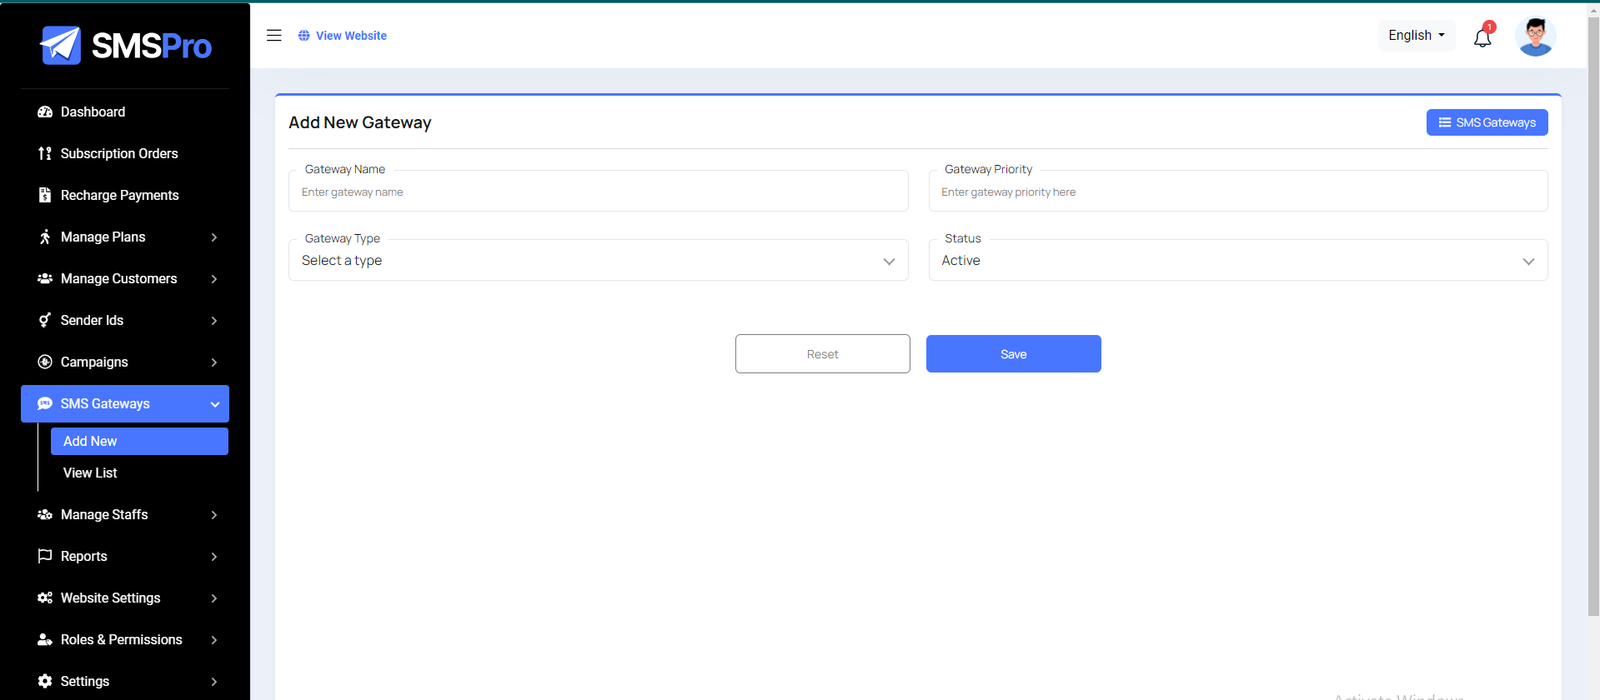
Create Api Gateway
In this segment, you can create a new API gateway. Please note that the gateway name must be unique. In this section, the Gateway Type field is the most important. We'll discuss this field in detail below.
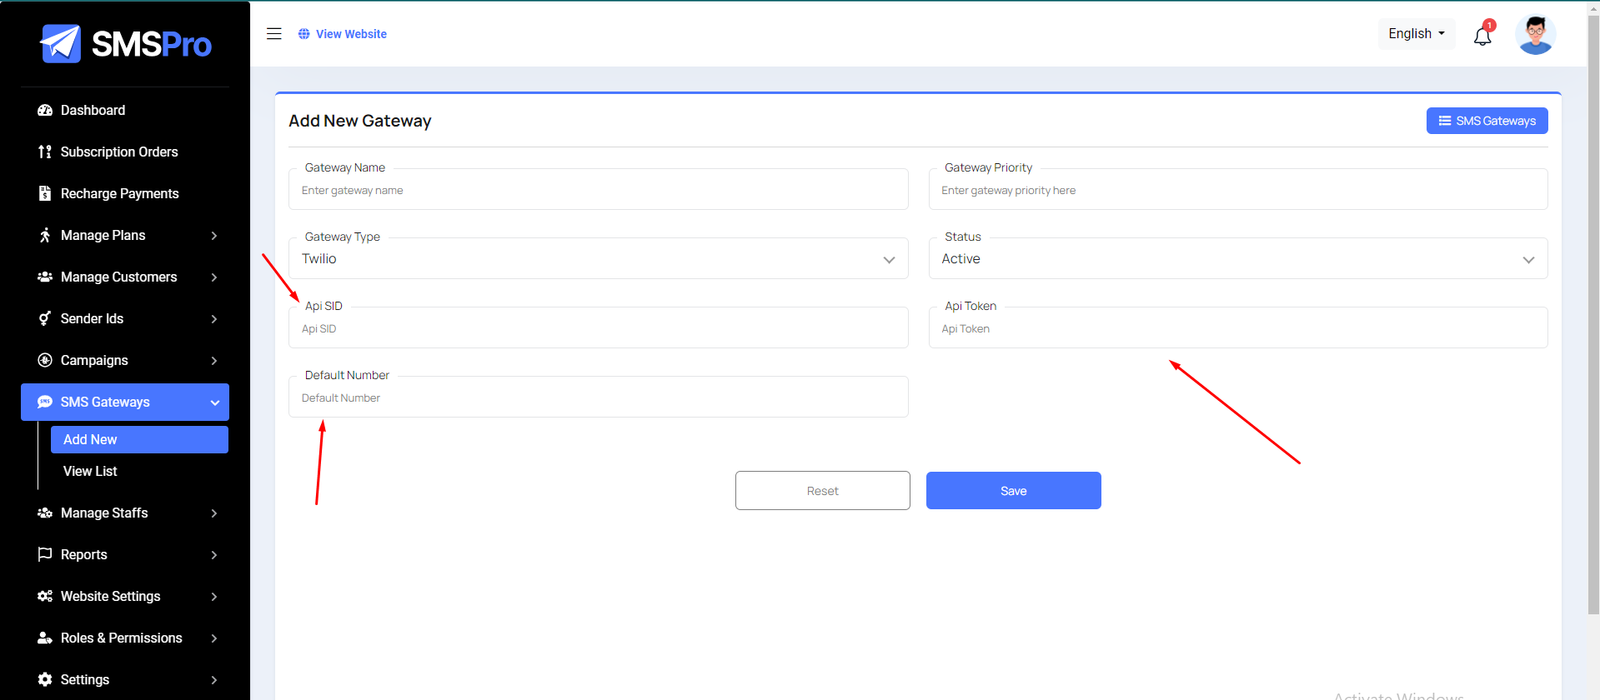
Gateway Type
When you create a new API gateway, you must select the gateway type. After selecting the gateway type, complete the necessary fields. Please check the image below. When we select a Twilio gateway, the required fields for the Twilio API will be displayed.
Reports
Here you can access various reports along with a search filter.
Quick SMS Report
Here, you'll found all quick sms histories
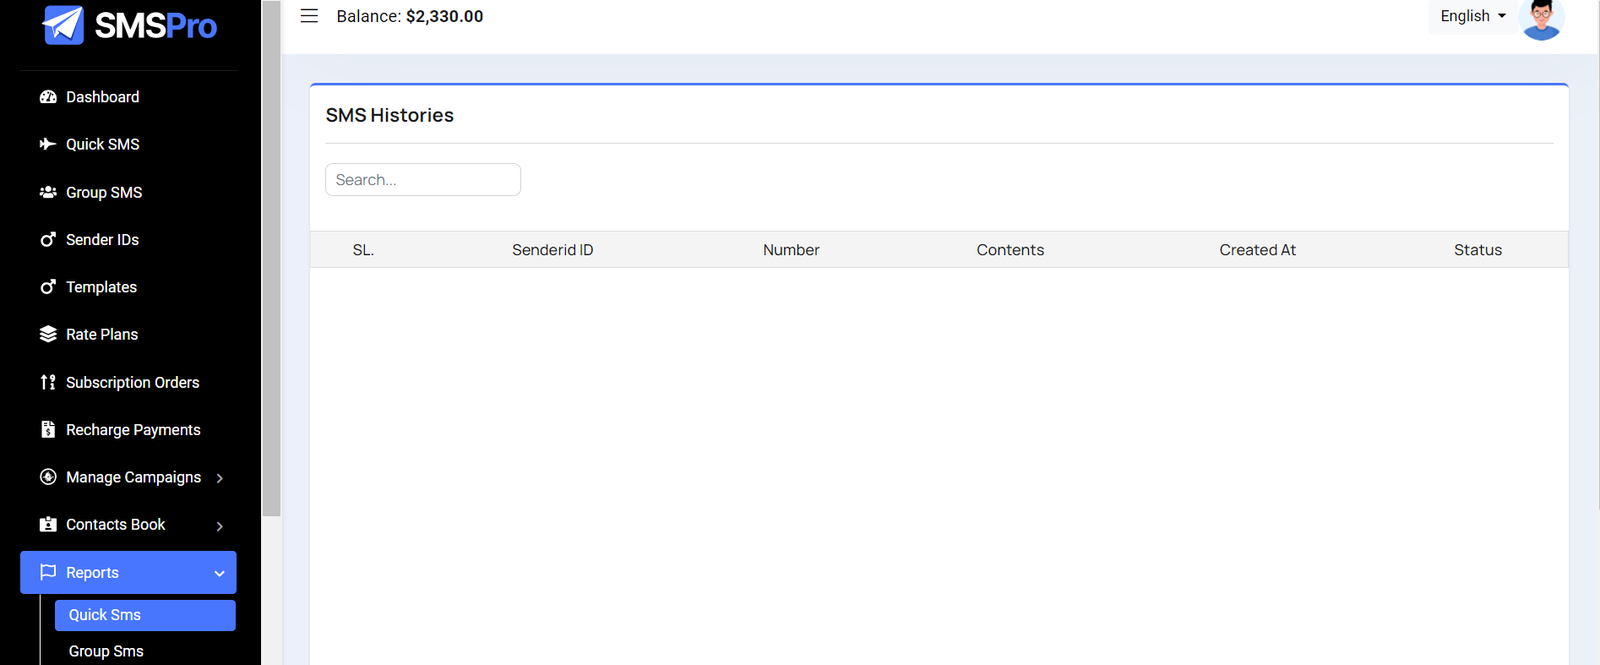
Group Sms Report
Here, you'll found all group sms histories
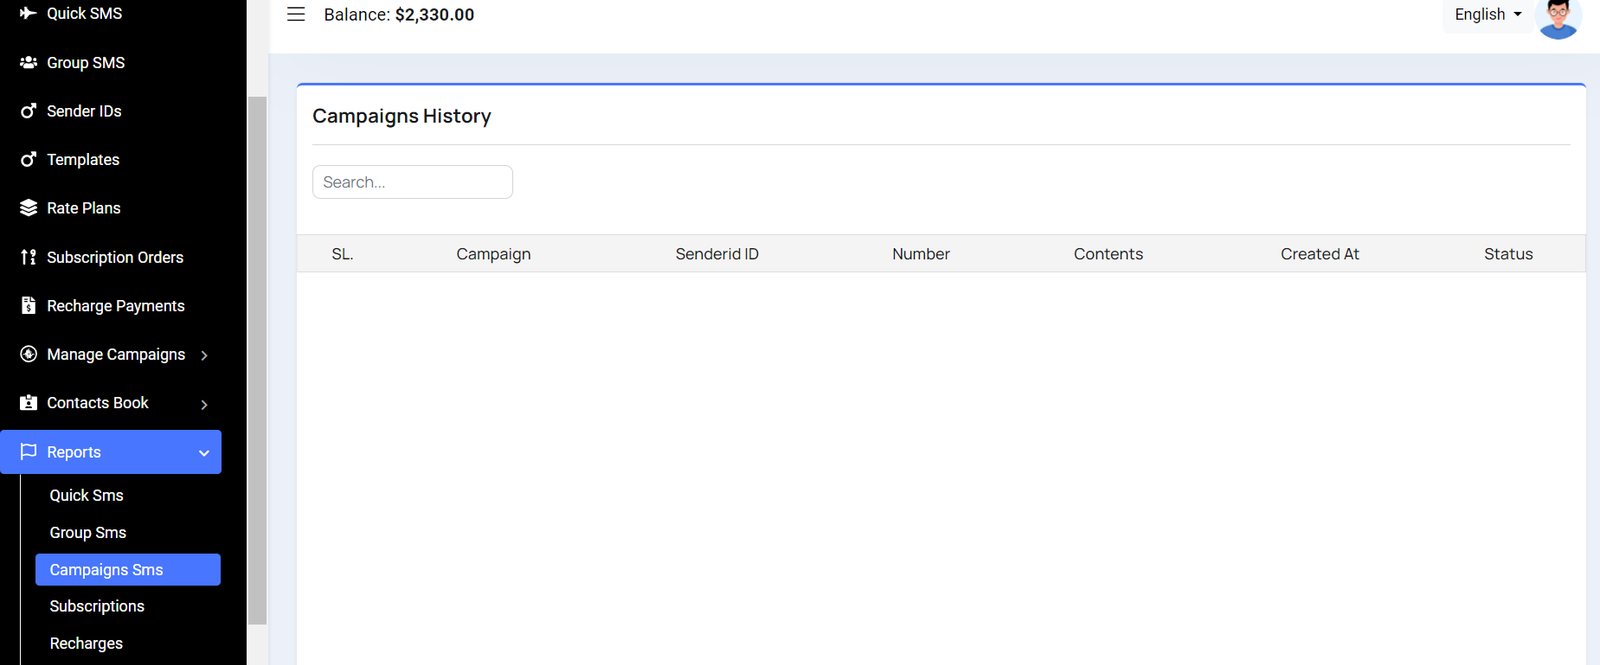
Campaigns Requests Report
Here, you'll found all campaigns requests sms histories
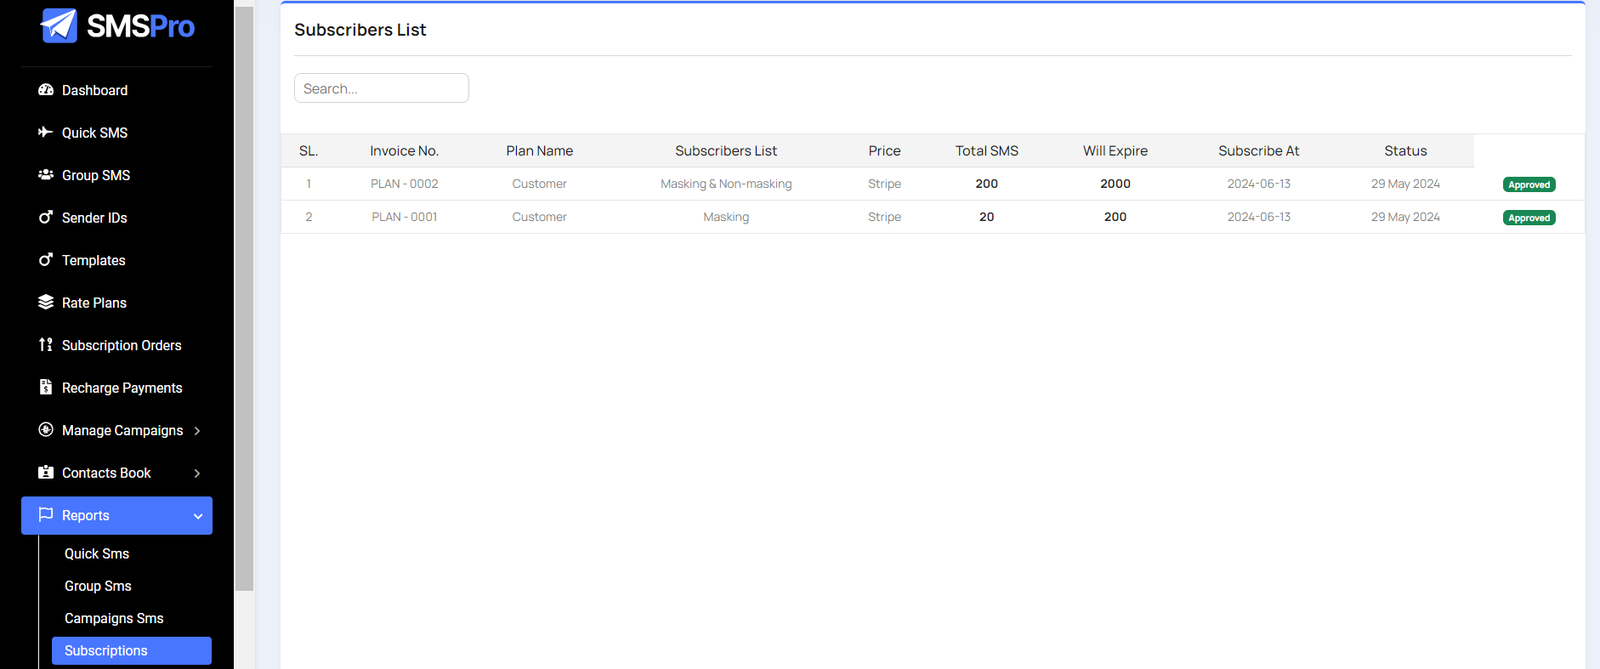
Subscribers Report
Here, you'll found all subscriptions histories
Recharges Report
Here, you'll found all recharges histories
Transactions Report
Here, you'll found all transactions histories
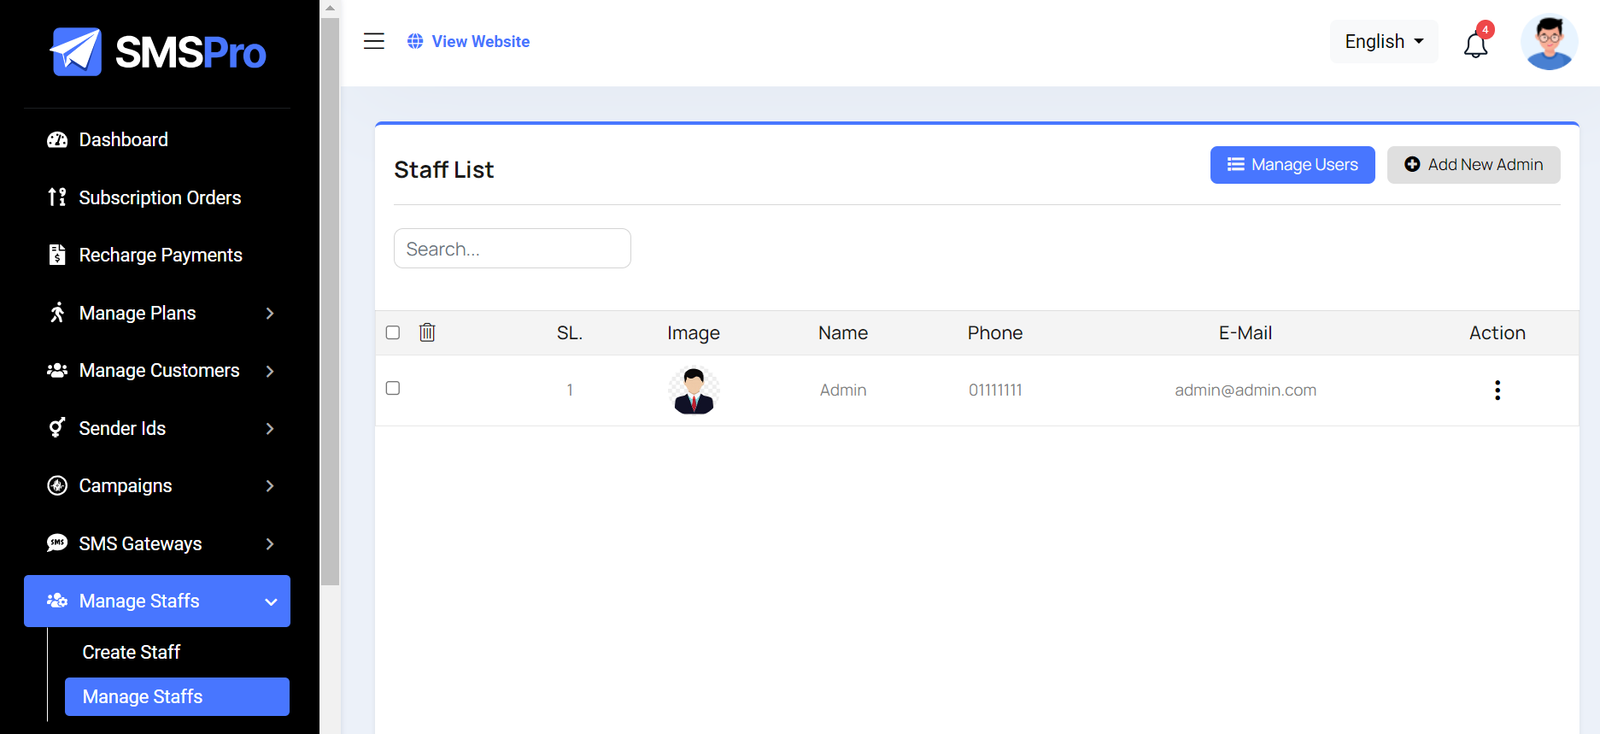
Staff List
Here, you can view the list of staff members along with a search filter. Additionally, you have the option to edit, delete individual entries, and perform multi-delete operations.
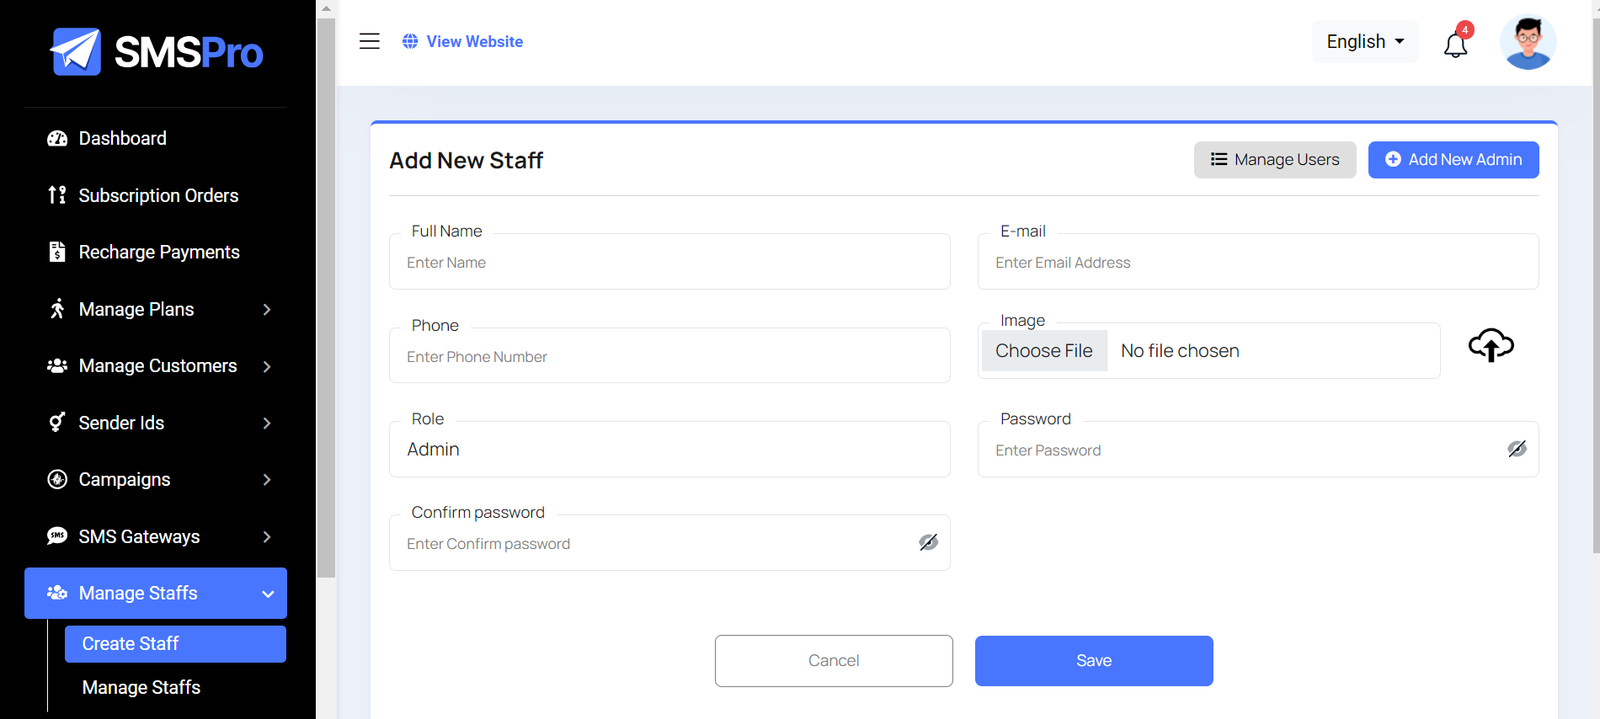
Create Staff
You can create a staff member here by completing the necessary fields.
Website Settings
Here you have the ability to perform various actions including handling pages, FAQs, testimonials, and services.
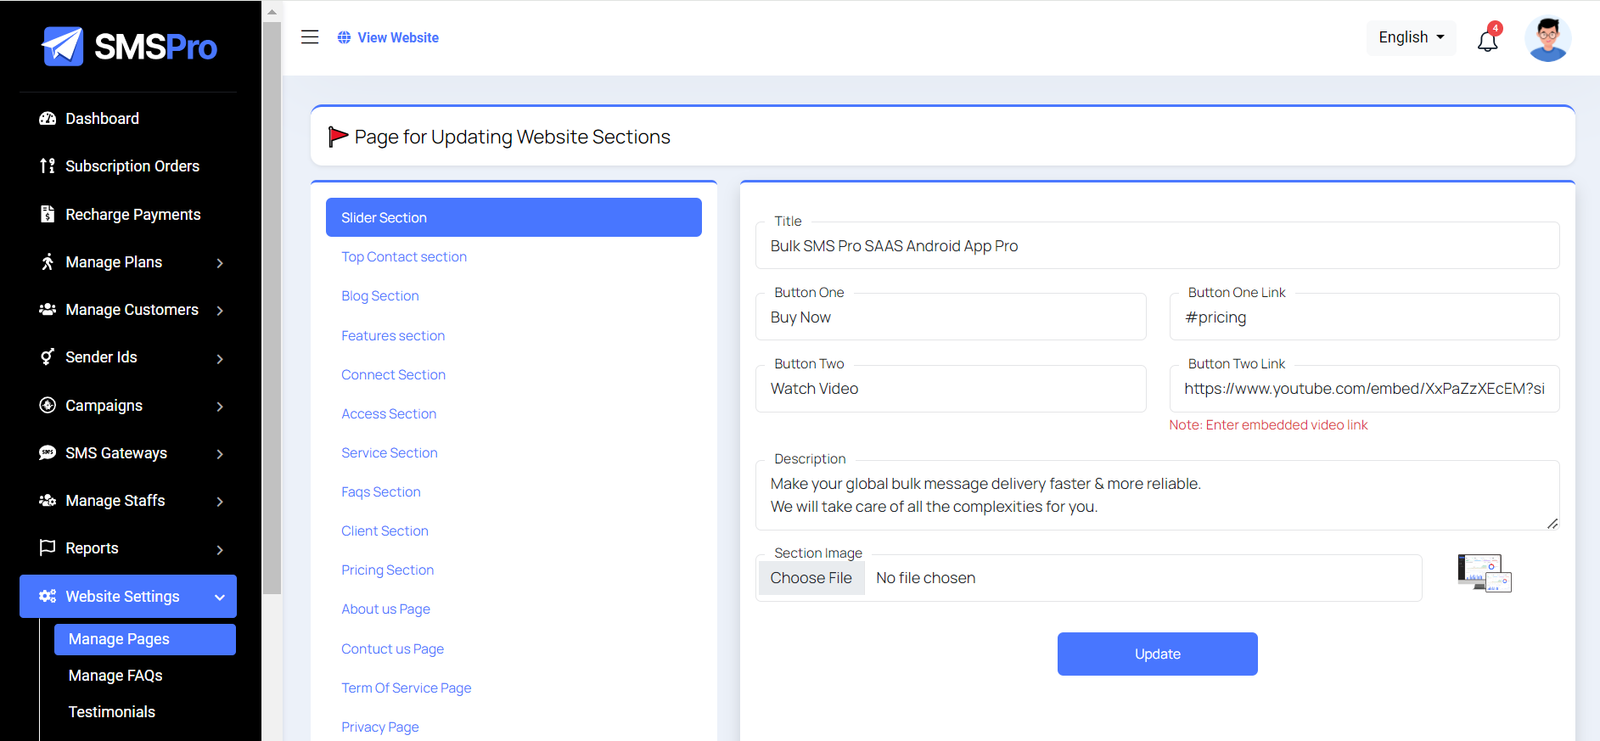
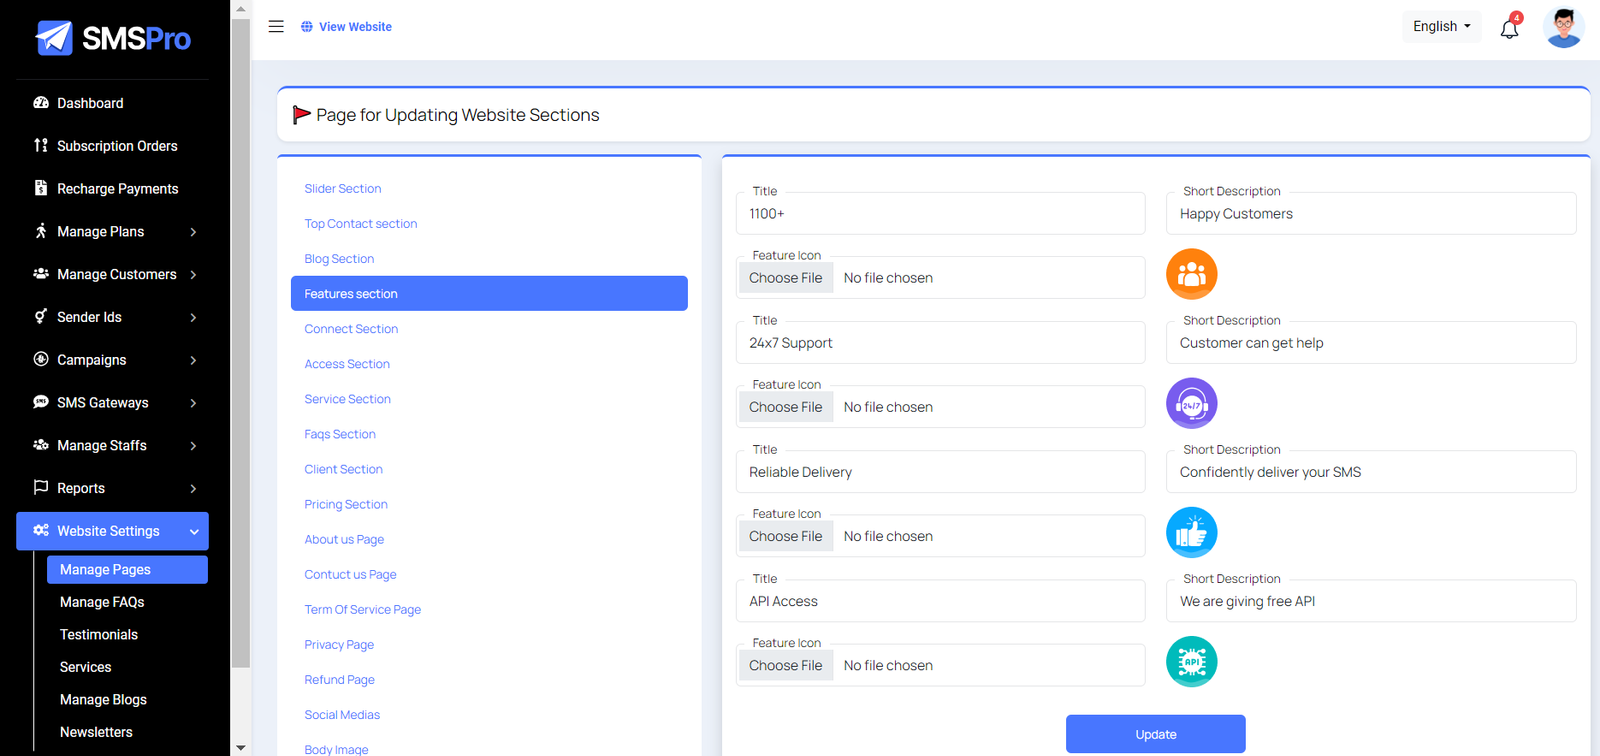
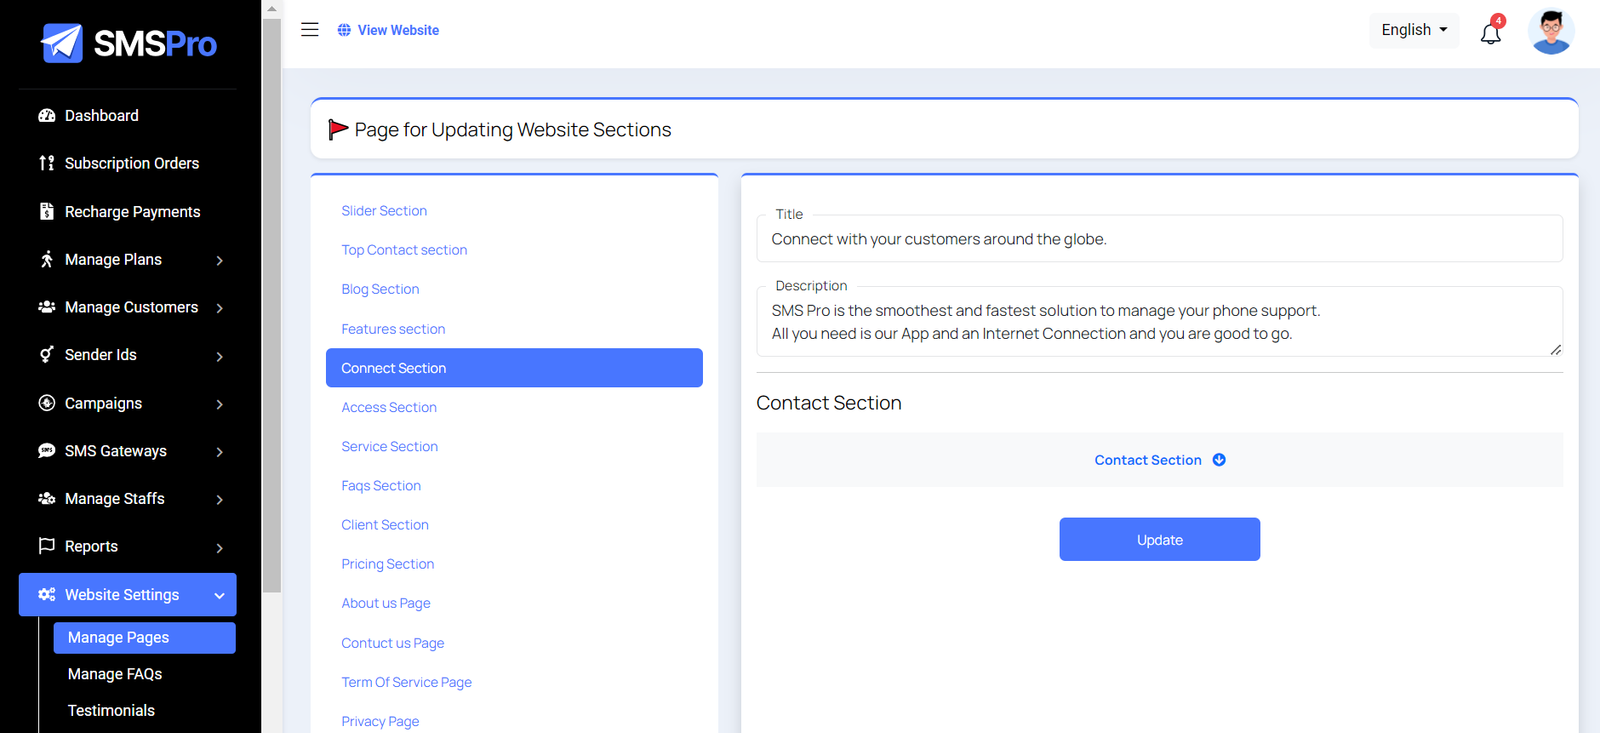
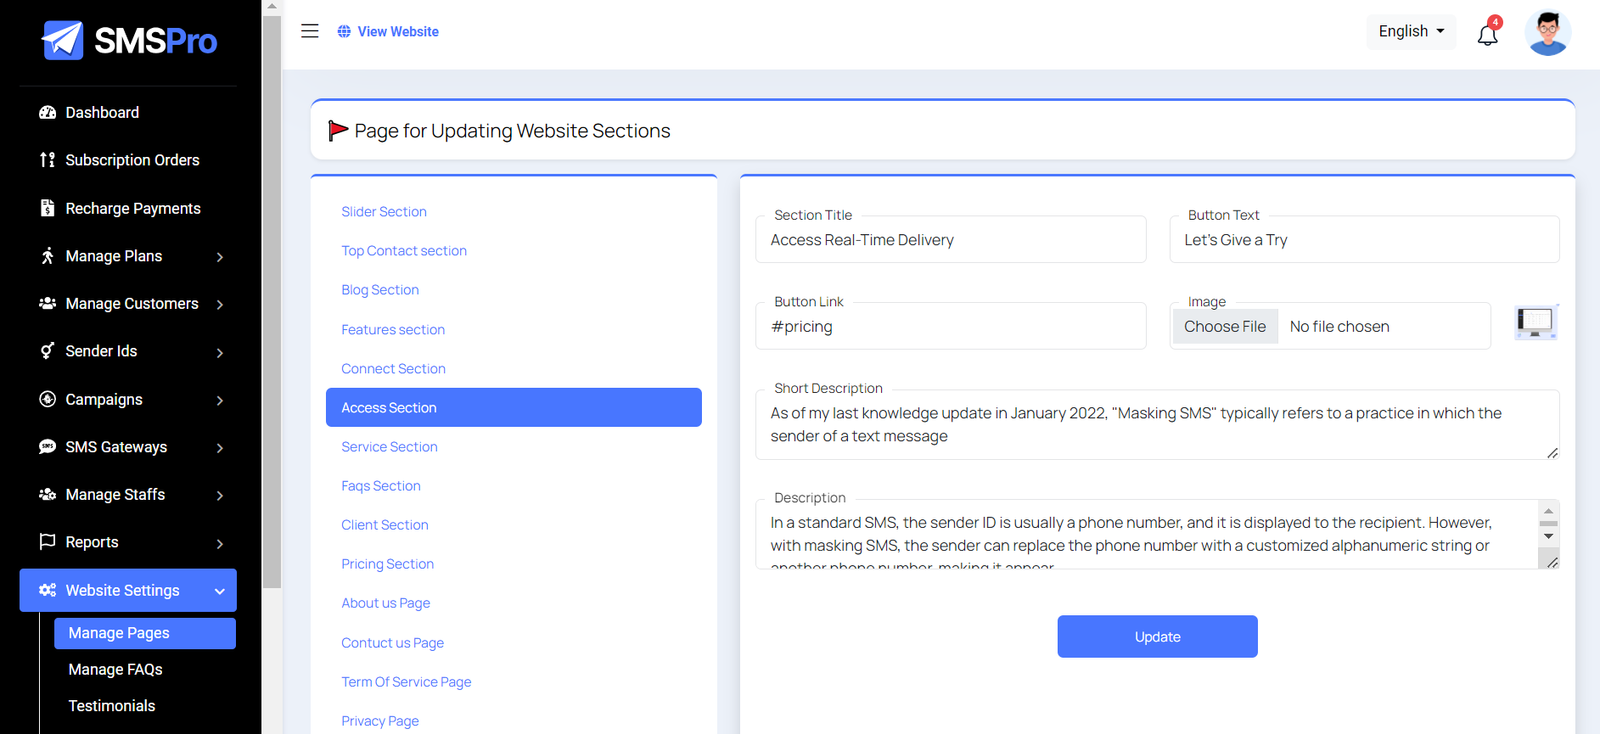
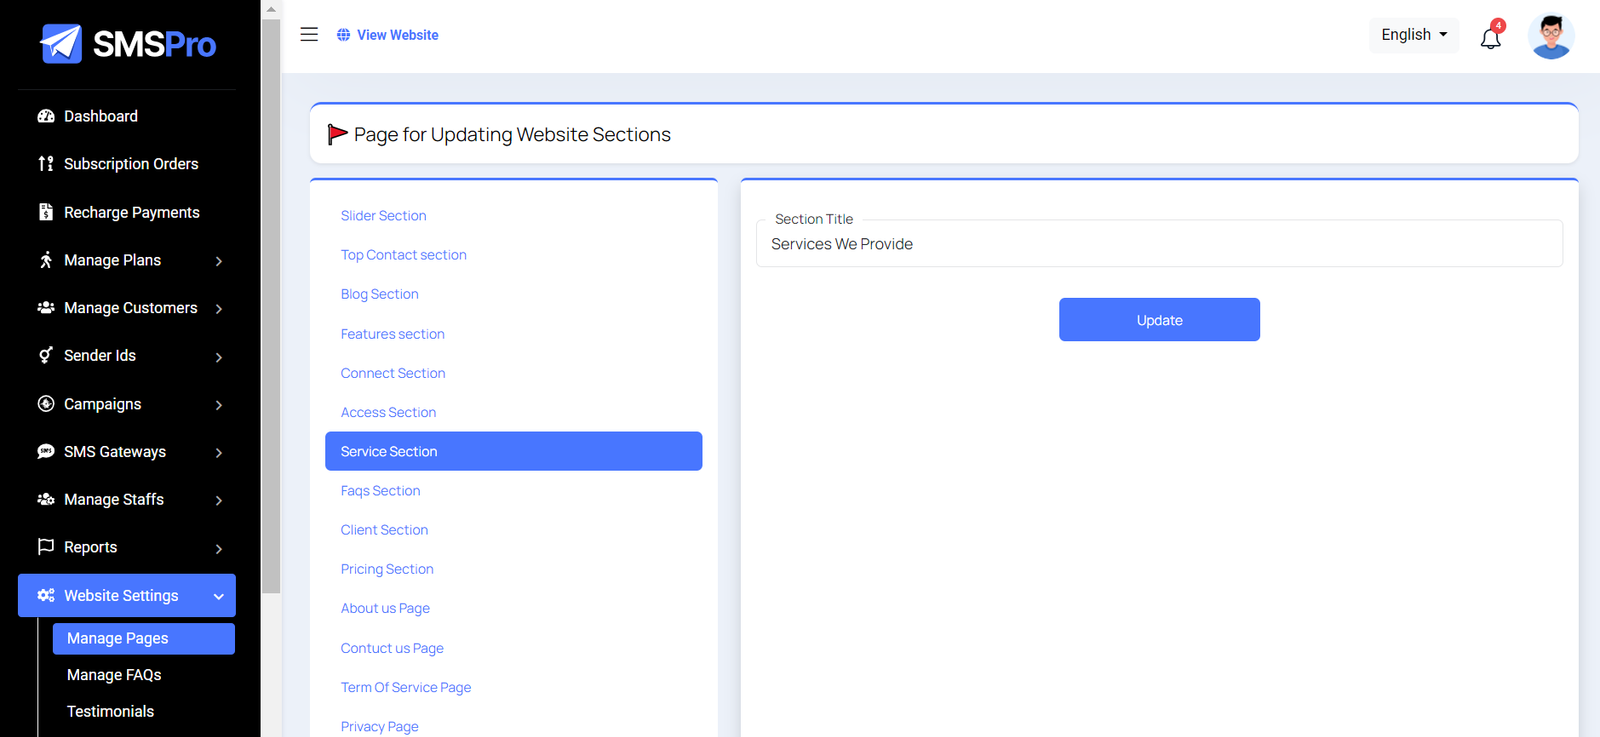
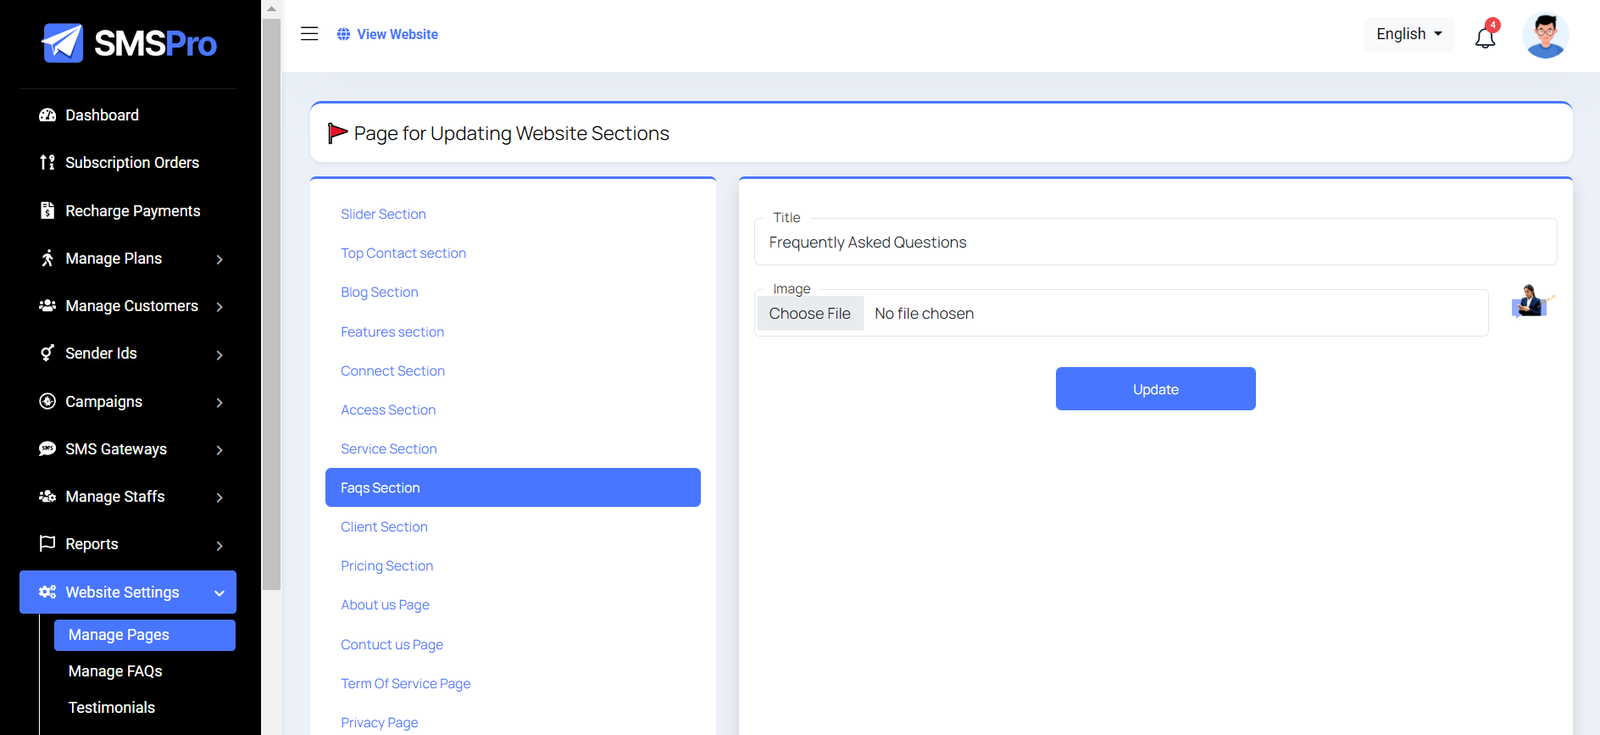
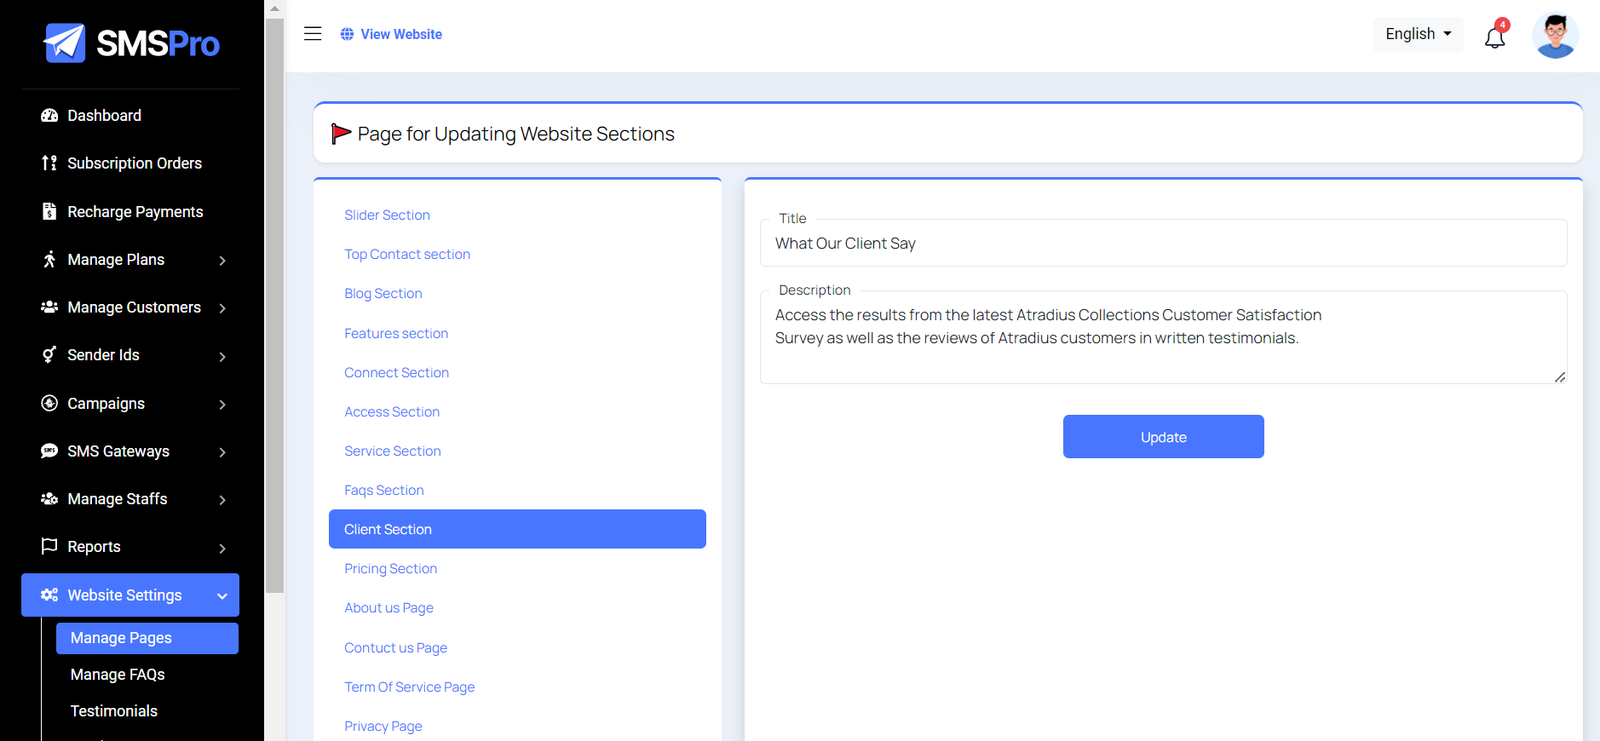
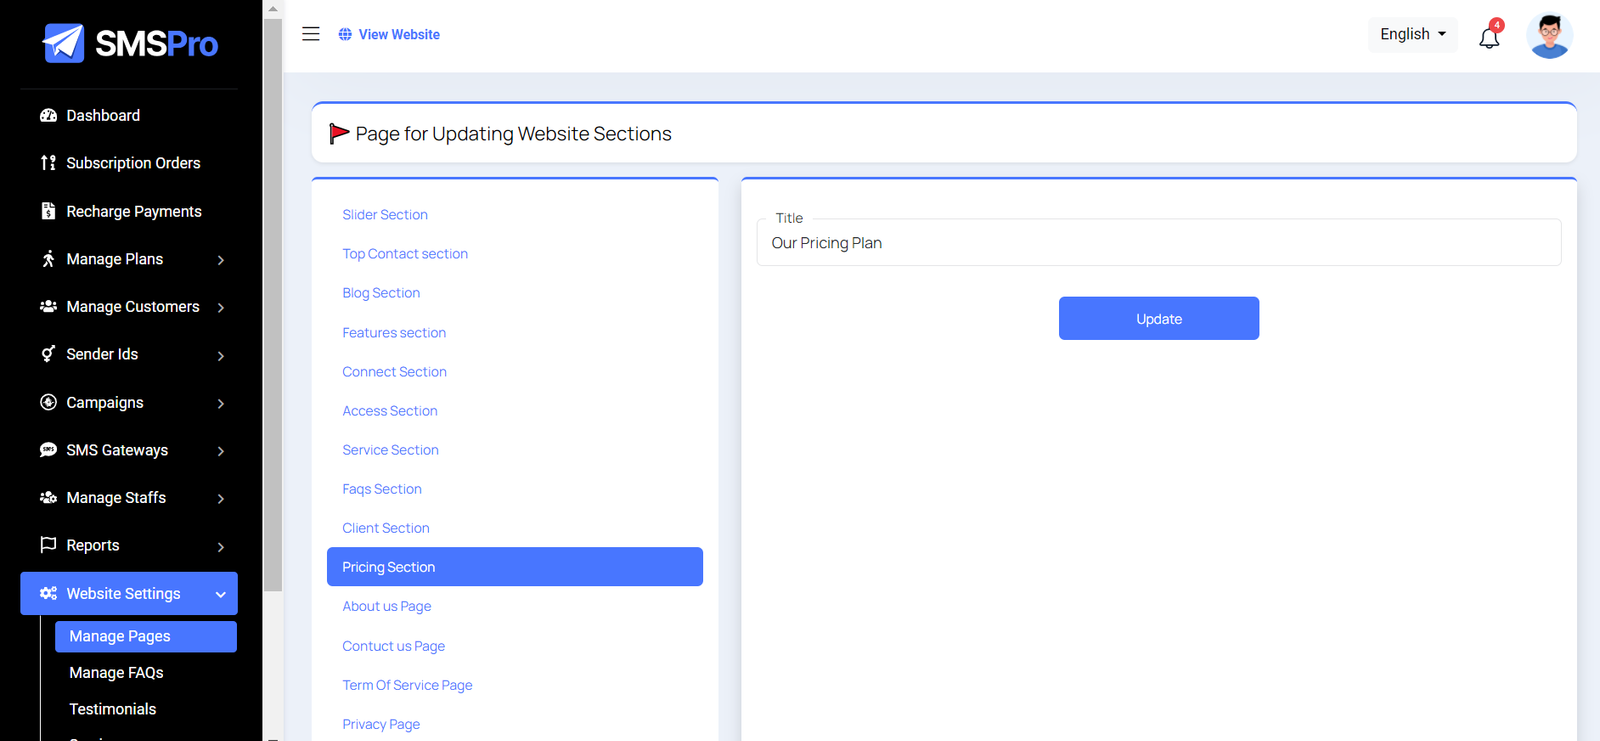
Manage Pages
You can modify various sections of the pages, including the slider, features, connections, accessibility, services, FAQs, clients, and pricing.
Faq List
Here you have the ability to view, update and delete faq list. Also search and multidelete option availabel here.

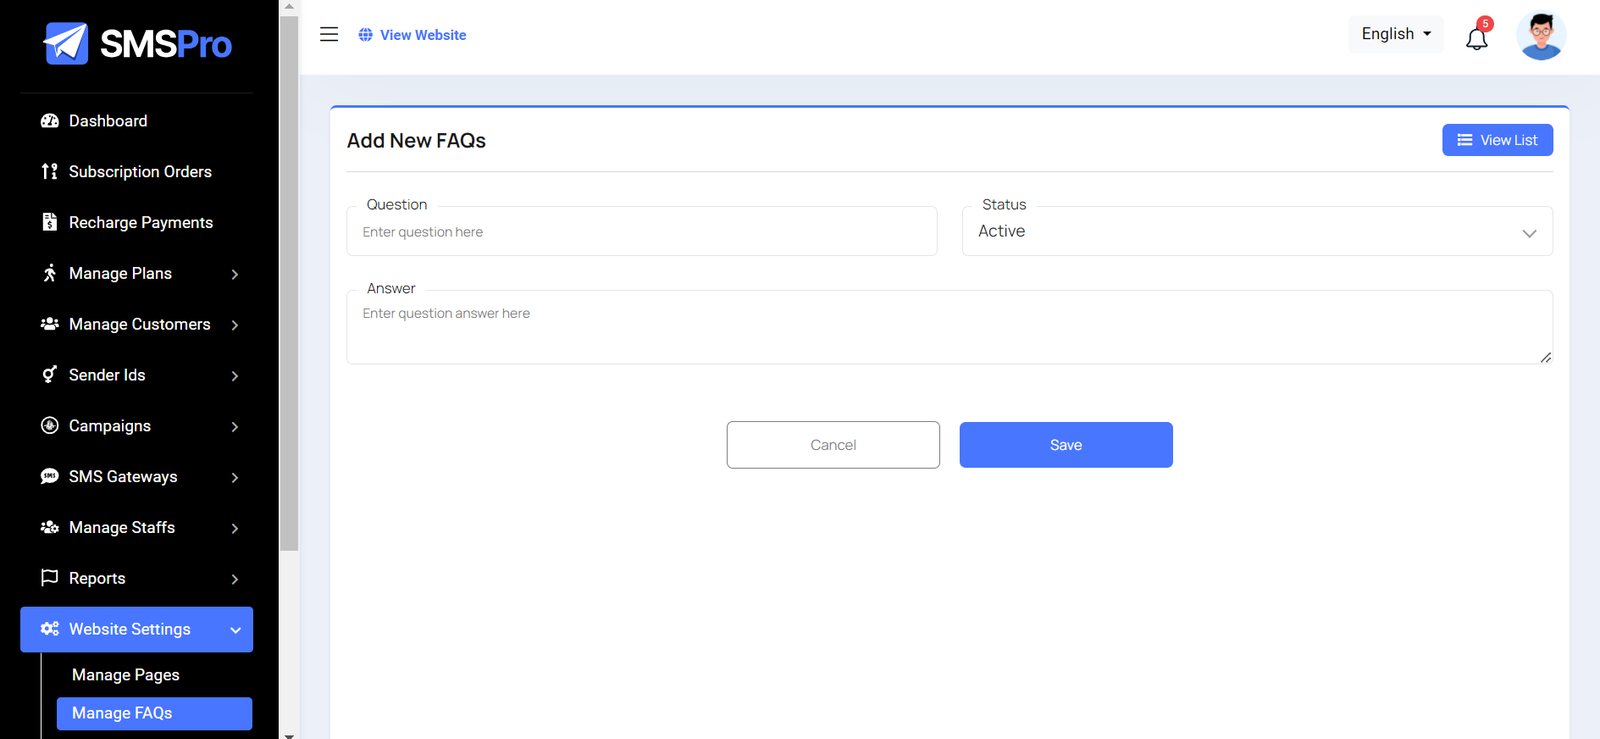
Create Faq
Here you can create Faq by fill up follow field.
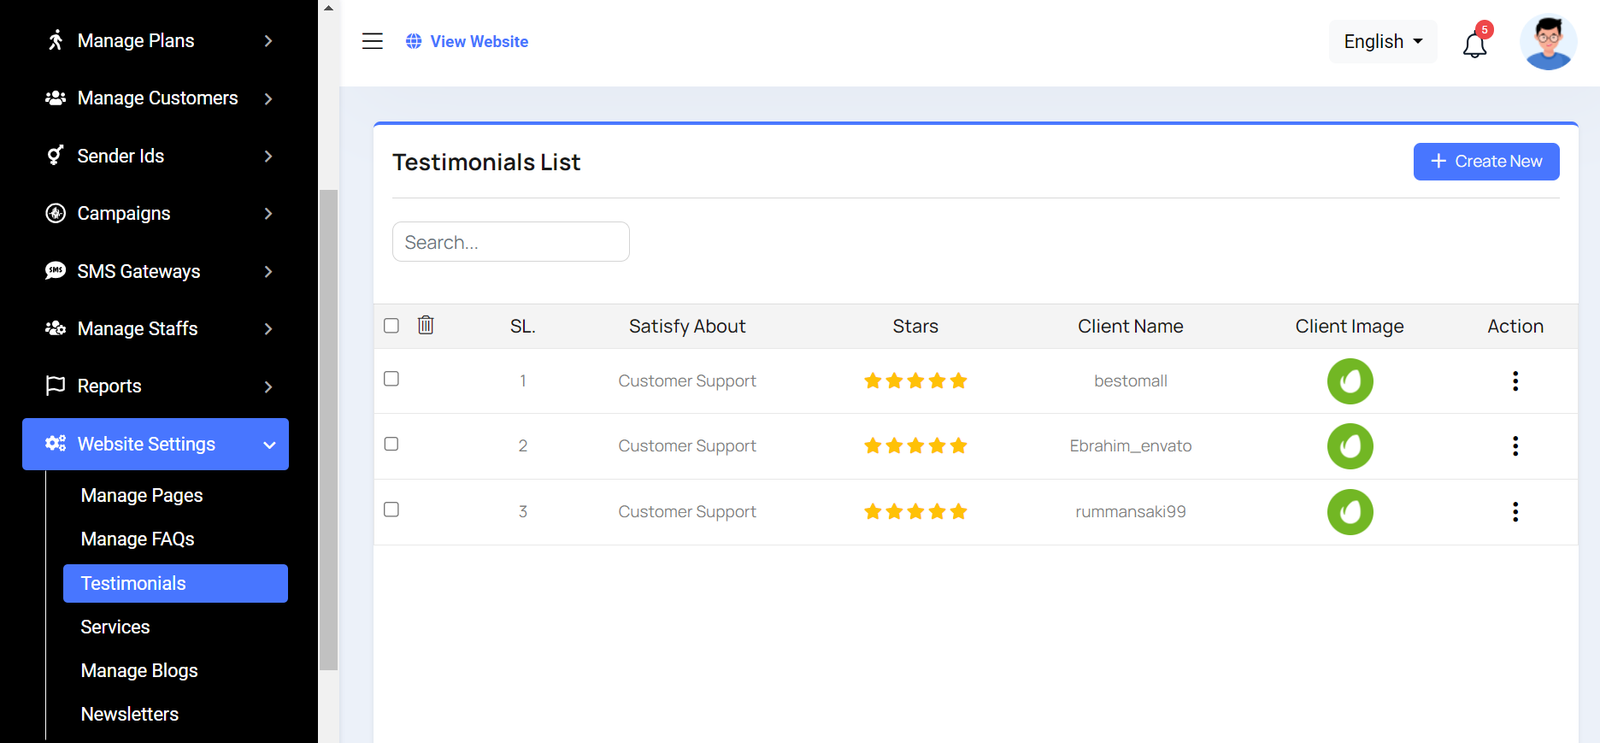
Testimonial List
Here you have option to see testimonial list and with update and delete option available. Also search and multi-deleting option exist.
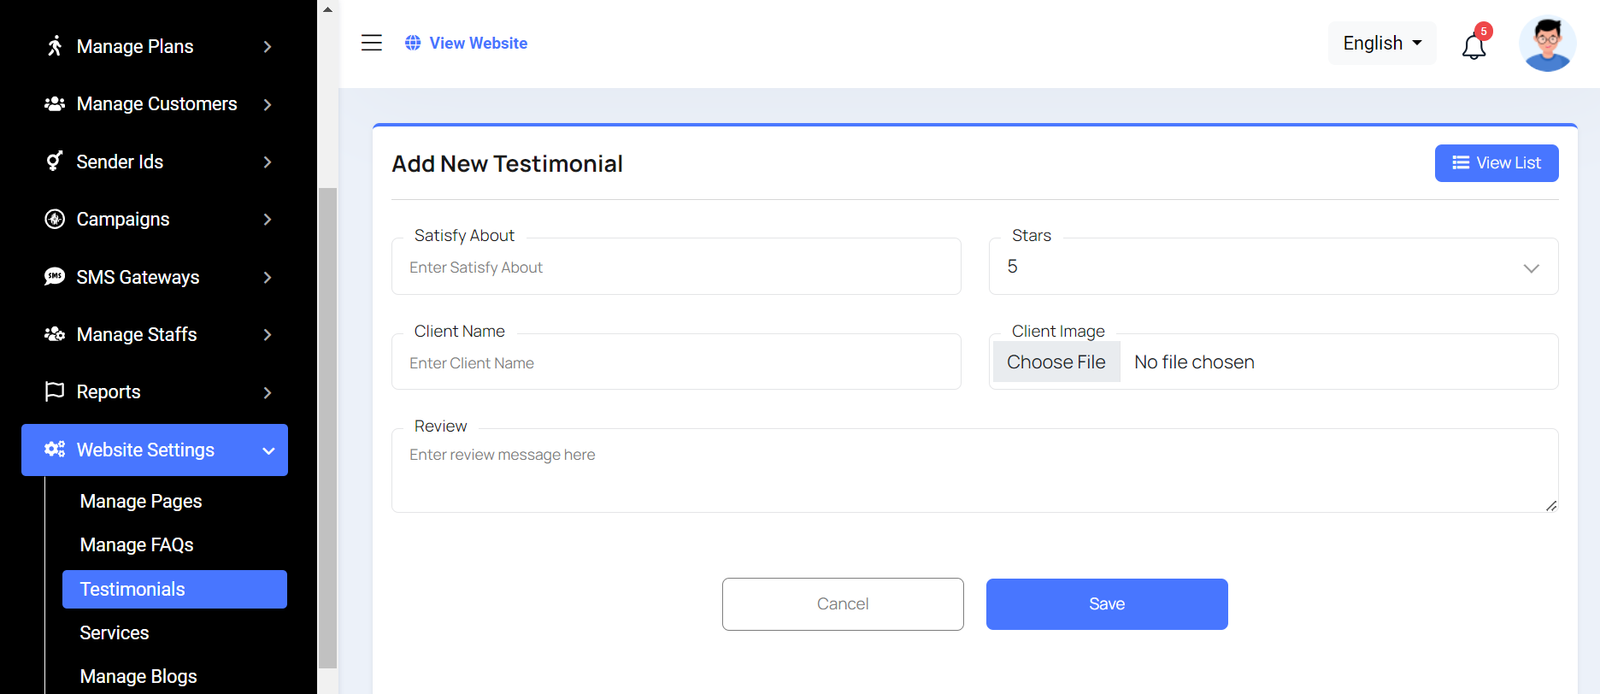
Create Testimonial
Here you create Testimonial to fill required field.
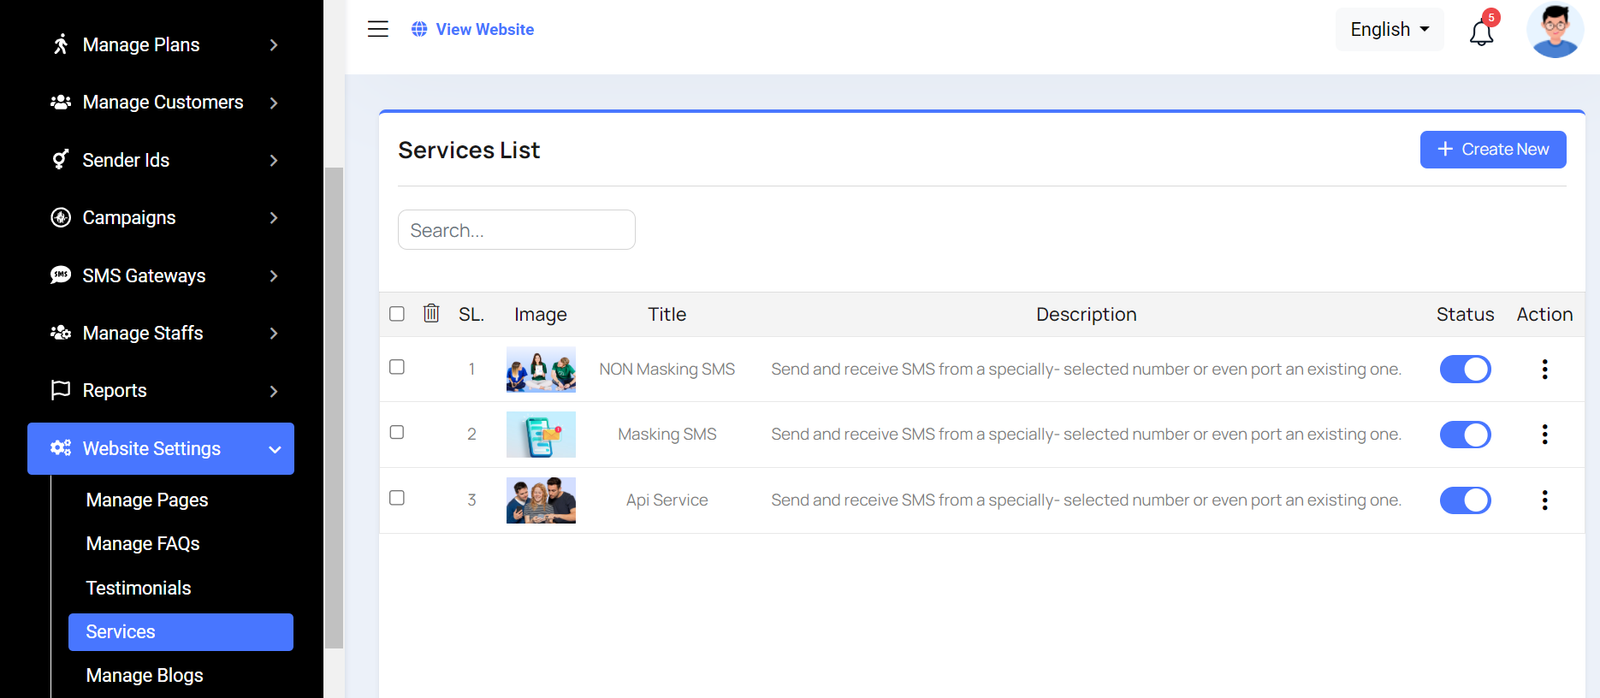
Service List
Here you have option to see service list and with update and delete option available. Also search and multi-deleting option available.
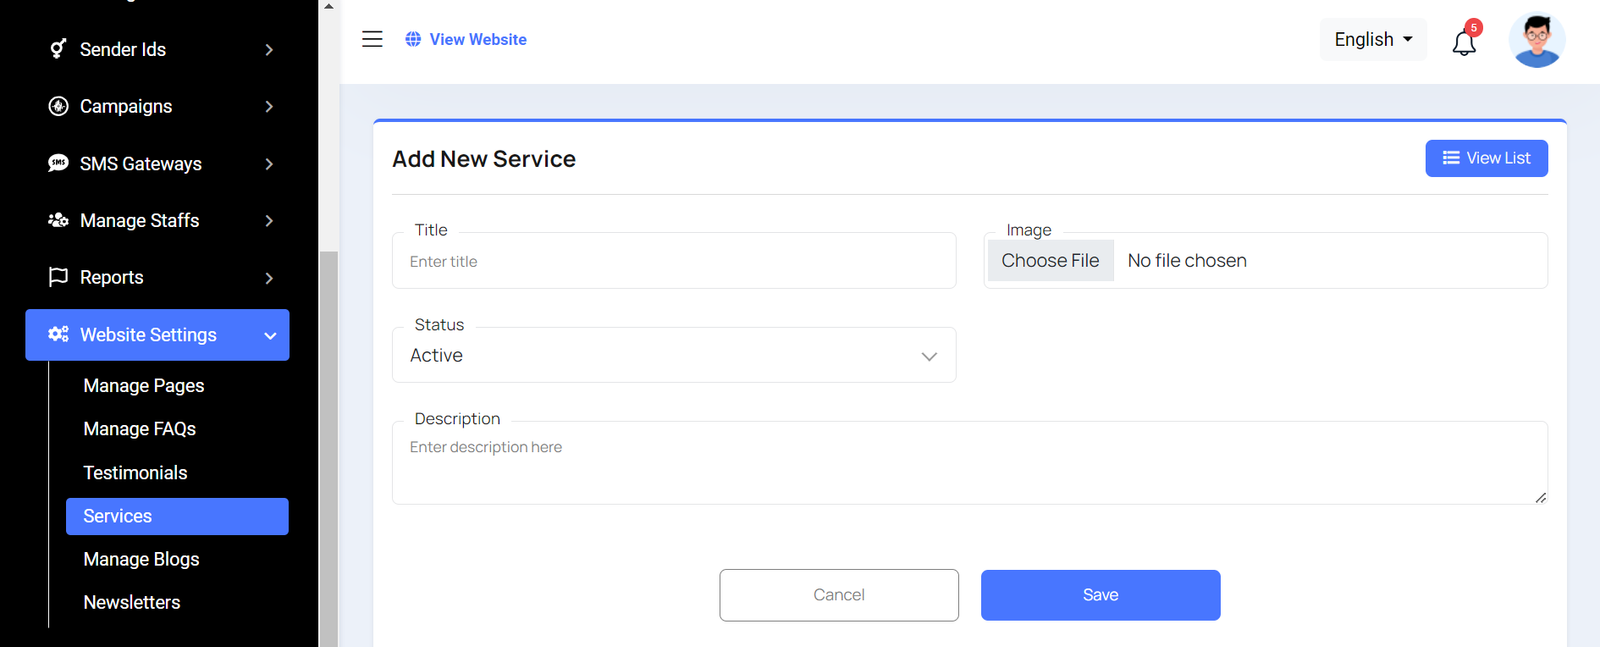
Create Service
Here you can create service to fill-up required field.
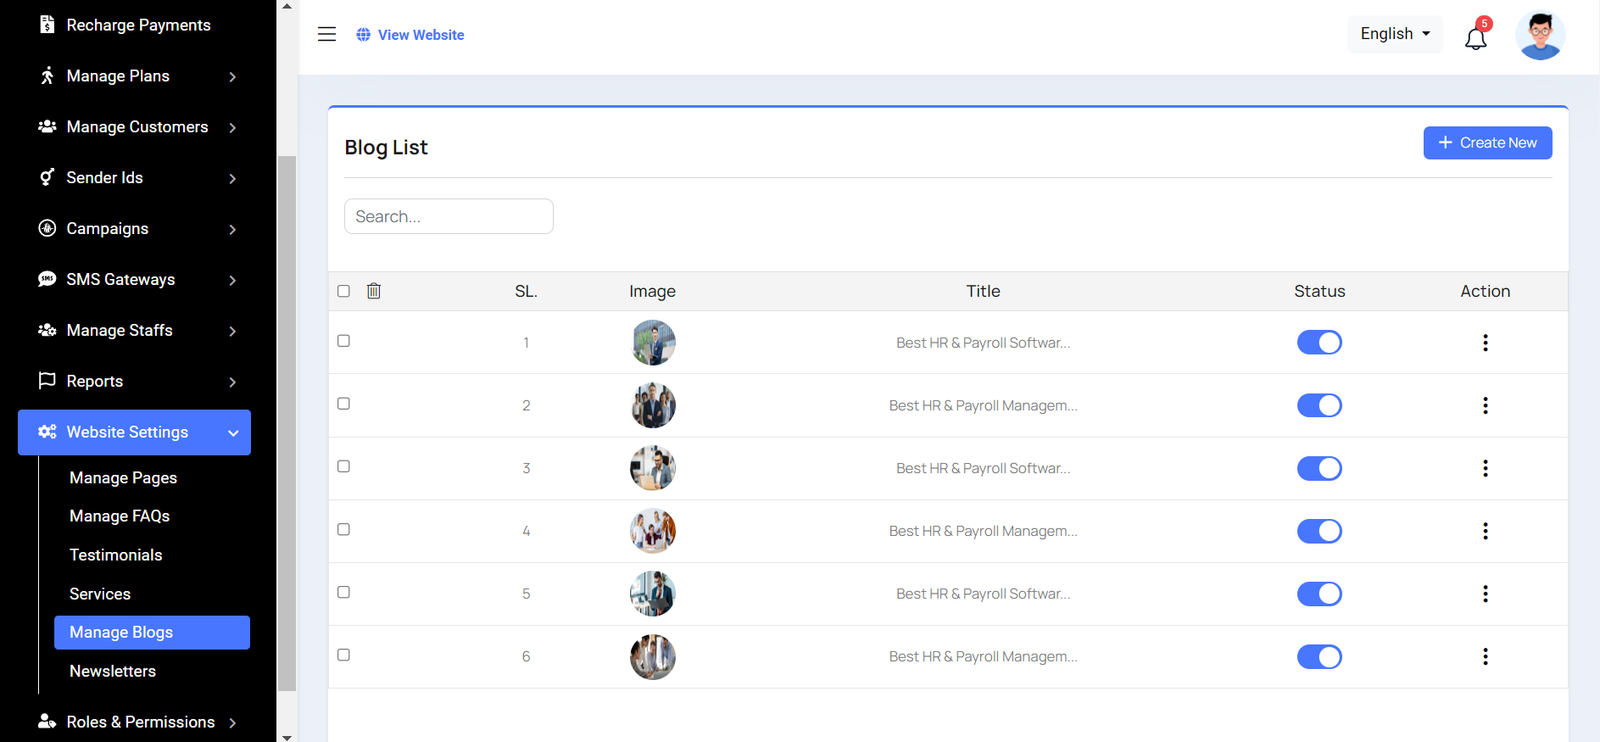
Blog List
Here you have the option to view the blog and comment lists. Additionally, editing and updating options are available. You can also search for specific items, and multi-delete functionality is also provided.
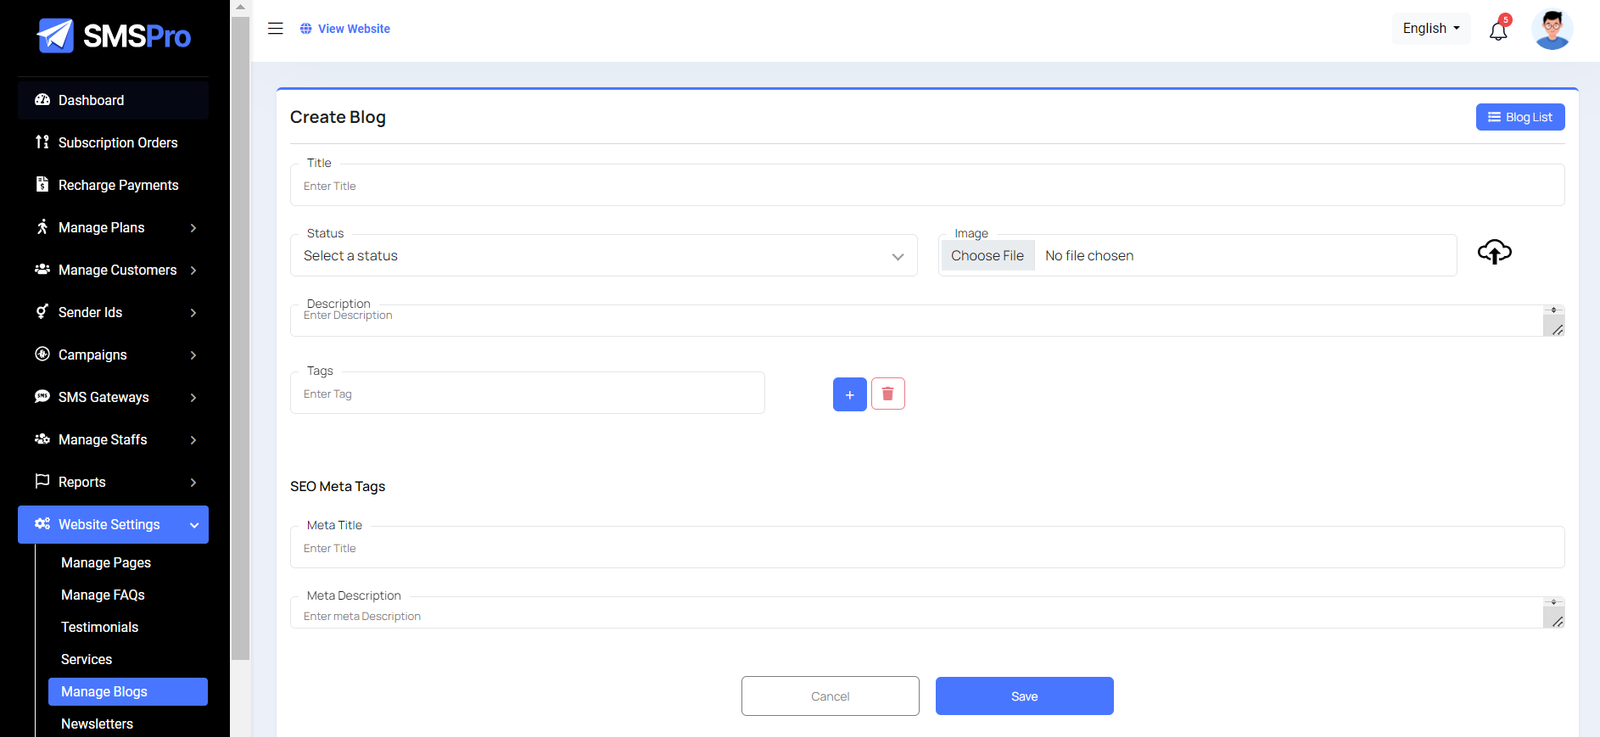
Create Blog
Feel free to utilize this platform to generate a blog post and complete the necessary fields. As you input your content, you'll notice the inclusion of multiple tags. Additionally, you can craft meta titles and meta descriptions for enhanced SEO purposes.
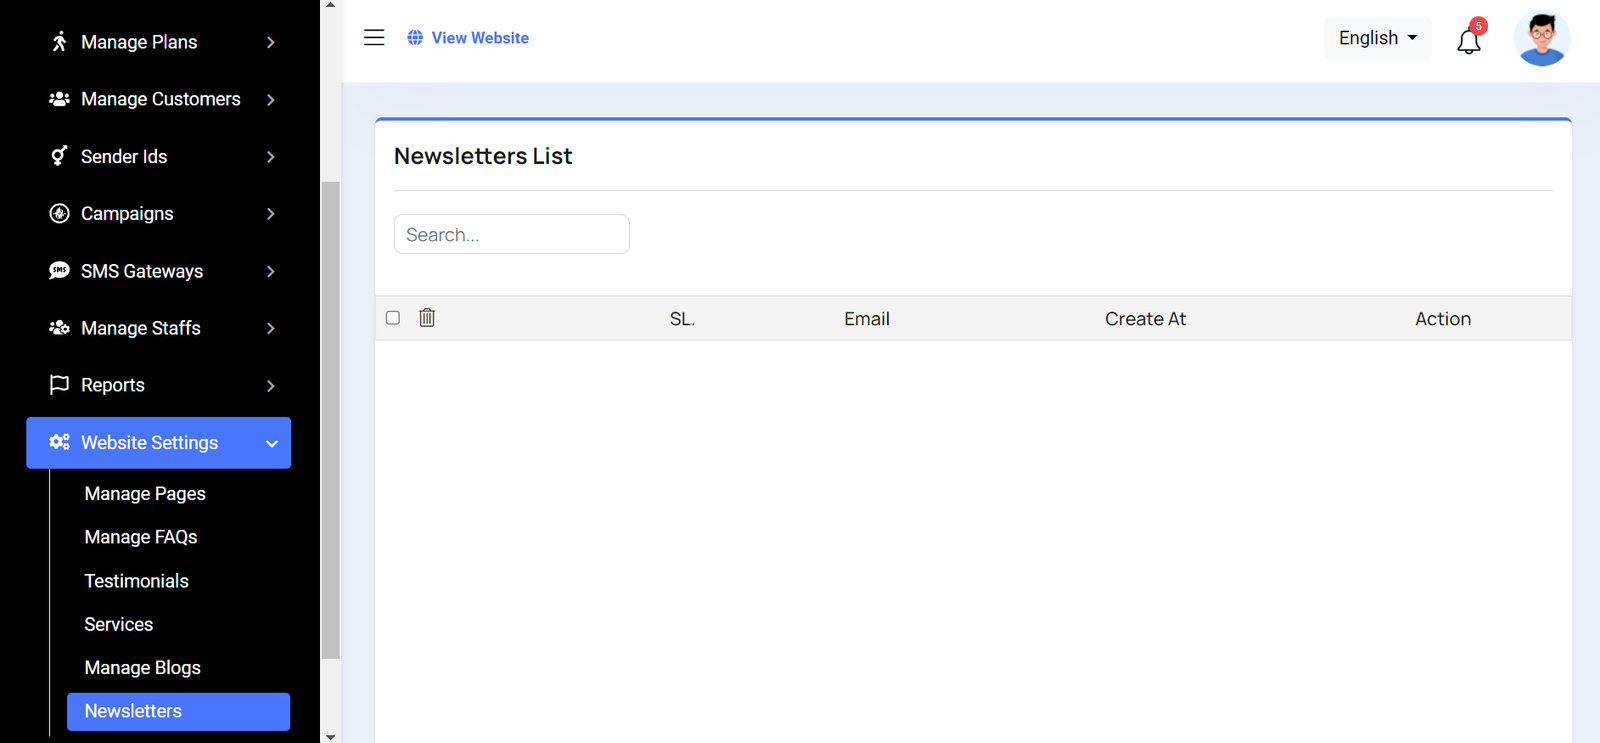
Newsletters List
Here you will able to see nesleteer list also delete and search option are availabe.From frontend user will send this email.
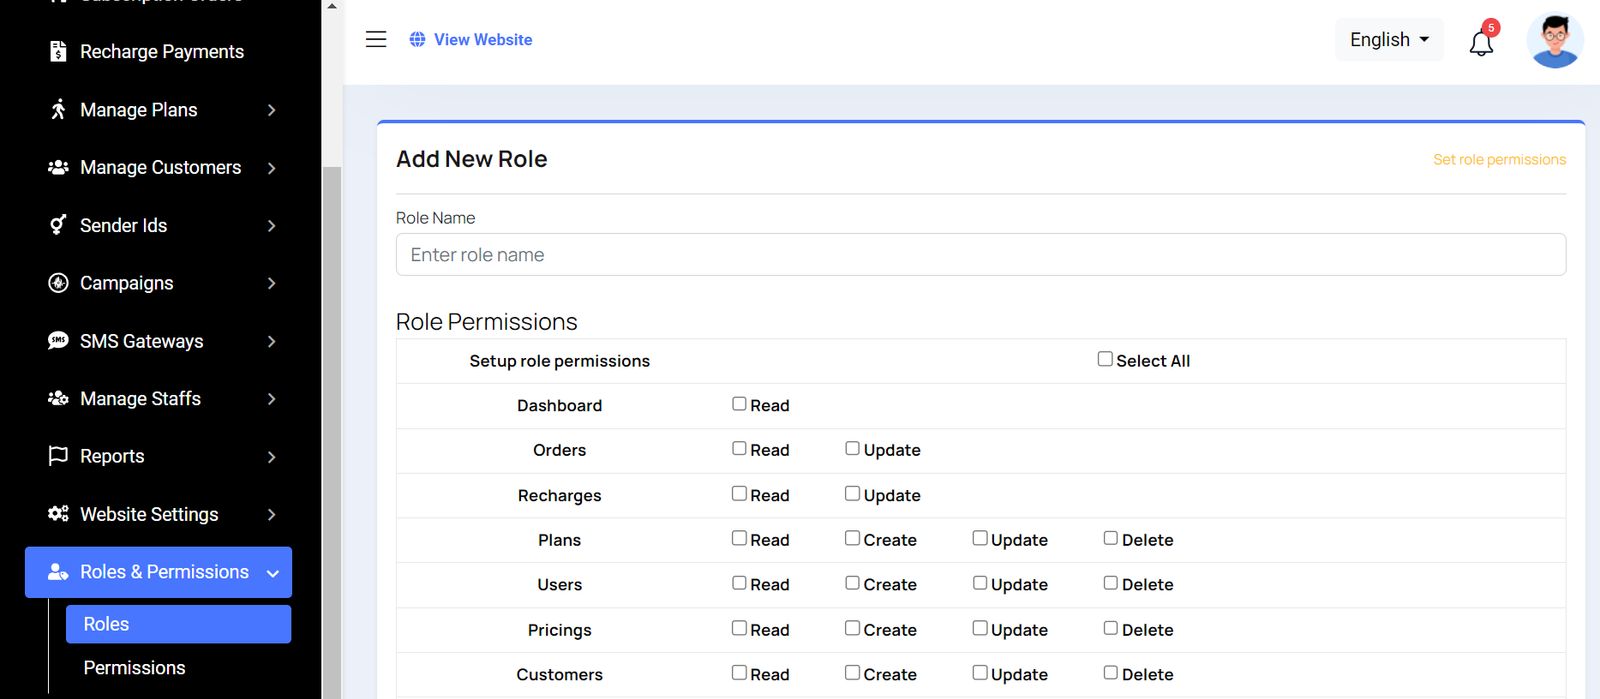
Roles & Permissions
In this section, you have the ability to define roles and allocate specific permissions to different users as needed.
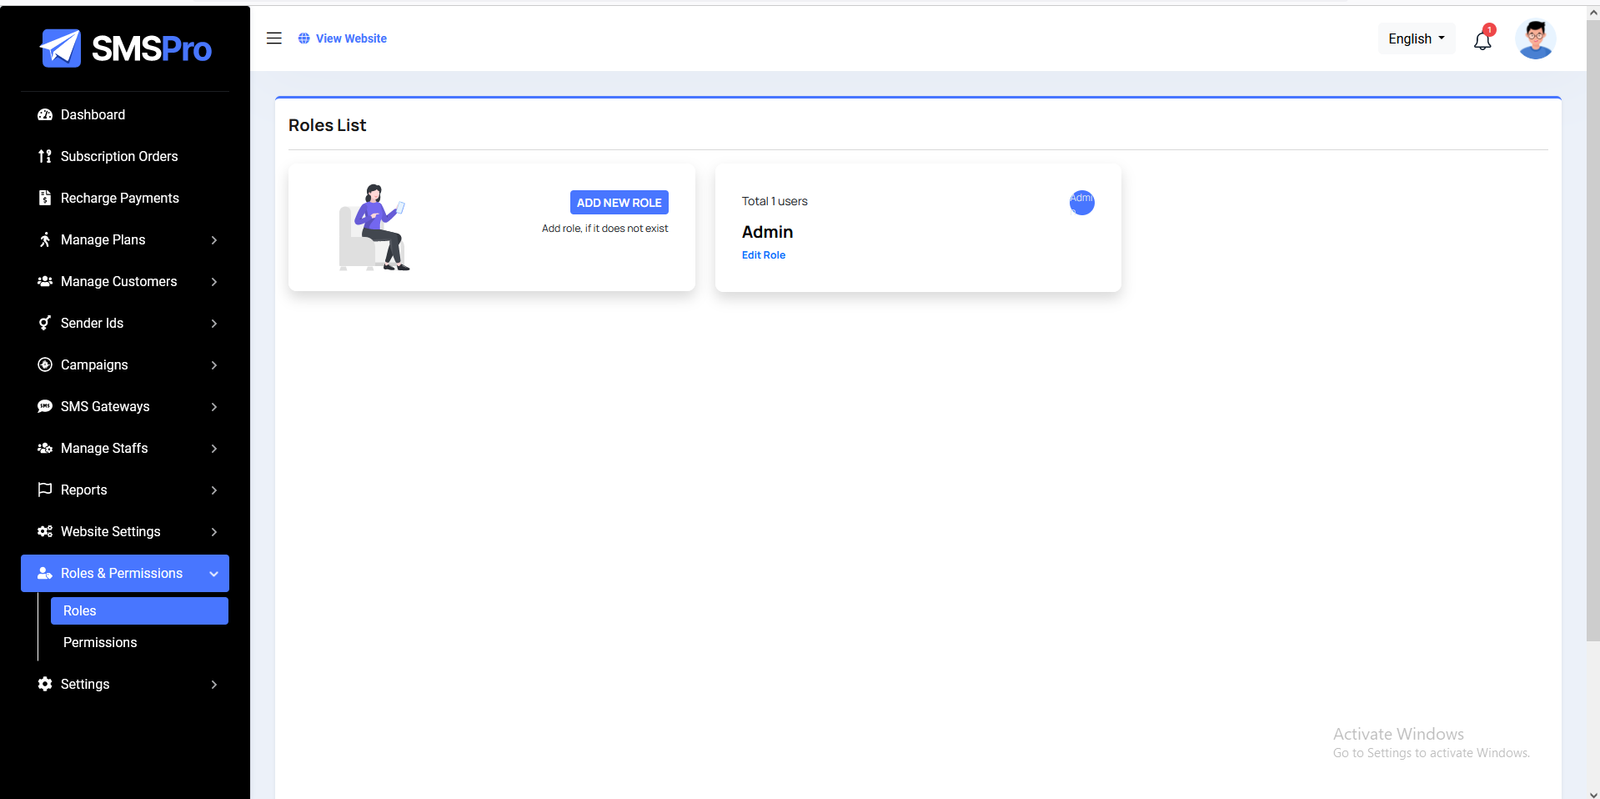
Roles
In this section, you have the capability to create new roles and update existing ones. When updating roles, you can configure their specific role permissions, granting or restricting access to various features and functionalities as required. This allows you to tailor user roles to your organizational needs and security requirements.
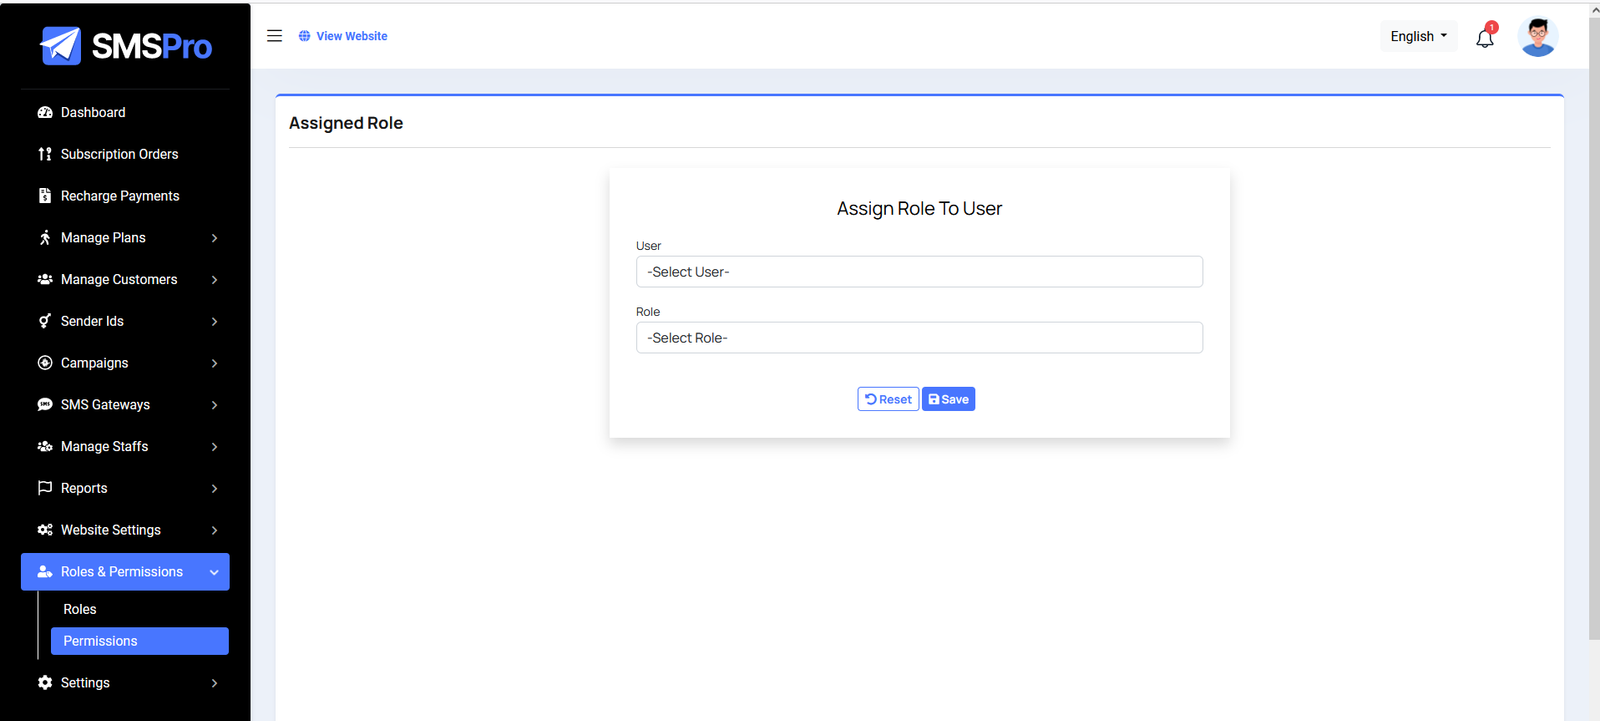
Permissions
In this section, you have the capability to set role-specific permissions, allowing you to fine-tune and control access rights for each role according to your organization's needs and security requirements.
Setting
In the Setting section, you have the capability to configure the fundamental aspects or core elements of this project.
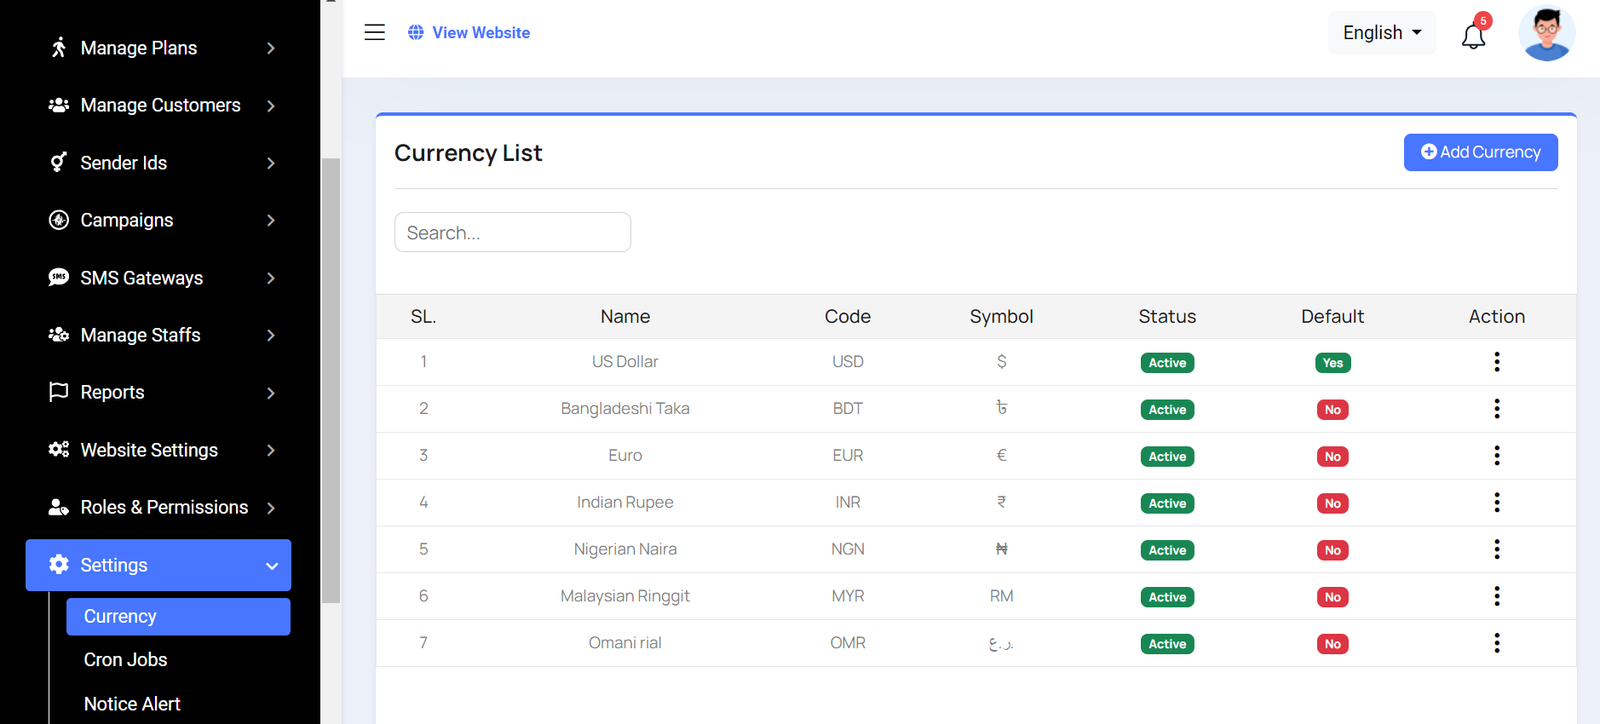
Currency list
Here, you can view a list of currencies with filtering options. Additionally, there is an option to edit currencies, and you can also set a default currency.
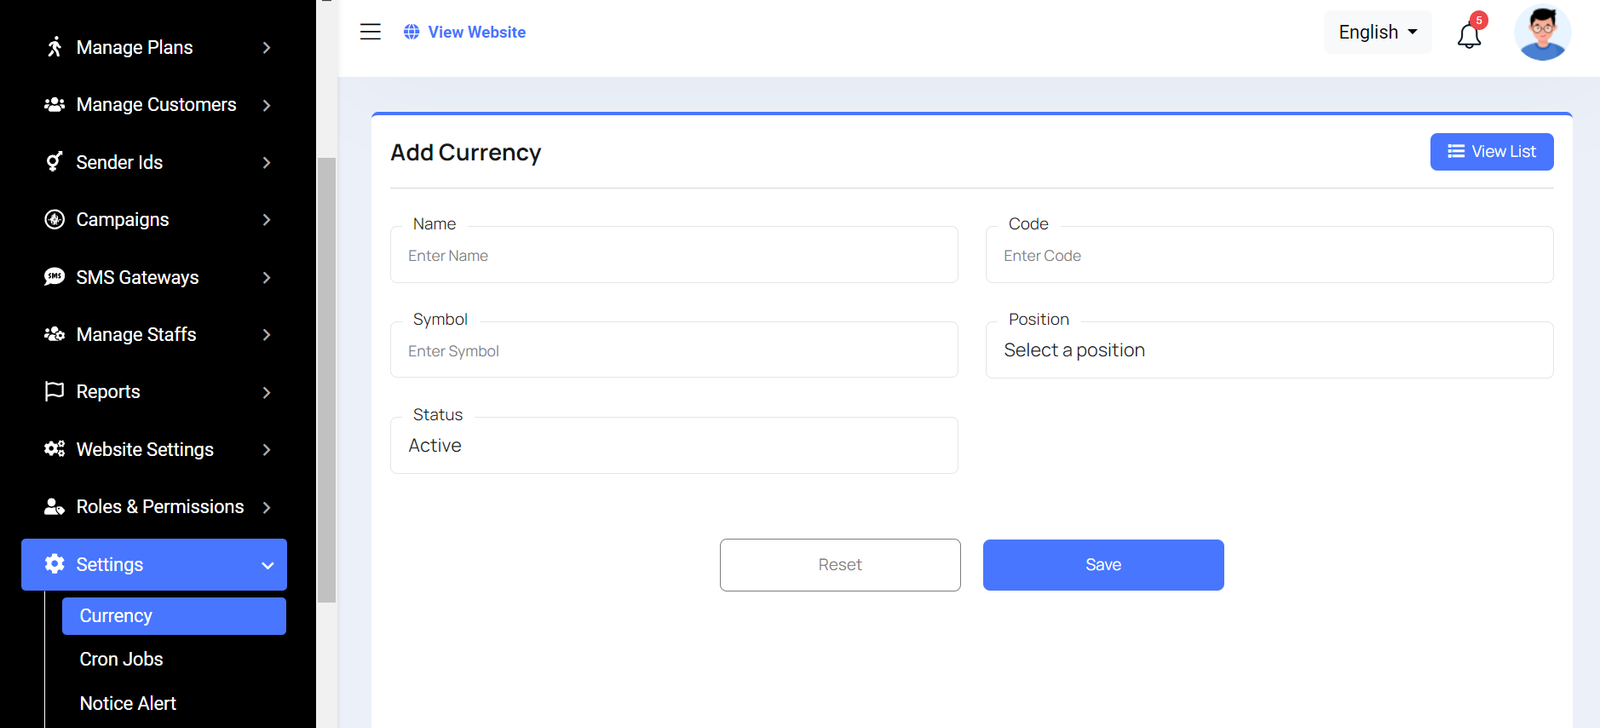
Create Currency
You have the option to include currency from this location.
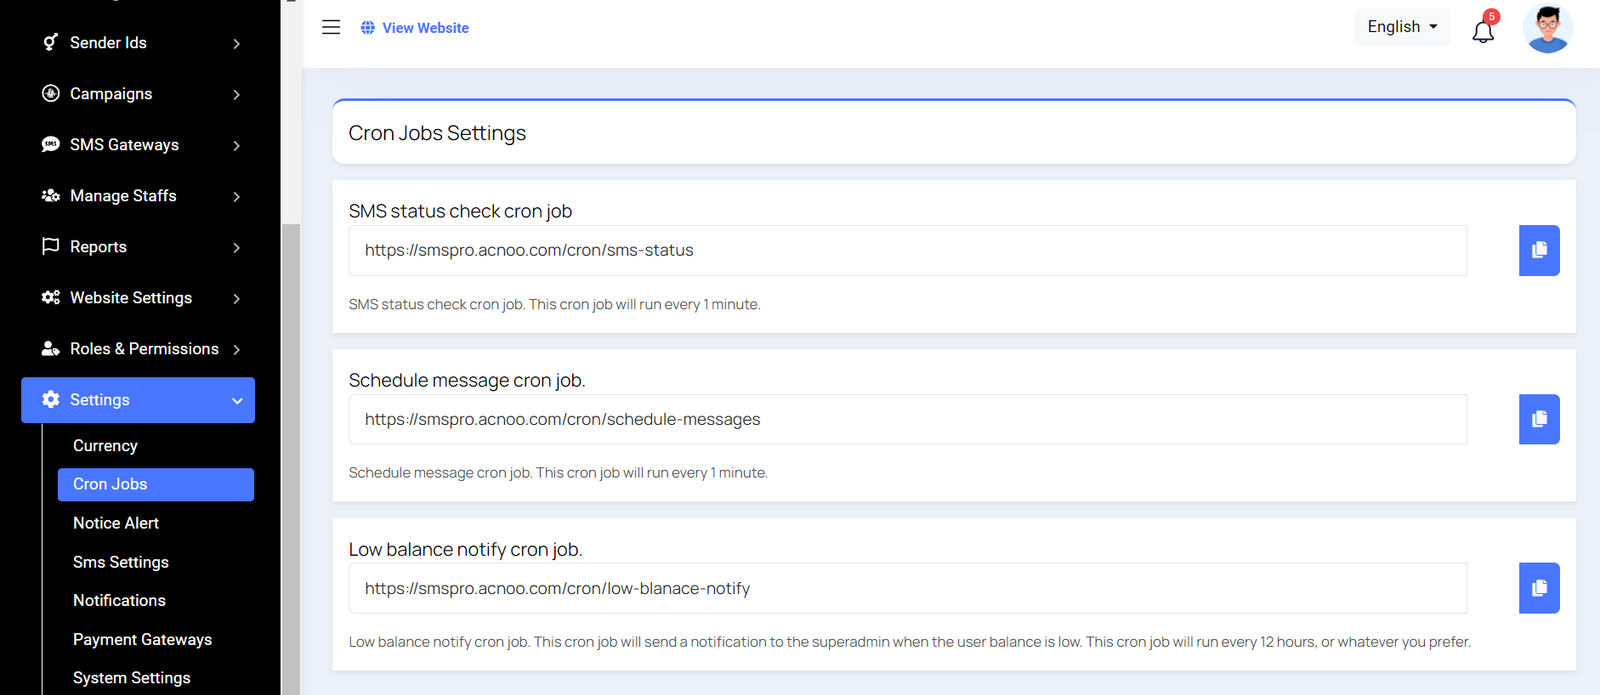
Cron Jobs
You can view Cron Jobs here, which will be configured directly from the server.
Notice Alert
You have the ability to modify the notification alert from this location. Upon a customer logging into the system, they will encounter this alert message.
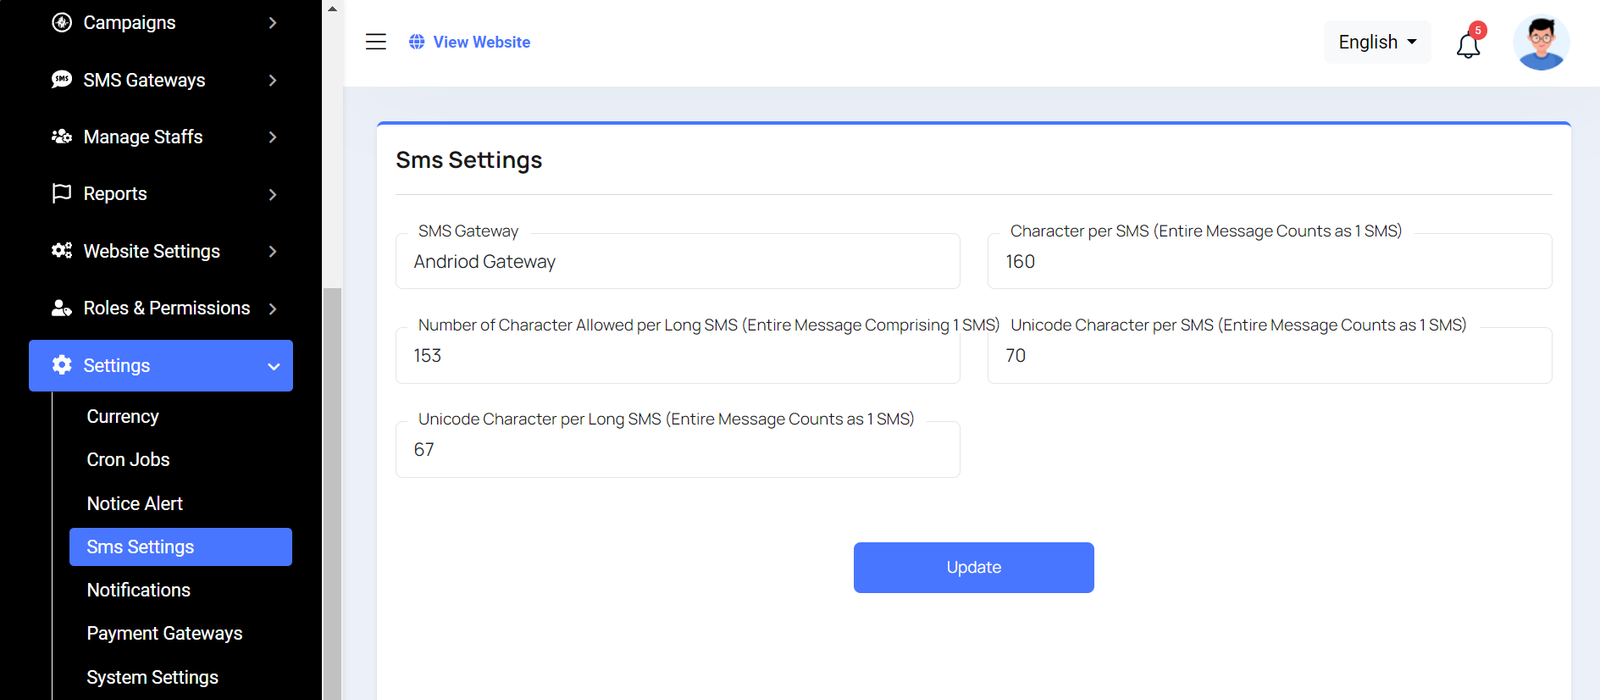
SMS Setting
Here you can update sms setting.
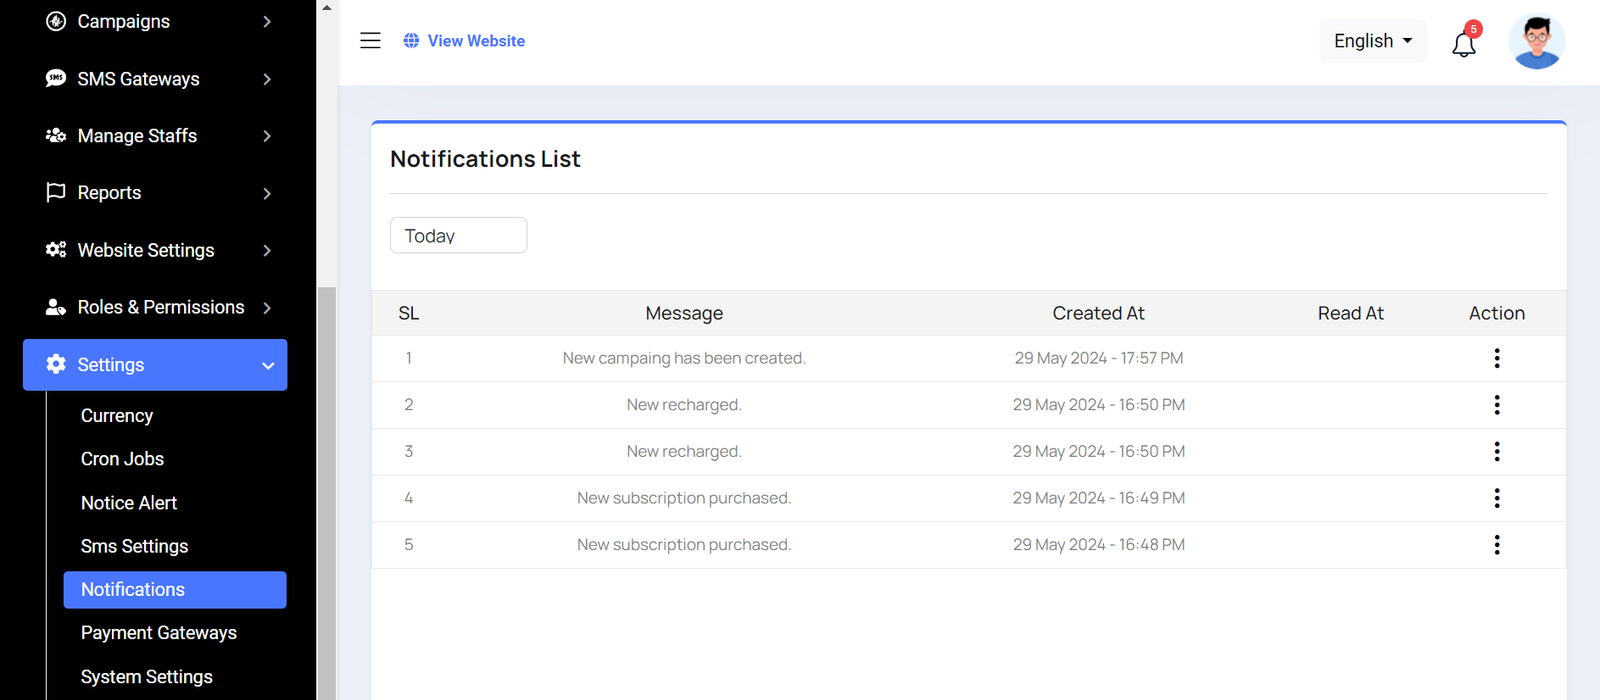
Notification
You can view notifications filtered by a specific time and access detailed information for each notification by clicking the "View" button.
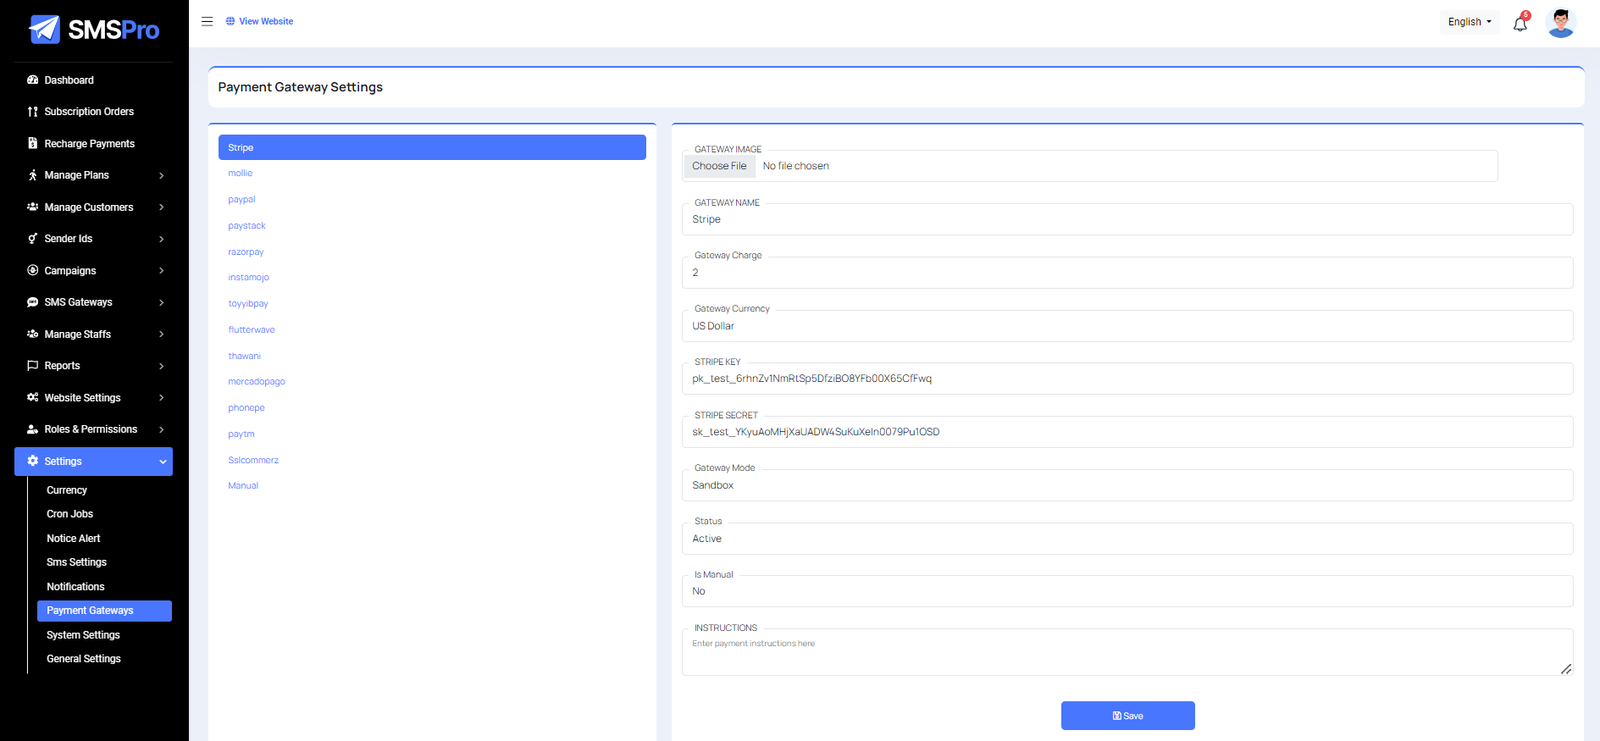
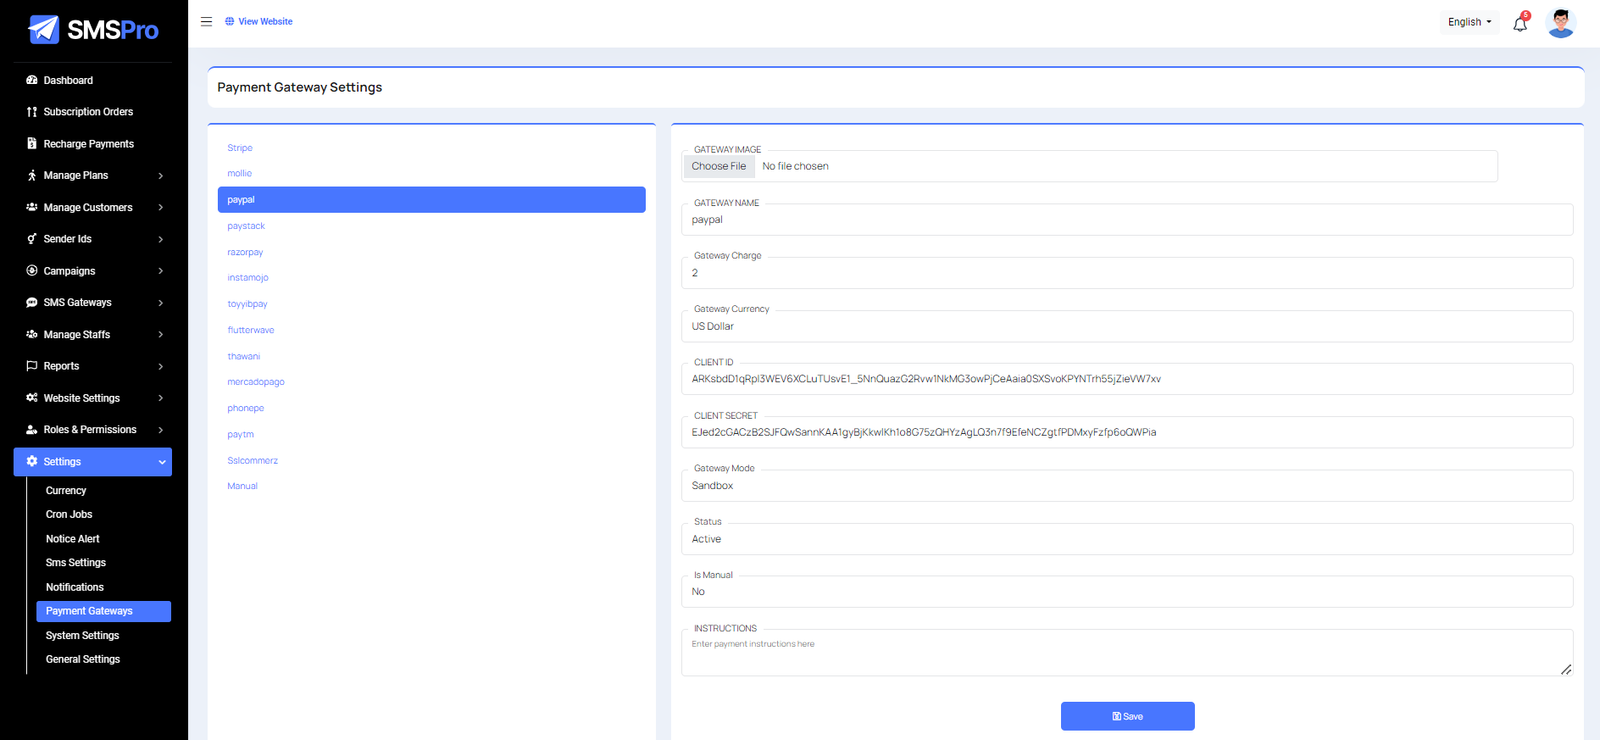
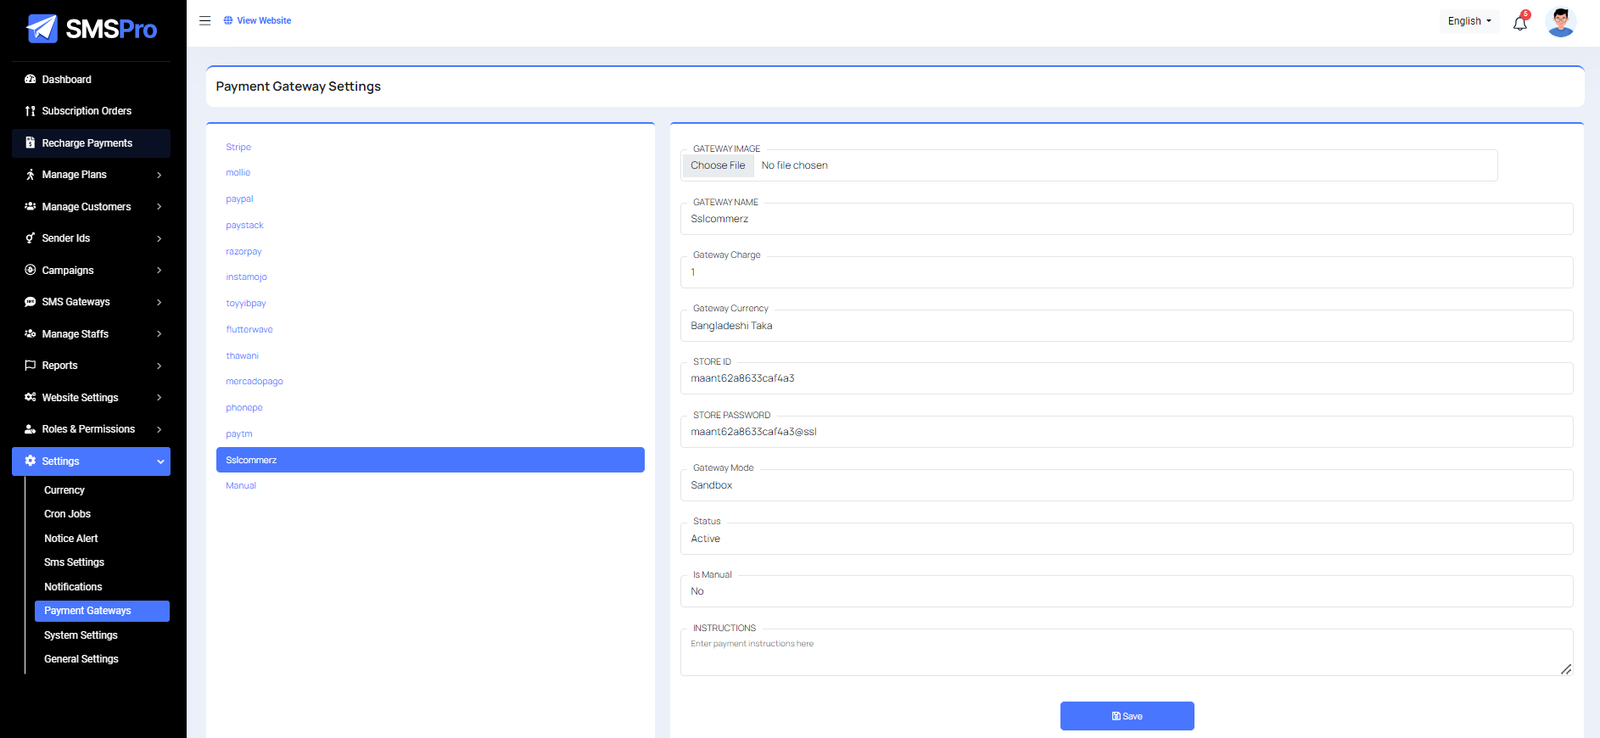
Payment Gateway Settings
Here, you can modify various payment gateways like Stripe, PayPal, SSLCommerz, and manual options.
Stripe
Paypal
Sslcommerz
Manual

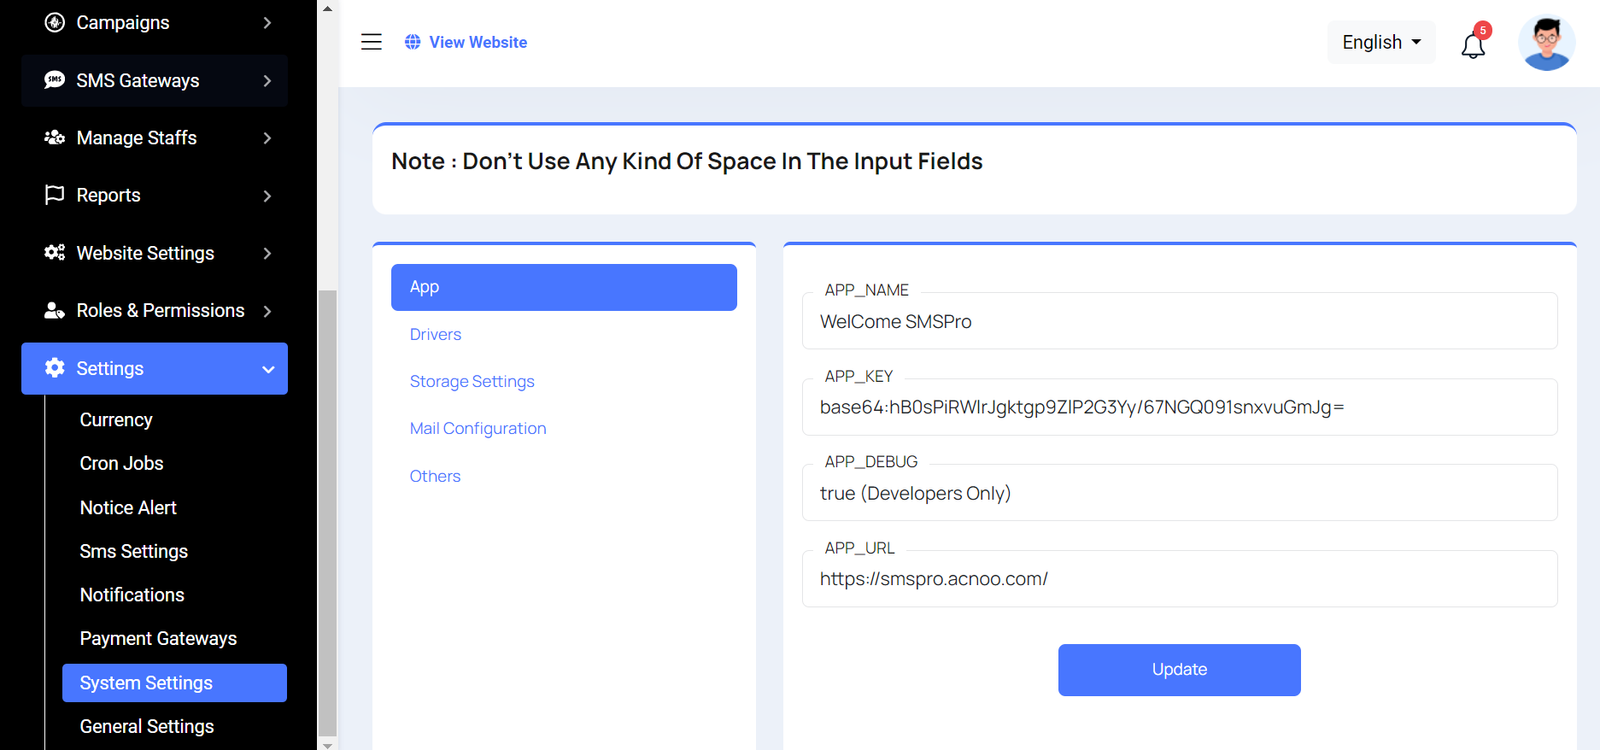
System Settings
In this section, you can configure various backend settings for the project, including application setup, driver configurations, mail settings, storage configurations, and other essential components. It's crucial to handle these configurations with care as they impact the functionality and security of the system.
App
Drivers
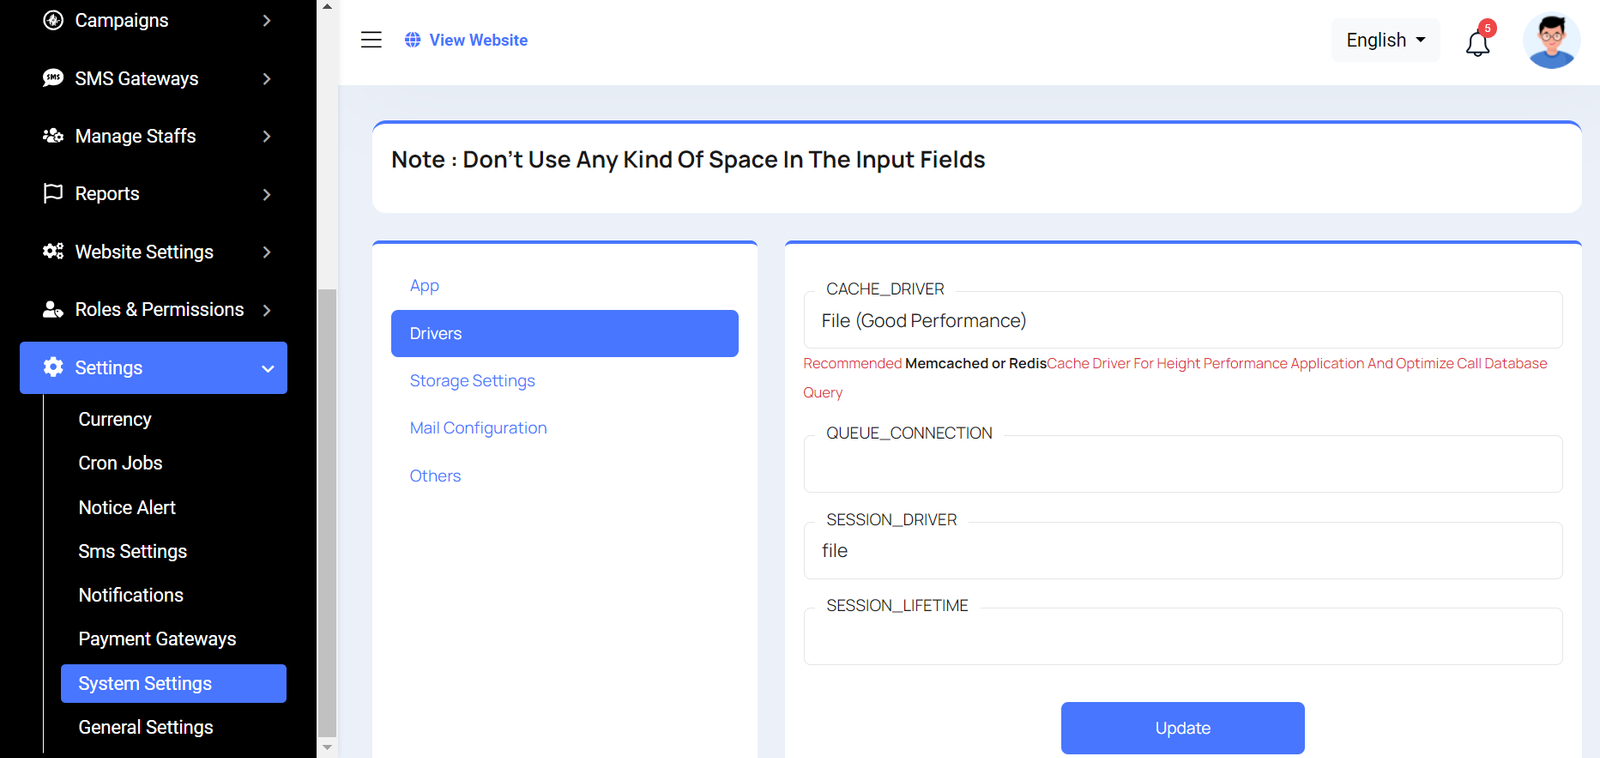
Drivers
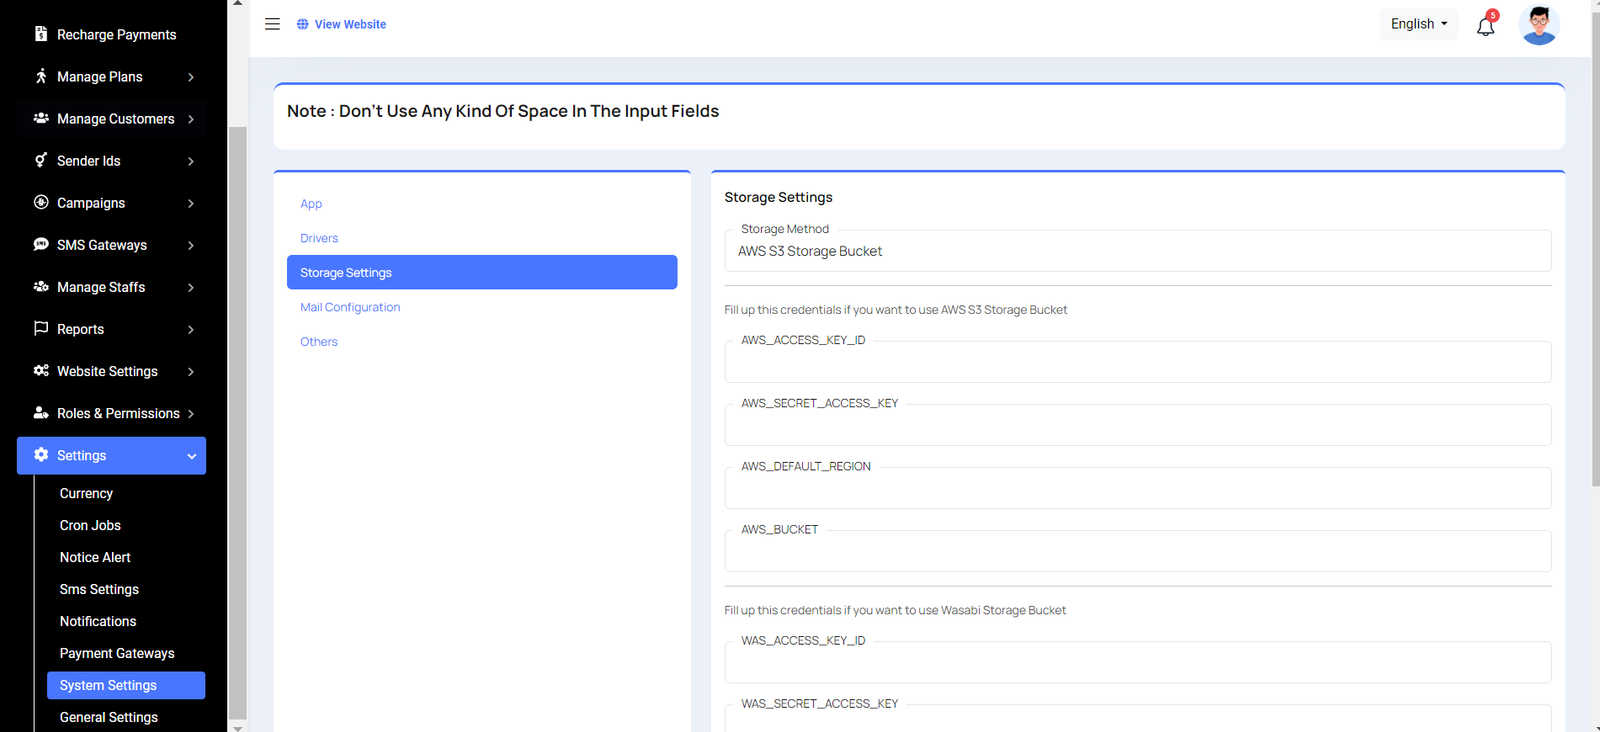
Storage Settings
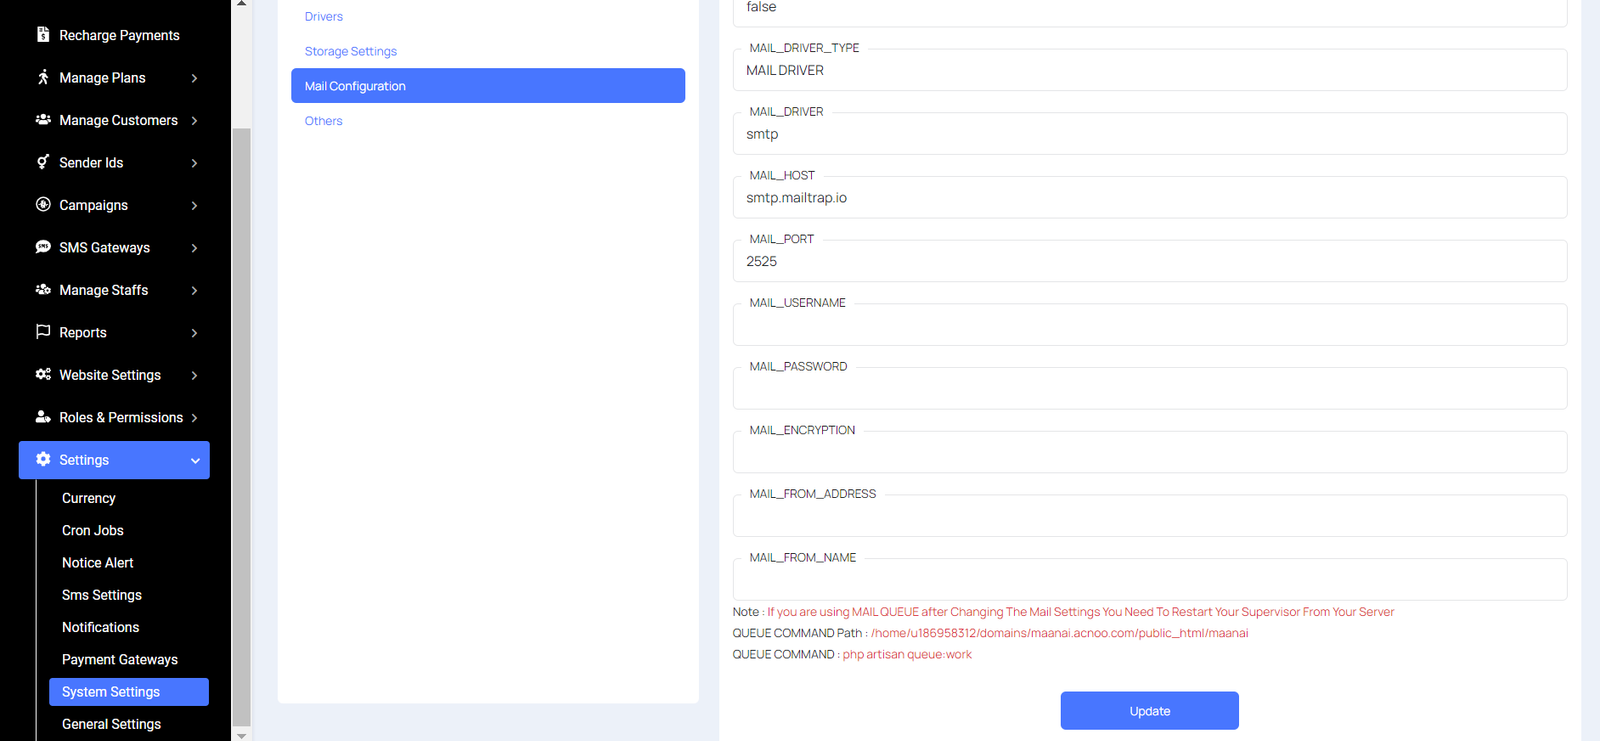
Mail Configuration
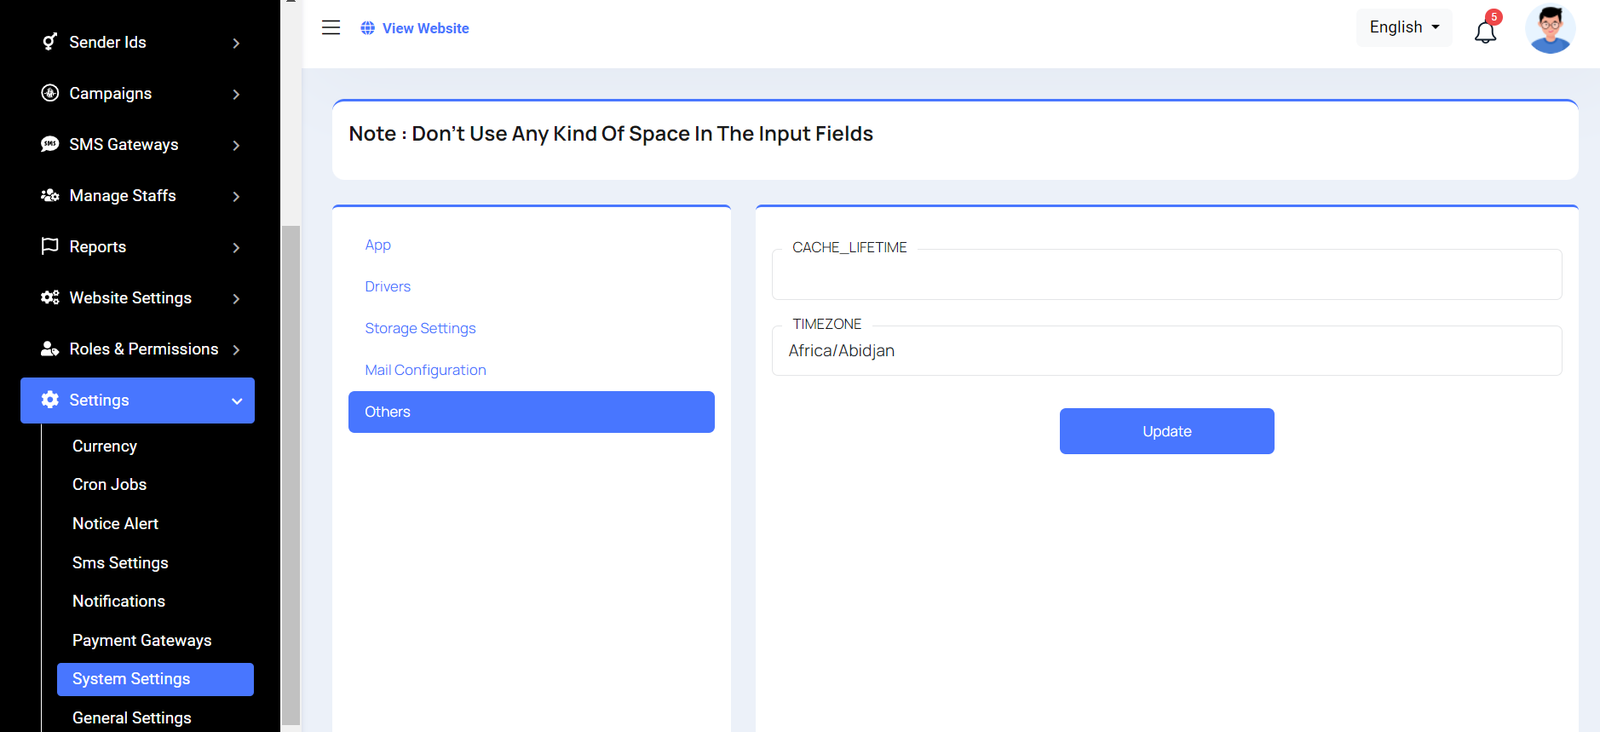
Others
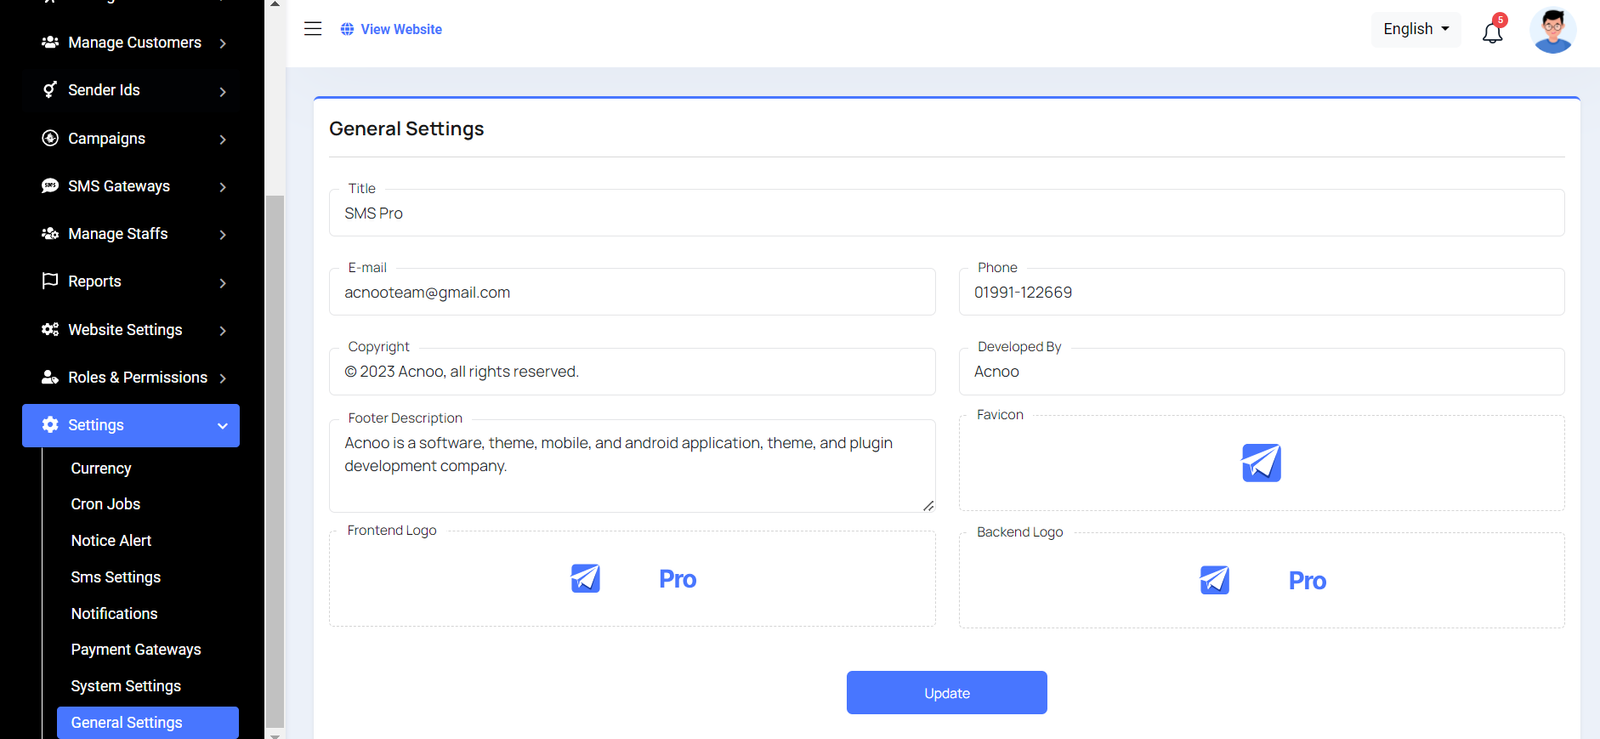
General Settings
You have the capability to modify the general project information.
Change Language
From the admin panel you can change language from here. In this version of the project, only mentioned languages is supported.
Customer Panel
This is the customer panel, where users can access their account details. They can also send messages to their customers or recipients. They have the option to send quick SMS messages or group SMS messages. Additionally, they can send campaign requests from their panel.
Dashboard
This is the dashboard page. The essential information regarding the project are displayed here.
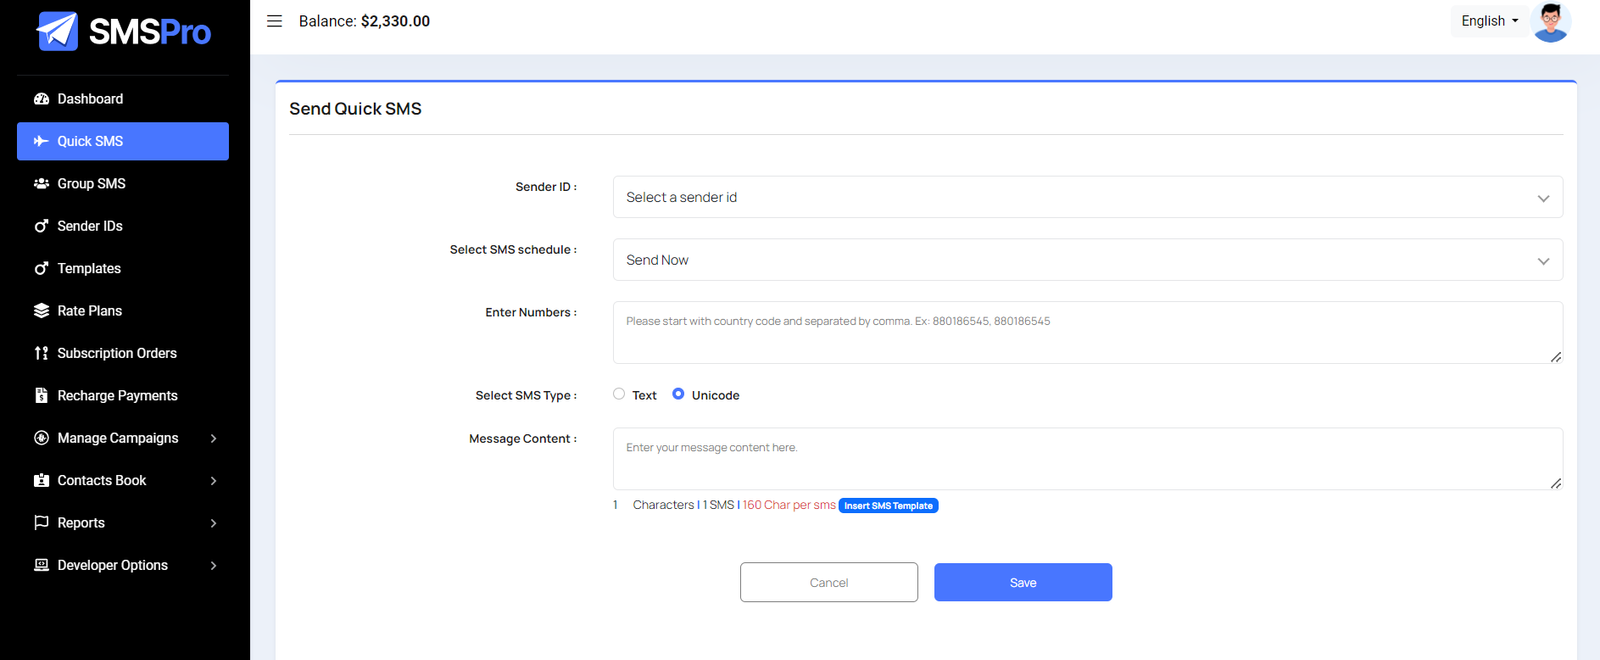
Quick SMS
In this section, you can send messages using a chosen sender ID. You have the option to select the SMS schedule for immediate delivery or set a specific time for scheduling. You can input single or multiple numbers, separating them with commas for multiple recipients. Additionally, you have the choice to send SMS messages in either text or Unicode format. By clicking the "Insert SMS Template" button, you can utilize your created templates for your message content.
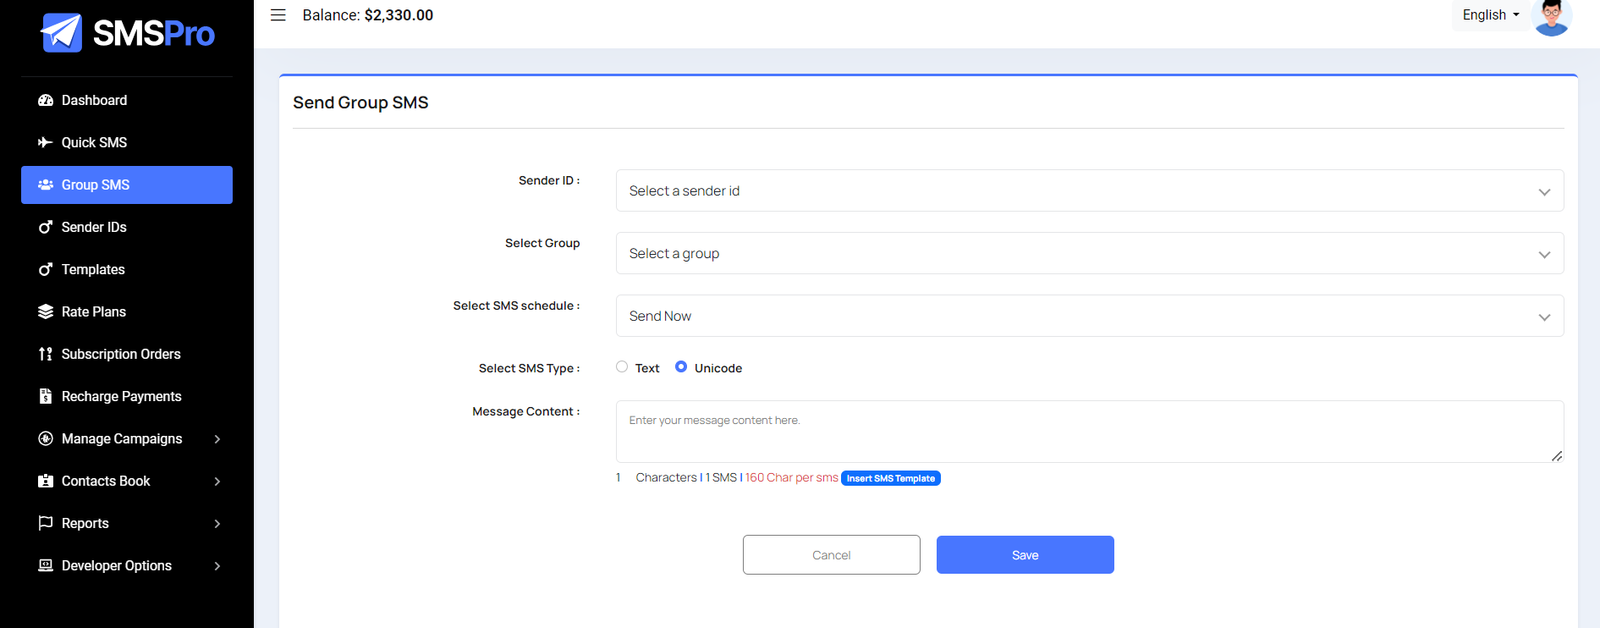
Group SMS
Similar to the Quick SMS section, you have the option to send SMS messages here. However, you can select a group from a list instead of manually inserting multiple numbers. This feature streamlines the process, especially if you have predefined groups for your recipients.
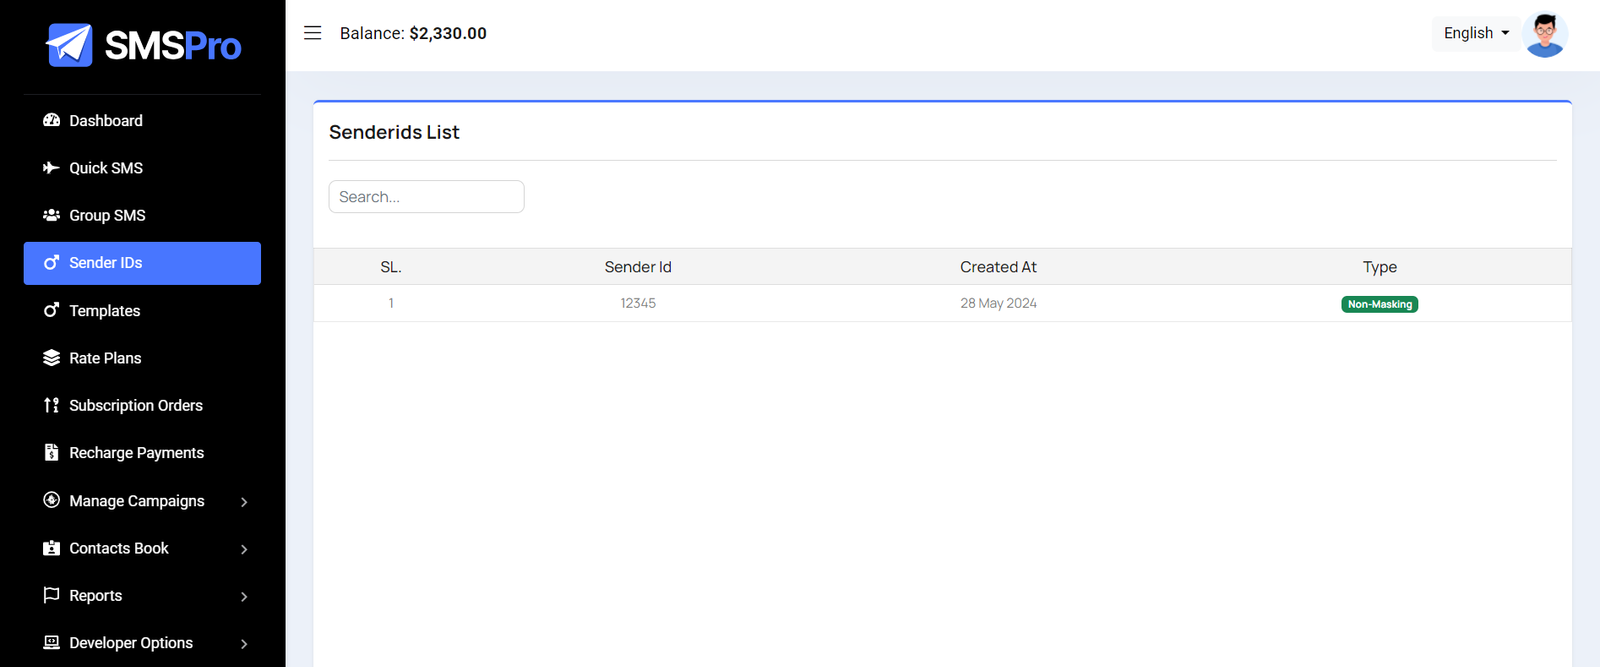
Sender IDs
In this section, you can view a list of senders, and there is also a search option available for your convenience.
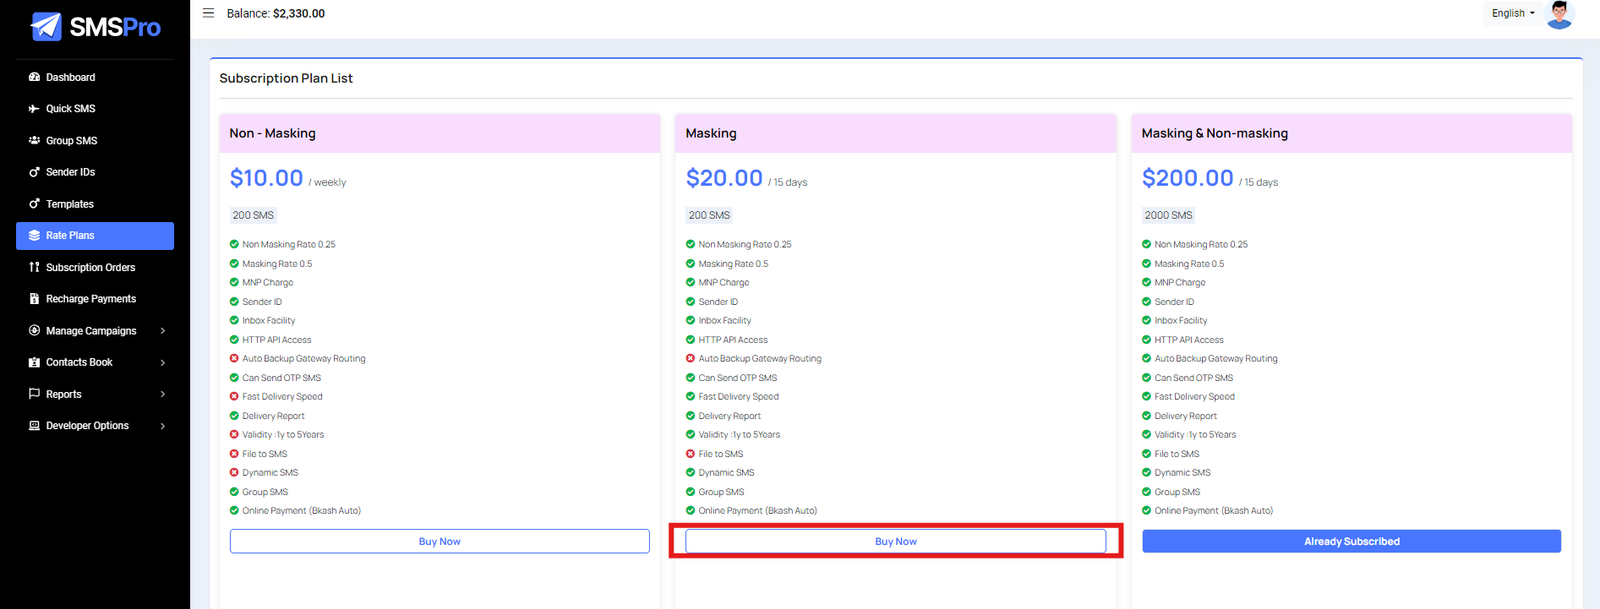
Subscription Plan List
In this section, you can view various subscription lists, each offering different features or plans. Additionally, you have the option to purchase a subscription by clicking on the "Buy Now" button associated with the desired plan.
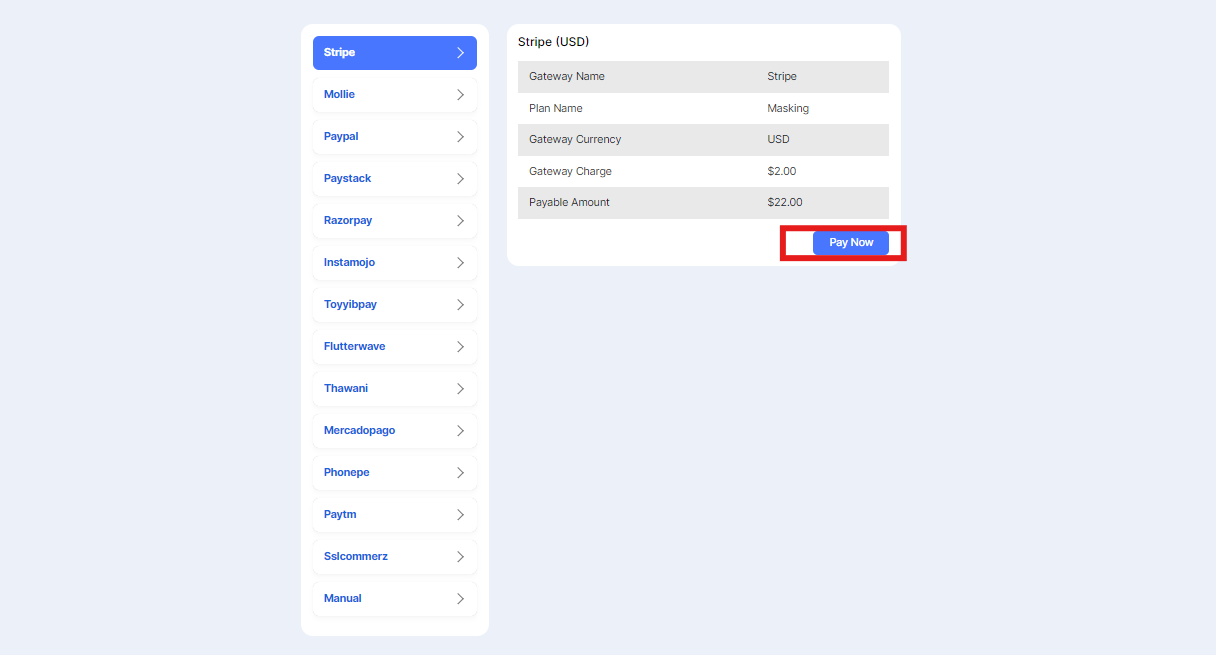
After clicking the "Buy Now" button, you'll be directed to the section below. Here, you can choose from various payment methods available. Simply select one of the options and click the "Pay Now" button to proceed with your payment.
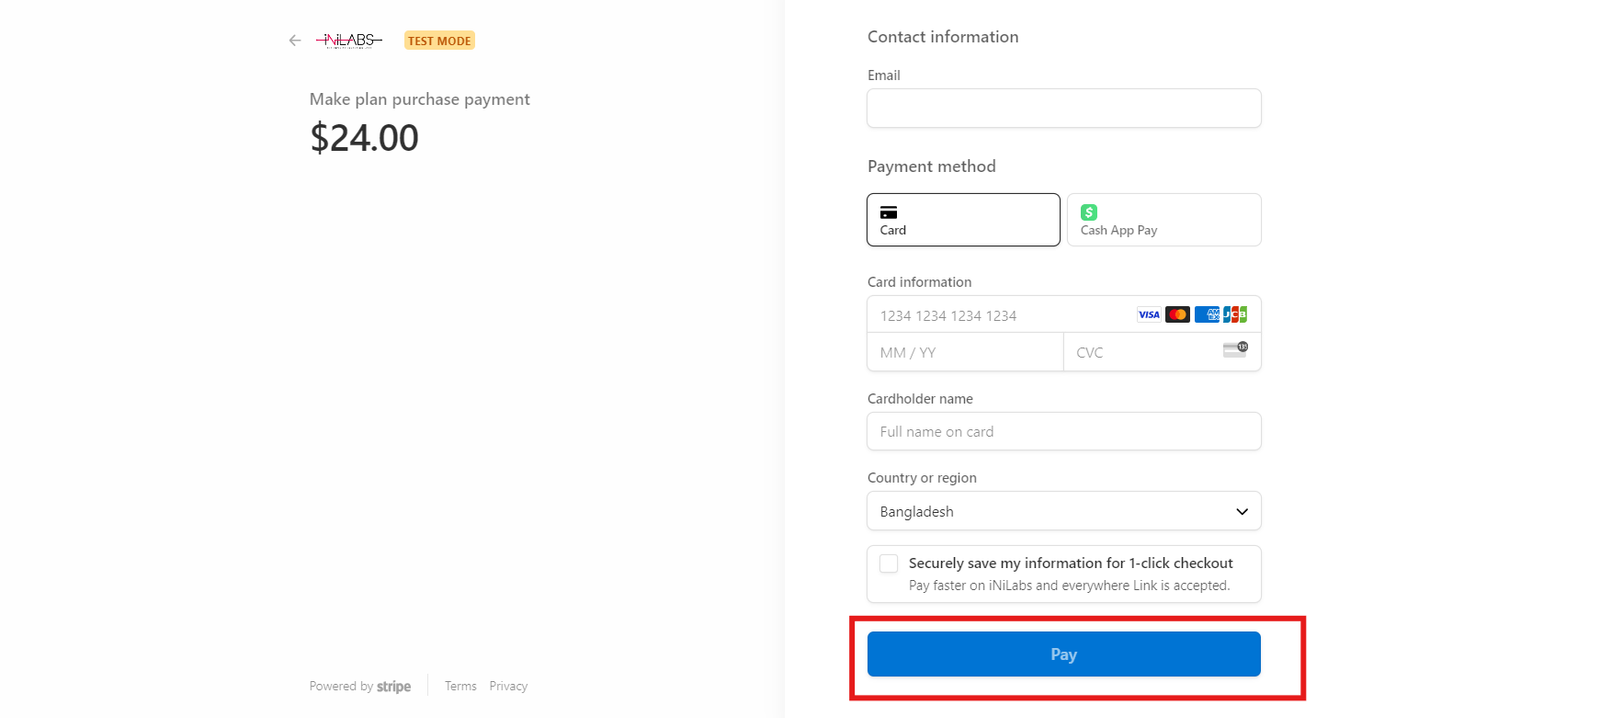
After selecting the Stripe payment method, the page below will open up. Here, you'll need to fill in the required fields to complete the transaction for purchasing the plan.
Subscription Plan Orders List
In this section, you can view the list of subscription orders with a convenient search filter. Additionally, you have the option to print invoices for the plans listed here.
When click print button you see below screen. Now you are able to save or print this invoice.
Recharges List
In this section, you can view a list of recharges with the option to search using filters. Additionally, you can make recharges and print invoices directly from this interface.
When you click on the "Make Recharge" button, you'll see the screen below. After clicking on the "Save" button, you'll find all the gateways for payment listed here. Now, you are able to make a recharge.
When click print button you see below screen. Here you can save or print invoice.
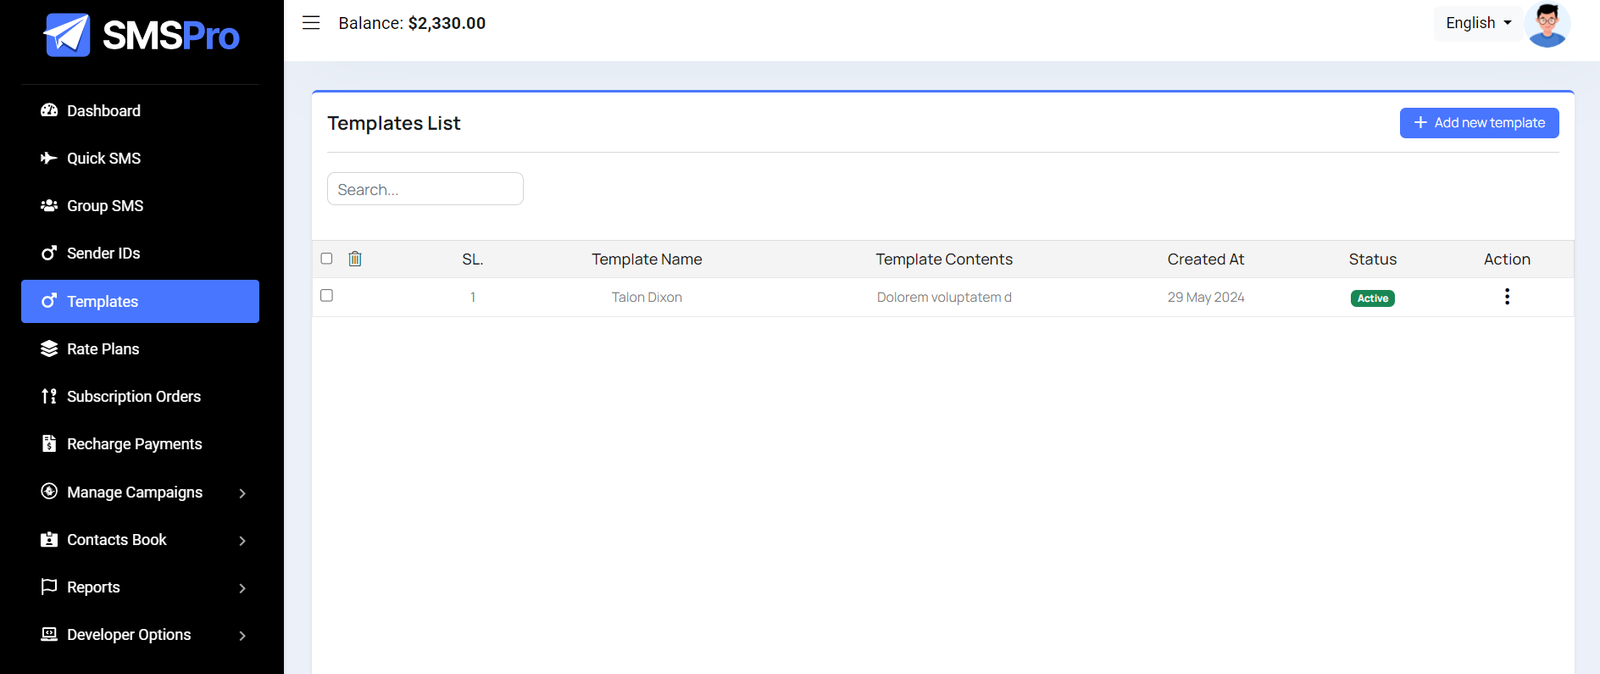
Templates List
In this section, you can view a list of templates along with a search option to find specific templates easily. Additionally, options to edit and delete templates are available for managing your templates efficiently.
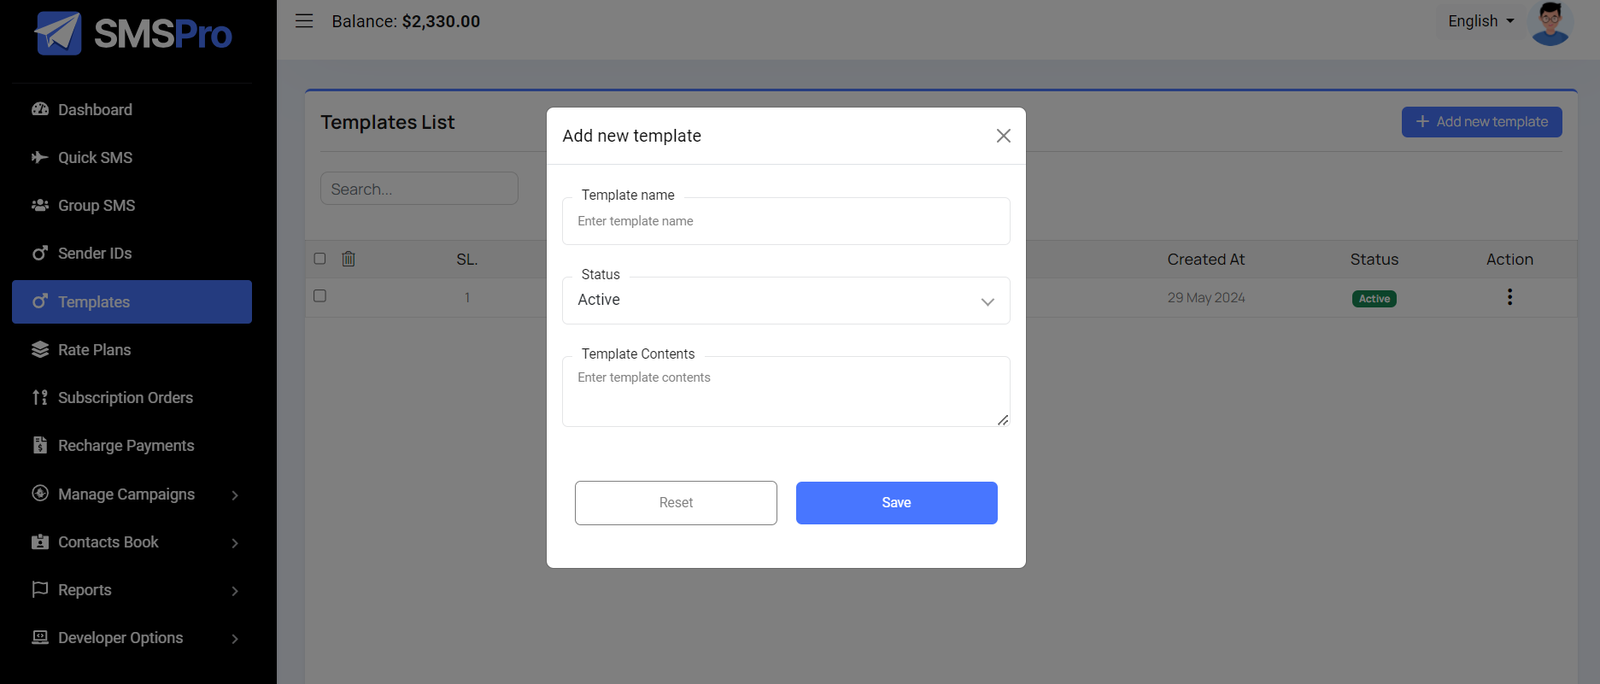
Create Template
In this section, you have the ability to create templates to meet specific requirements.
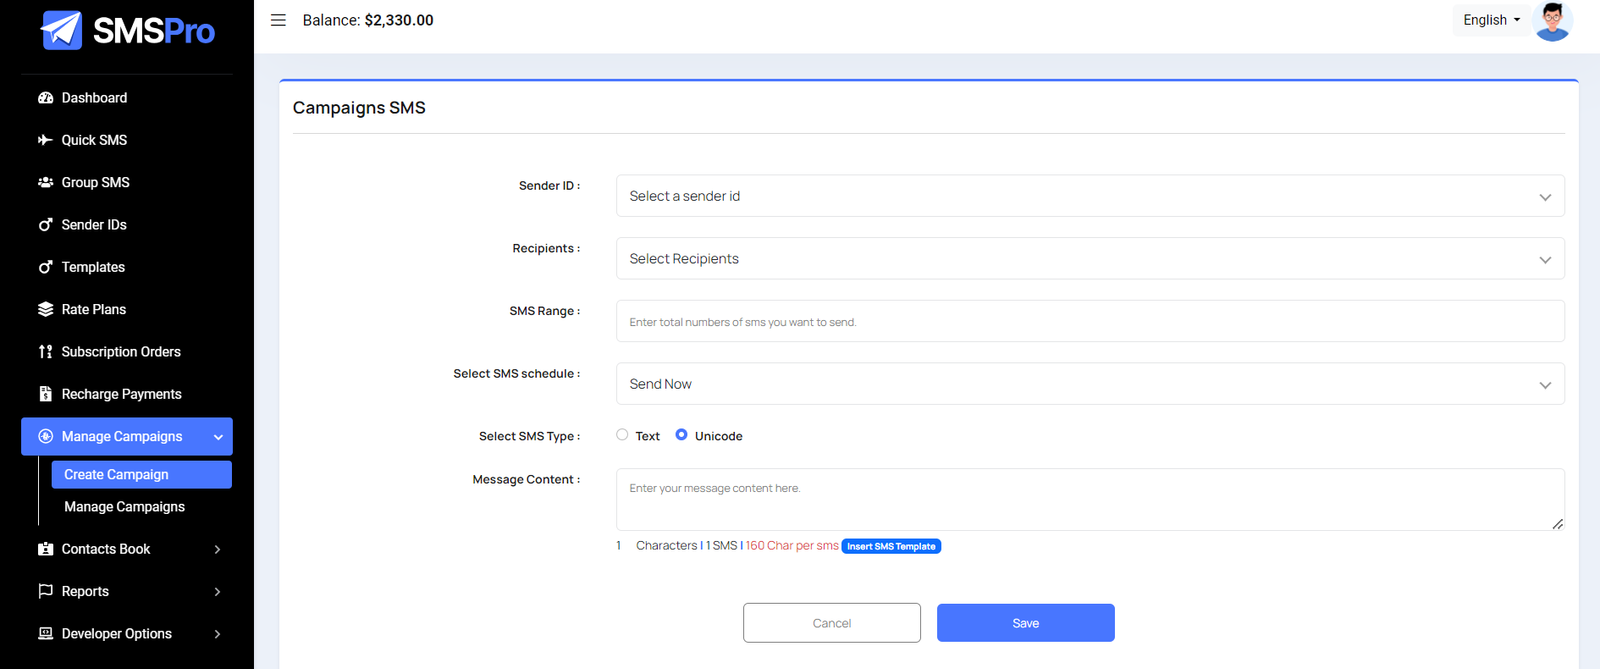
Create Campaign Request
Users can create a campaign request here, which will be sent to the admin for approval. After the request is approved, the campaign messages will be sent to the recipients. Users will be able to send messages to a range of people from the campaign list. If the user provides a range of 5, the SMS will be sent to 5 people.
Campaigns Requests List
In this section, you'll find a list of campaign requests along with a search option to quickly find a specific campaign list.

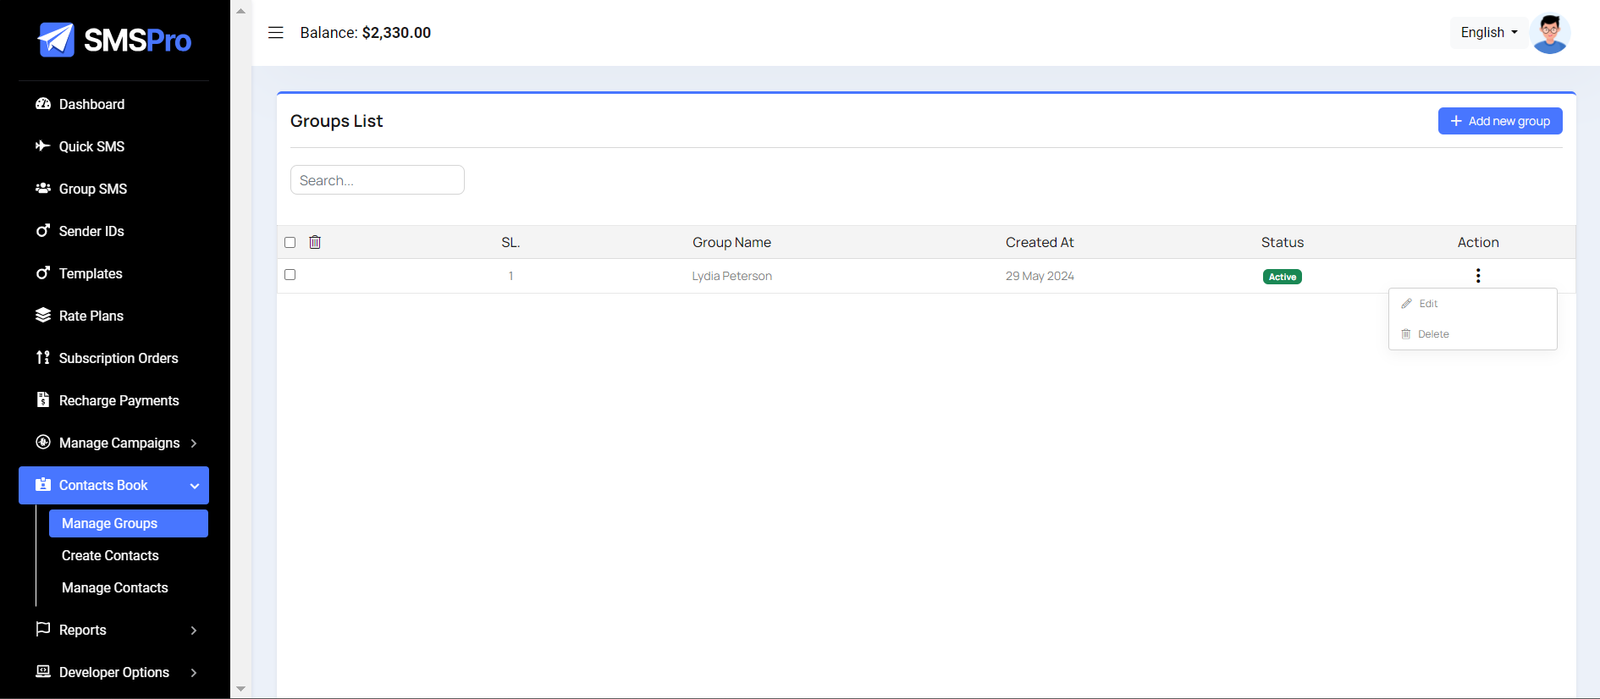
Groups List
In this section, you can view a list of groups, and there's a search filter option available to refine your search. You also have the ability to edit or delete existing groups as needed.
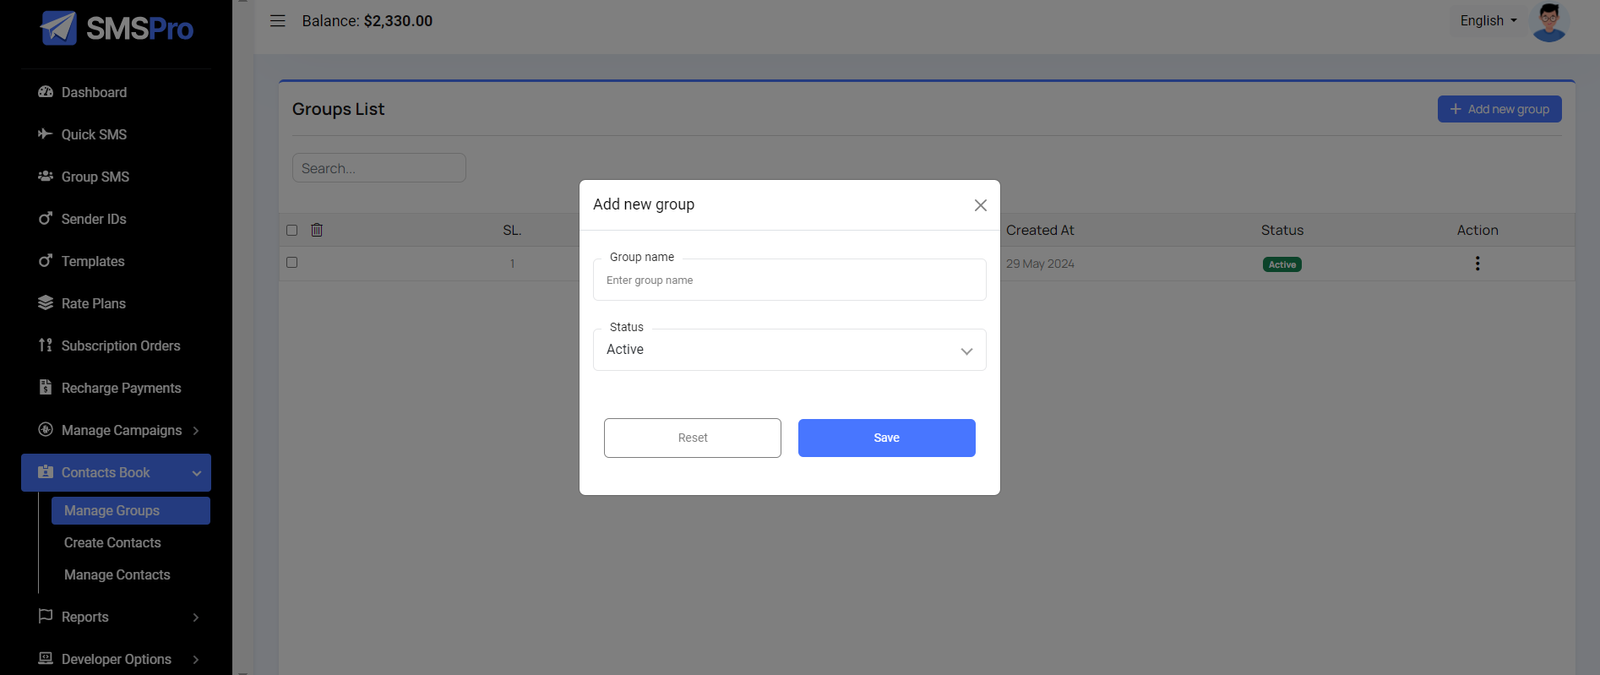
Create Groups
Now you can create a group by filling in the required fields.
Contact List
In this section, you can view a list of contacts, and there is an option to filter the list using a search function. Additionally, you can edit or delete contacts as needed.
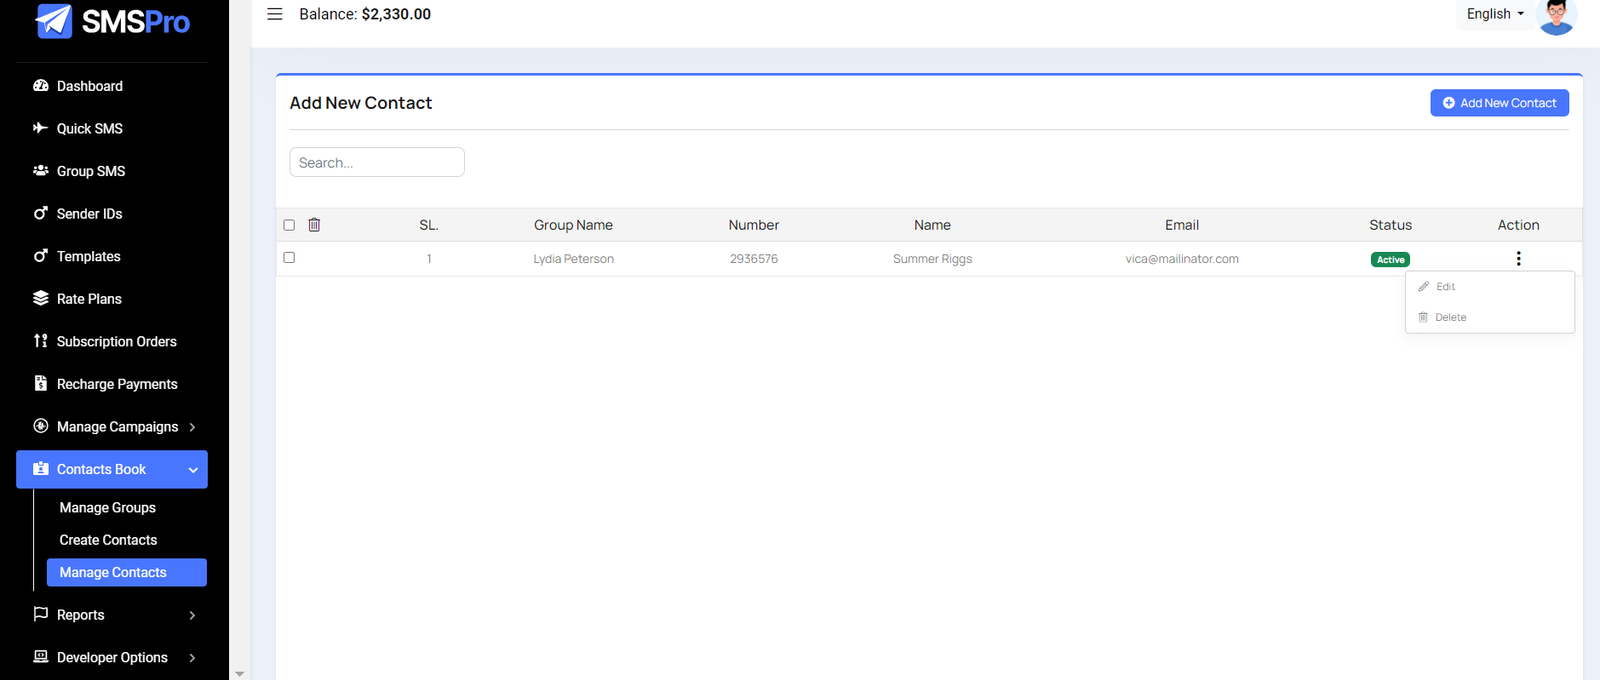
Create Contact
Now you can create a contact by filling in the required fields.

Reports
Here you can access various reports along with a search filter.
Quick SMS Histories
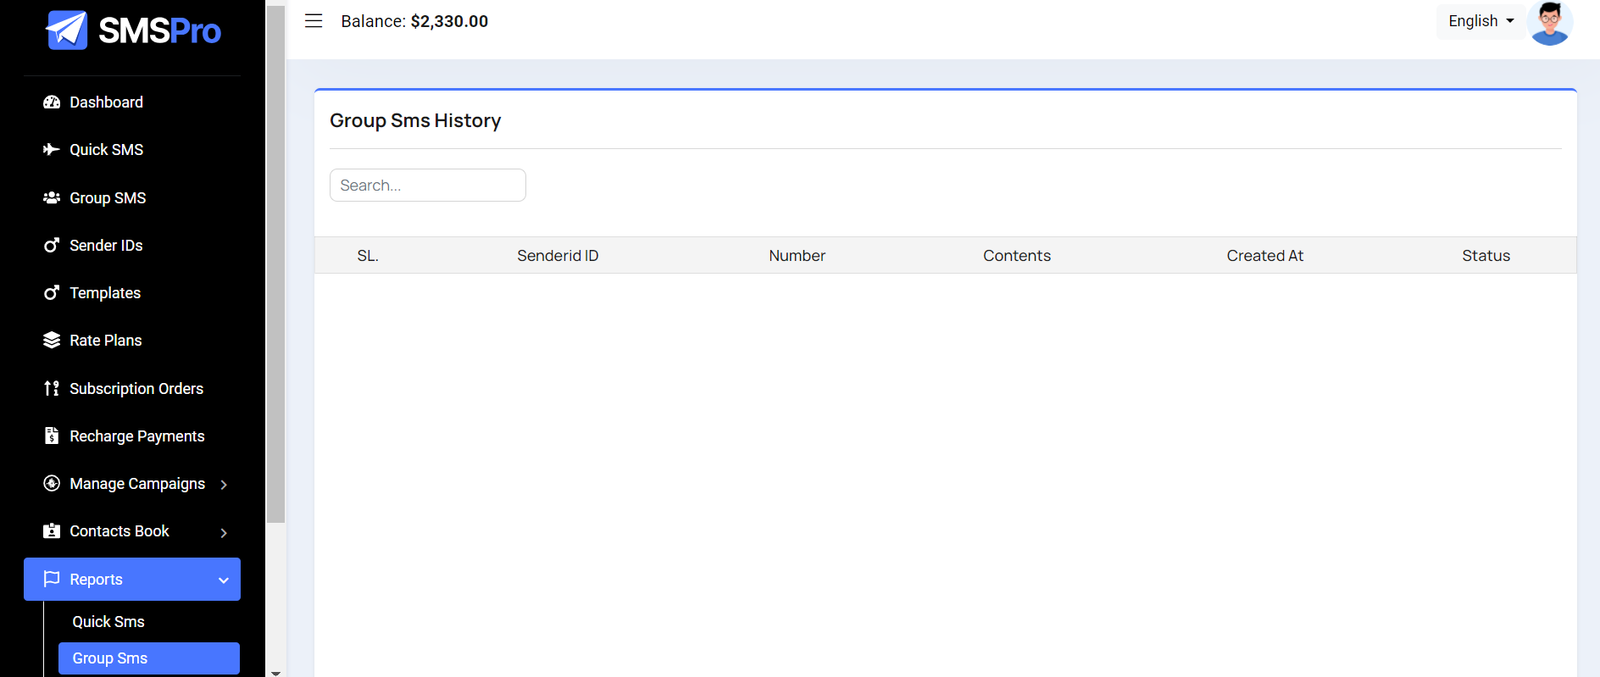
Group Sms History
Campaigns History
Subscribers List
Recharges List
Transactions List
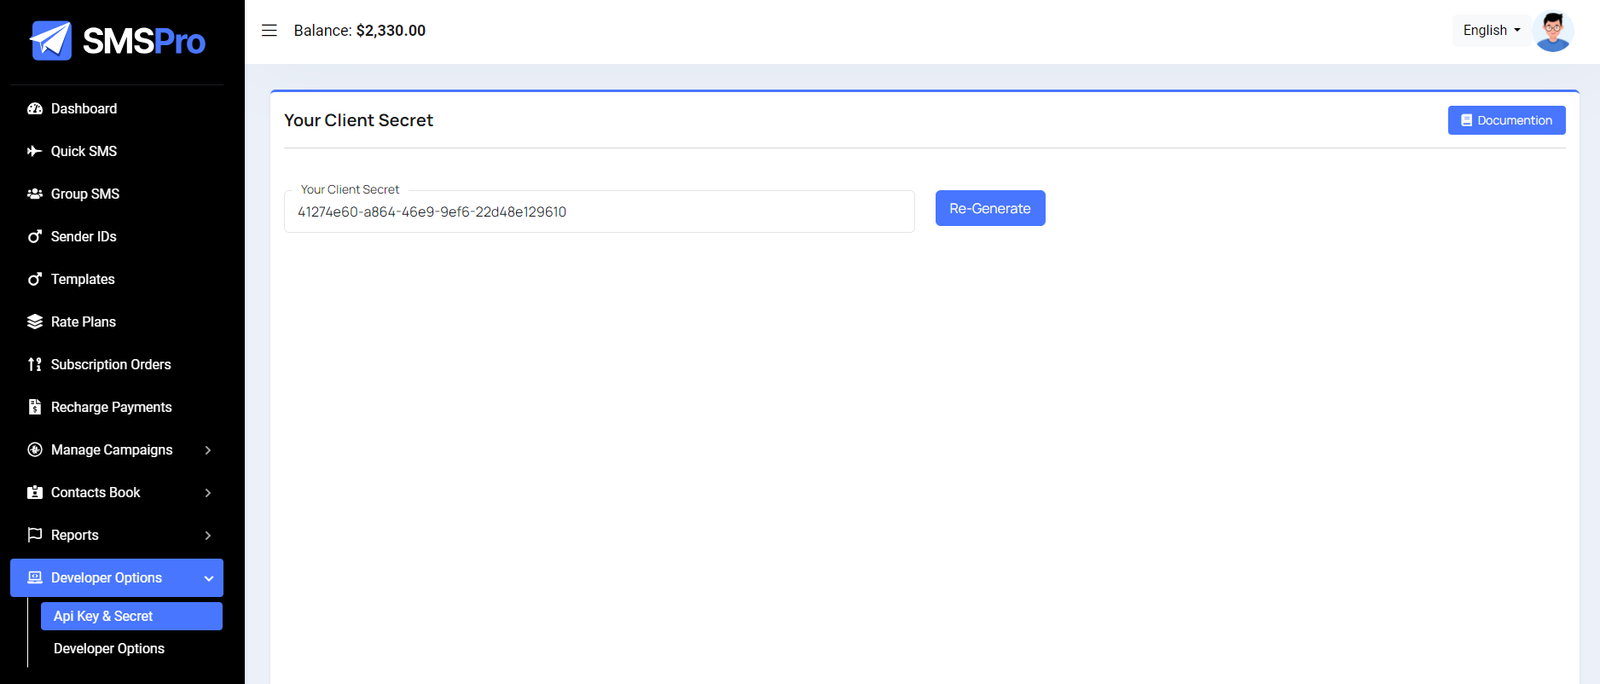
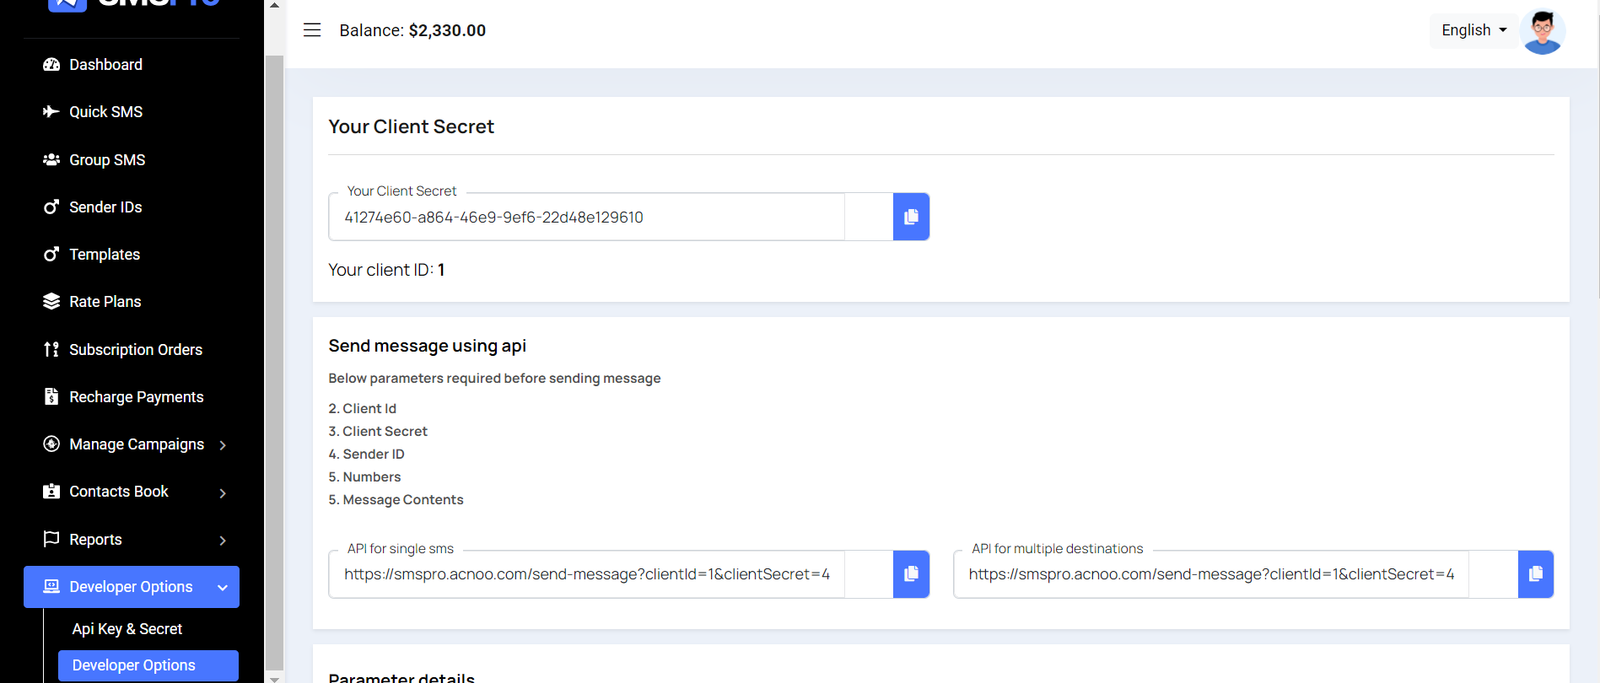
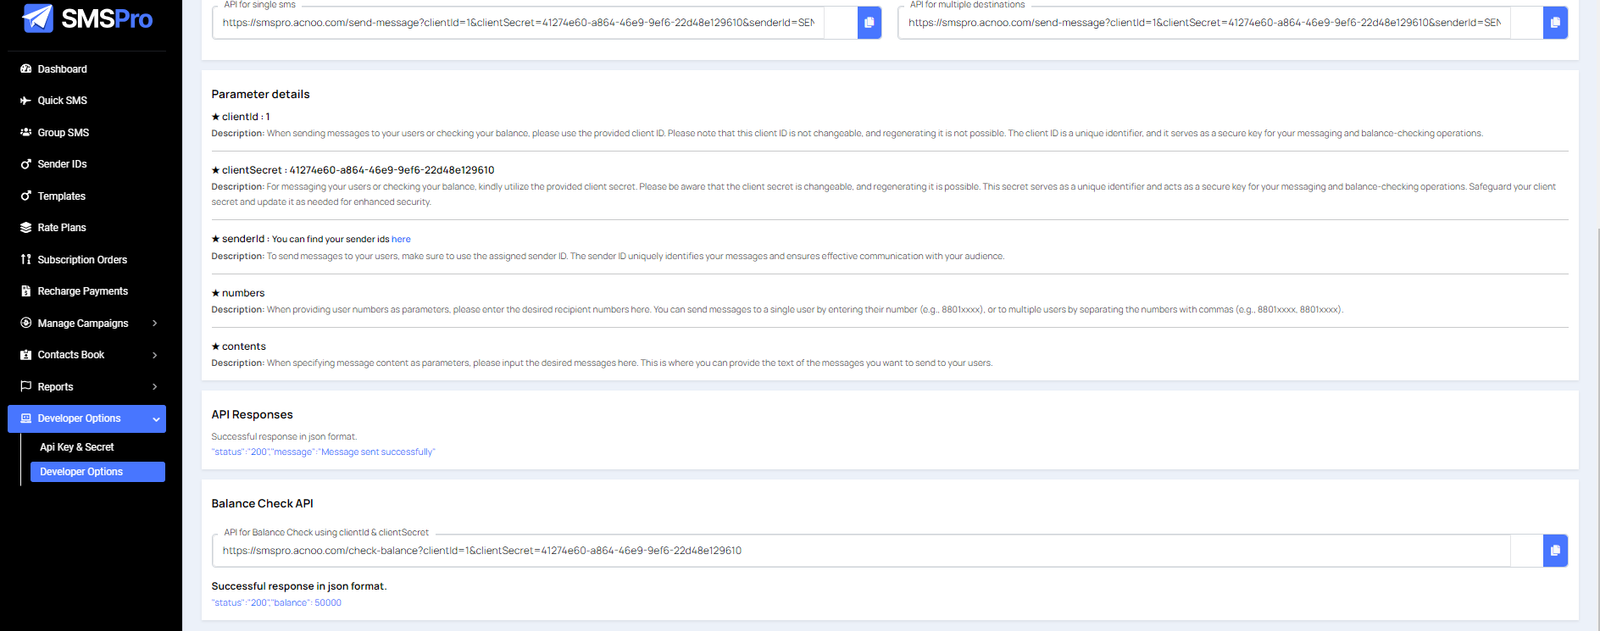
Create Client Secret
Here you have the ability to regenerate the client secret.
SMS Api.
If a user want use the sms api, user can use this following the user panel documentation for more details to use the api in a external application.
Change Language
From the admin panel you can change language from here. In this version of the project, only mentioned languages is supported. Also you can change the language of the website home page from here.

HELP & SUPPORT
Free support policy includes troubleshooting, technical assistance with the product only. It does not include any customization, additional features integration or concerns about third- party plugins compatibility. But, support is applied to plugin(s) we have developed and integrated ourselves. We appreciate your understanding!
If you need assistance and information on purchased product that is not covered in documentation, mail them on our support at
You can expect answer within 24-48 hours, usually as soon as possible in the order they were received.
Additionally, if any email has no response from the item owner for more than 7 days, that support email will be archived by default. However, if you need further assistance, you can mail us again.